From the early days of simple server-rendered pages to the complex client-side rendering techniques powered by JavaScript, developers have continuously sought more efficient, faster, and more scalable ways to deliver content to users.
Next.js is popular for its seamless support of static site generation (SSG) and server-side rendering (SSR), which offers developers the flexibility to choose the most appropriate rendering method for each application page. Traditionally, Next.js utilized functions like getStaticProps, getStaticPaths, and getServerSideProps to manage how pages are rendered. Depending on the data requirements, these functions determine whether a page should be generated at build time or on each server request.
However, with the release of Next.js 13 and beyond, there’s been a significant shift in rendering patterns. The framework has introduced new features that have changed the way developers approach building applications. These include Server Components for dynamic server-side rendering and improved caching mechanisms for better performance.
In this article, we’ll explore the evolution of rendering patterns in Next.js, focusing on the latest advancements and how they can be leveraged to build more efficient web applications.
Understanding the Basics
Before diving into the latest features of Next.js, it’s essential to understand the traditional methods of rendering in web development. Traditionally, web applications relied on either fully static or fully dynamic rendering techniques.
Static vs. Dynamic Rendering

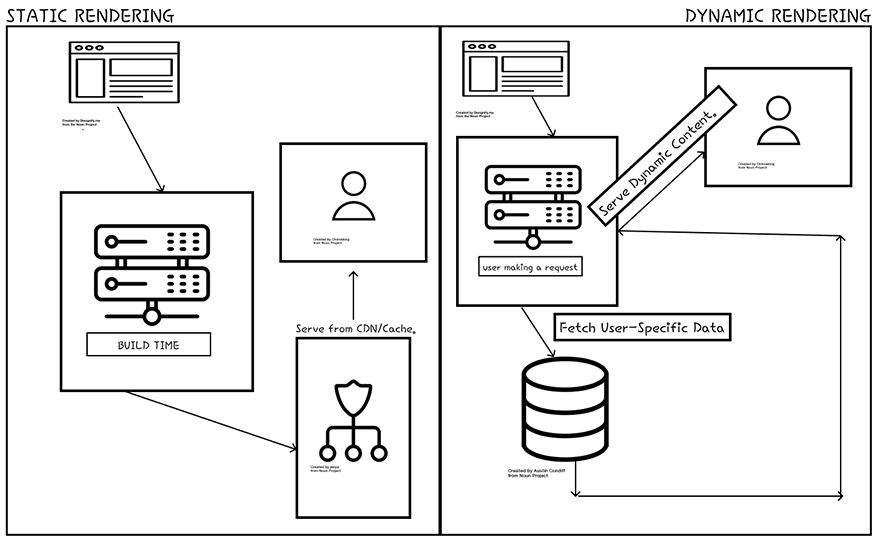
- Static Rendering: Involves generating HTML content at build time. Once a page is built, it can be served to any user without additional server-side processing. This method is efficient for pages where content does not change frequently.
- Dynamic Rendering: Involves generating HTML content on-the-fly for each request. This approach is necessary for pages that display user-specific data or content that updates frequently.
While these methods served as the foundation for web development, they also had limitations. Static rendering could not accommodate real-time content updates, and dynamic rendering often led to slower page load times due to server-side processing.
The Shift to Next.js 13
Next.js 13 represents a paradigm shift in how you approach rendering. Moving beyond the conventional SSG and SSR, Next.js introduces a more granular and flexible approach to rendering that better aligns with the diverse needs of modern web applications. This shift is not about discarding the old methods but rather enhancing and extending them with more sophisticated and efficient rendering patterns.
The introduction of React Server Components, Streaming, Edge Middleware, and improved data fetching mechanisms are at the heart of this evolution. These innovations allow you to mix and match static and dynamic content with unprecedented ease, offering the best of both worlds: the performance benefits of static rendering and the flexibility of dynamic content delivery.
The distinction between static and dynamic content has become increasingly complex, with many applications requiring a combination of both. For example, a web page might statically render blog posts for performance and SEO, while dynamically rendering comments to ensure they are up-to-date. Next.js 13’s new rendering patterns empower developers to navigate this complexity more effectively, enabling more nuanced and performance-oriented rendering strategies.
Server Components in Next.js

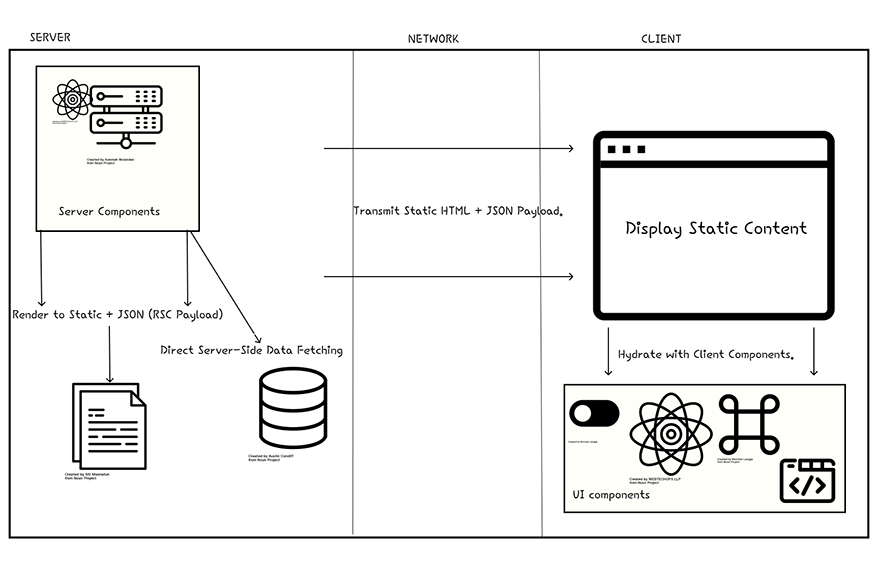
React Server Components allow for server-side rendering of components without sending the corresponding JavaScript to the client. This results in faster load times and reduced bundle sizes, as only the necessary client-side code is sent to the browser. Server Components execute on the server, enabling direct access to server-side resources (like databases or file systems) without exposing sensitive operations to the client. They render to a static format sent to the client, where interactive parts of the application can be hydrated with client components.
The primary advantages of server components include:
- Reduced JavaScript Bundle Size: Since server components are not included in the client bundle, they significantly reduce the overall size of the JavaScript sent to the browser.
- Improved Performance: By rendering on the server, initial page loads are faster, enhancing the user experience, especially on slower network connections.
- Direct Access to Server-Side Resources: Server components can directly fetch data from databases or perform other server-side operations, simplifying data fetching and manipulation.
How Server Components Work
Server Components are rendered using React’s APIs, which orchestrate the rendering process in chunks. These chunks are determined by individual route segments and Suspense Boundaries. The rendering process involves two main steps:
- React renders Server Components into a special data format known as the React Server Component Payload (RSC Payload).
- Next.js uses the RSC Payload and Client Component JavaScript instructions to render HTML on the server
On the client side, the HTML is used to show a fast non-interactive preview of the route on the initial page load. This approach benefits the Initial Page Load and First Contentful Paint (FCP), as well as Search Engine Optimization (SEO) and social network shareability
Using Server Components
By default, Next.js uses Server Components, and you can opt into using Client Components when needed. Server Components allow for data fetching to be moved closer to the data source on the server, which can improve performance by reducing the time it takes to fetch data needed for rendering Here’s an example of how to use Server Components in a Next.js application:
// app/page.tsx
export default async function Page() {
  // Fetch static data similar to `getStaticProps`
  const staticData = await fetch('https://api.example.com/static-data', { cache: 'force-cache' });

  // Fetch dynamic data similar to `getServerSideProps`
  const dynamicData = await fetch('https://api.example.com/dynamic-data', { cache: 'no-store' });

  // Use the fetched data in your component
  return (
    <div>
      {/* Render static and dynamic data */}
    </div>
  );
}
In this example, staticData is fetched and cached similarly to how getStaticProps would work, while dynamicData is fetched for every request like getServerSideProps.
Dynamic Rendering with Server Components
Dynamic rendering with Server Components is achieved by using dynamic functions such as cookies(), headers(), and searchParams. These functions rely on information that can only be known at request time, such as a user’s cookies or the URL’s search parameters. Using any of these functions will opt the whole route into dynamic rendering at request time.
Here’s an example of accessing request-based data in a Server Component:
// app/page.tsx
import { cookies, headers } from 'next/headers';

async function getData() {
  const authHeader = headers().get('authorization');
  // Fetch data using the authorization header
}

export default async function Page() {
  const theme = cookies().get('theme');
  const data = await getData();
  // Render the data based on the theme and fetched data
}
In this example, headers() and cookies() are used to access request headers and cookies, respectively, within a Server Component.
Server Components in Next.js represent a significant advancement in rendering patterns, providing developers with the ability to write UI that can be rendered and optionally cached on the server.
Streaming with Next.js
Streaming is a technique in web development that allows content to be sent from the server to the client in chunks as it becomes ready, rather than waiting for the entire page to be fully rendered. This can significantly improve the user experience by displaying content faster and more efficiently.
How Next.js Implements Streaming
Next.js makes use of streaming to deliver content to the client as soon as possible. This is particularly useful for Server Components, which can be rendered and streamed to the client in parts, allowing users to see content more quickly. Here’s an example of how streaming might be used with Server Components:
// app/page.tsx
import { Suspense } from 'react';

// A Server Component that fetches and renders some data
const ServerRenderedComponent = React.lazy(() => import('./ServerRenderedComponent'));

export default function Page() {
  return (
    <div>
      <h1>My Next.js Page</h1>
      <Suspense fallback={<p>Loading...</p>}>
        <ServerRenderedComponent />
      </Suspense>
    </div>
  );
}
In this example, ServerRenderedComponent is a component that is rendered on the server. The use of Suspense and React.lazy allows the rest of the page to be sent to the client and displayed while ServerRenderedComponent is still being loaded and rendered.
Impact of Streaming on Dynamic Content Rendering
Streaming has a particularly significant impact on the rendering of dynamic content. By streaming dynamic content as it’s ready, Next.js ensures that users can interact with parts of the page without waiting for all the data to be loaded. This improves the perceived performance of the application and enhances the user experience.
Edge Middleware
Edge Middleware is a piece of code that runs at the edge of the network, closer to the user, enabling faster execution and response times. It acts as a bridge between the incoming request and the application, allowing developers to modify requests and responses, implement URL redirects, enrich headers, and more. This functionality is particularly useful for tasks like geolocation-based content delivery, user authentication, and A/B testing.
To add Middleware to your app, you need to create a middleware.ts or middleware.js file at the same level as your app or pages directory.
Here’s an example of how Edge Middleware might be used to personalize content based on the user’s location:
// middleware.ts
import { NextResponse } from 'next/server';

export function middleware(request) {
  const country = request.geo.country || 'US';
  const response = NextResponse.next();

  // Personalize content based on the user's country
  response.headers.set('X-Country', country);

  return response;
}
In this example, the middleware function uses the request.geo.country property to determine the user’s country and set a custom header to personalize the content.
Edge Middleware directly impacts the way static and dynamic content is served in Next.js applications. By running at the edge, middleware can perform operations like:
- Personalizing Static Content: Even though a page might be statically generated and cached, Edge Middleware can modify the response based on user-specific data, such as cookies or geolocation. This allows for the delivery of personalized content at the speed of static.
- Optimizing Dynamic Content Delivery: For dynamic content that needs to be rendered on-the-fly, Edge Middleware can preprocess requests, redirect users or modifying queries before they hit the server. This preprocessing can reduce server load and improve response times for dynamic rendering.
- Enhancing SEO and Performance: By manipulating requests and responses at the edge, middleware can ensure that search engines and social networks receive optimized content, improving SEO and shareability. Additionally, the ability to stream responses from the edge enhances the user’s perceived performance, as content begins to appear sooner.
Here’s an example of how Edge Middleware might be used to deliver dynamic content based on the user’s location:
// middleware.ts
import { NextResponse } from 'next/server';

export function middleware(request) {
  const country = request.geo.country || 'US';
  const personalizedContentUrl = `/content/${country}.json`;

  // Fetch personalized content based on the user's country
  const contentResponse = await fetch(personalizedContentUrl);
  const contentData = await contentResponse.json();

  // Construct a response with personalized content
  const response = new NextResponse(JSON.stringify(contentData));
  response.headers.set('Content-Type', 'application/json');

  return response;
}
Layouts and Nested Routing
Next.js version 13 introduced a new file-based routing system and the concept of layouts. These features play a crucial role in both static and dynamic rendering, offering the developer a more organized way to manage application structure and content hierarchy.
Nested routing allows you to create a hierarchy of pages, reflecting the logical structure of the application’s content. This hierarchical approach simplifies the management of complex page structures and makes it easier to implement dynamic routing patterns. Nested routing is also beneficial for SEO, as it creates clear, readable URLs that reflect the content’s organization.
Enhancing Static and Dynamic Rendering with Layouts and Nested Routing
Layouts and nested routing enhance static and dynamic rendering in several ways:
- Performance Optimization: By defining common layouts, static elements of the page can be cached and reused, reducing the amount of data that needs to be fetched and rendered for each page.
- Consistent User Experience: Layouts ensure that users have a consistent experience as they navigate through the application, with common elements persisting across page transitions.
- Dynamic Data Fetching: Nested routing makes it easier to fetch data dynamically based on the URL structure, allowing for efficient data retrieval and rendering of dynamic content.
Here’s an example of how to implement layouts and nested routing in Next.js:
// app/layout.tsx
export default function Layout({ children }) {
  return (
    <div>
      <header>My Application Header</header>
      <main>{children}</main>
      <footer>My Application Footer</footer>
    </div>
  );
}

// app/posts/page.tsx
import Layout from '../layout';

export default function PostsPage() {
  // Fetch and render posts
  return (
    <Layout>
      <h1>Posts</h1>
      {/* Render posts */}
    </Layout>
  );
}

// app/posts/[id]/page.tsx
import Layout from '../../layout';

export default function PostPage({ params }) {
  // Fetch and render a single post based on the ID from params
  return (
    <Layout>
      <article>
        {/* Render the post */}
      </article>
    </Layout>
  );
}
In this example, Layout is a component that defines the common structure for pages. The PostsPage component uses Layout to wrap the posts list, while PostPage uses the same Layout to wrap the details of a single post. Nested routing is reflected in the file structure, with posts/[id]/page.tsx representing a nested route under posts.
Leveraging React 18 Features
React 18 introduced a host of new features that Next.js has integrated to improve the developer experience and enhance application performance. Among these features, Suspense for data fetching and Concurrent Features stand out for their impact on rendering patterns in Next.js applications.
React 18 brought several new capabilities to the React ecosystem, including:
Automatic Batching: React 18 can automatically batch multiple state updates into a single re-render for better performance.
For example with React 18:
function MyComponent() {
  const [count, setCount] = useState(0);
  const [flag, setFlag] = useState(false);

  useEffect(() => {
    // Updates inside of timeouts are now batched in React 18
    setTimeout(() => {
      setCount(c => c + 1);
      setFlag(f => !f);
      // React will only re-render once at the end (thanks to batching)
    }, 1000);
  }, []);

  return (
    <div>
      <p>Count: {count}</p>
      <p>Flag: {flag.toString()}</p>
    </div>
  );
}
In this example, updates to count and flag within the setTimeout callback are batched, resulting in a single re-render instead of two.
Transitions: This feature allows developers to mark certain updates as transitions, which can be interrupted to prioritize more urgent updates, improving the user experience during heavy rendering tasks.
import { useState, useTransition } from 'react';

function SearchComponent() {
  const [input, setInput] = useState('');
  const [isPending, startTransition] = useTransition();

  const updateInput = (newInput) => {
    startTransition(() => {
      setInput(newInput);
    });
  };

  return (
    <div>
      <input
        type="text"
        value={input}
        onChange={(e) => updateInput(e.target.value)}
      />
      {isPending ? <p>Loading...</p> : null}
    </div>
  );
}
startTransition here is used to mark the input update as non-urgent, allowing more critical updates to take precedence.
Suspense: While Suspense has been around for code-splitting in React, React 18 expanded its capabilities to include data fetching, allowing developers to wait for asynchronous operations before rendering a component.
import { Suspense } from 'react';

const ProfileData = React.lazy(() => import('./ProfileData'));

function UserProfile() {
  return (
    <Suspense fallback={<div>Loading profile...</div>}>
      <ProfileData />
    </Suspense>
  );
}
ProfileData is a component that fetches and displays user profile information. By wrapping it in Suspense with a fallback, users see a loading message until the data is ready to be displayed.
Optimistic UI Updates
Optimistic UI updates involve making a predictive change to the application’s state before the actual operation is completed. This pattern is particularly useful for operations like creating, updating, or deleting data, where the user expects immediate feedback.
Next.js leverages the useOptimistic hook from React to implement optimistic UI updates. This hook allows developers to manage an optimistic state that reflects the expected outcome of an operation.
For example, if you want to implement optimistic update for adding a comment:
import { useOptimistic } from 'react';

function CommentForm({ postId }) {
  const [comments, setComments] = useOptimistic([]);

  const addComment = async (text) => {
    // Create an optimistic comment
    const optimisticComment = { id: 'temp-id', text, optimistic: true };
    setComments([...comments, optimisticComment]);

    try {
      // Send the comment to the server
      const res = await fetch(`/api/posts/${postId}/comments`, {
        method: 'POST',
        body: JSON.stringify({ text }),
        headers: {
          'Content-Type': 'application/json',
        },
      });
      const newComment = await res.json();

      // Replace the optimistic comment with the real one
      setComments(comments.map(c => c.id === 'temp-id' ? newComment : c));
    } catch (error) {
      // If the server call fails, remove the optimistic comment
      setComments(comments.filter(c => c.id !== 'temp-id'));
    }
  };

  return (
    <form onSubmit={(e) => {
      e.preventDefault();
      const text = e.target.elements.commentText.value;
      addComment(text);
      e.target.reset();
    }}>
      <textarea name="commentText" required />
      <button type="submit">Add Comment</button>
    </form>
  );
}
In this example, when a user submits a new comment, it is immediately added to the list of comments optimistically. Once the server confirms the operation, the optimistic comment is replaced with the actual comment from the server.
Optimistic updates can be applied to a variety of user interactions. Here’s an example of an optimistic update when liking a post:
import { useOptimistic } from 'react';

function LikeButton({ postId, initialLikes }) {
  const [likes, setLikes] = useOptimistic(initialLikes);

  const likePost = async () => {
    // Optimistically increment likes
    setLikes(likes + 1);

    try {
      // Send the like to the server
      await fetch(`/api/posts/${postId}/like`, { method: 'POST' });
    } catch (error) {
      // If the server call fails, revert the optimistic update
      setLikes(likes);
    }
  };

  return (
    <button onClick={likePost}>
      Like ({likes})
    </button>
  );
}
In this example, the number of likes is optimistically incremented when the user clicks the “Like” button. If the server request fails, the number of likes is reverted to its previous value.
Conclusion
Next.js has evolved to offer developers a more flexible and efficient approach to rendering web applications. With the introduction of Server Components, Streaming, Edge Middleware, and improved data fetching mechanisms, Next.js 13 and beyond enable developers to mix and match static and dynamic content with unprecedented ease. These advancements empower developers to navigate the complexity of modern web applications more effectively, delivering the best of both worlds: the performance benefits of static rendering and the flexibility of dynamic content delivery.
Furthermore, the new file-based routing system, layouts, and nested routing enhance the organization and management of application structure and content hierarchy, improving performance and user experience. Leveraging React 18 features like Suspense for data fetching and Concurrent Features, Next.js applications can benefit from automatic batching, transitions, and optimistic UI updates, resulting in more performant and responsive user interfaces.
Resources
- Static vs Dynamic Rendering in Nextjs 13
- Unlocking Web Performance: A Deep Dive into Static vs Dynamic Rendering with NextJS
- Next.js Documentation: Server Components
- Next.js Documentation: Streaming
- Next.js Documentation: Edge Middleware
- Next.js Documentation: Layouts and Nested Routing
- React Documentation: Suspense


