

Defenition: POS – “Point of Sale”. At the point of sale, the merchant calculates the amount owed by the customer, indicates that amount, may prepare an invoice for the customer (which may be a cash register printout), and indicates the options for the customer to make payment.
This is the second chapter of our series of creating a simple POS using React, Node, and MongoDB. In the previous chapter, we set up the frontend integrating AdminLTE and connected MongoDB cloud to the Node background. In this tutorial, we are going to add register and login features using JWT.
Register
Let’s Start From the Frontend
We need to get the sample code from AdminLTE. Copy the code wrapped inside <div class="login-box"></div> tags and paste it in a new file named register.js. Convert the pasted HTML code to JSX using the previously installed VSCode extension.
Then, we add Formik and Yup dependencies to easily integrate form and form validation.
yarn add formik yup
Import these two packages inside register.js.
import React, { Component } from "react";
import { Formik } from "formik";
import * as Yup from "yup";
Wrap the created form using the special tag <Formik>. You have to add initial values for the fields that are being used. We use the onSubmit function to display the form values on the console when a user submits the form.
render() {
    return (
      <div className="register-box">
        <div className="register-logo">
          <a href="../../index2.html">
            <b>Basic</b>POS
          </a>
        </div>
        <div className="card">
          <div className="card-body register-card-body">
            <p className="login-box-msg">Register a new membership</p>

            <Formik
              initialValues={{
                fullname: "",
                email: "",
                password: "",
                confirm_password: ""
              }}
              onSubmit={(values) => {
                console.log(values);
              }}
            >
              {props => this.showForm(props)}
            </Formik>
          </div>
          {/* /.form-box */}
        </div>
        {/* /.card */}
      </div>
    );
  }
}
Now we add the showForm function to clean the code and save time.
showForm = ({
    values,
    errors,
    touched,
    handleChange,
    handleSubmit,
    setFieldValue,
    isSubmitting
  }) => {}
We inject parameters that are passed on to the form inside this function.
We use onSubmit={handleSubmit} to capture form submission, onChange={handleChange} to capture the values inserted to the forms, and disabled={isSubmitting} to disable form submission.
return (
<form onSubmit={handleSubmit}>
<div className="form-group has-feedback">
<input
type="text"
name="username"
onChange={handleChange}
value={values.username}
className="form-control"
placeholder="Username"
/>
</div>
<div className="form-group has-feedback">
<input
type="text"
name="email"
onChange={handleChange}
value={values.email}
placeholder="Email"
/>
</div>
<div className="form-group has-feedback">
<input
type="password"
name="password"
onChange={handleChange}
value={values.password}
className="form-control"
placeholder="Password"
/>
</div>
<div className="form-group has-feedback">
<input
type="password"
name="confirm_password"
onChange={handleChange}
placeholder="Confirm Password"
/>
</div>
<div className="row">
<div className="col-md-12">
<button
disabled={isSubmitting}
type="submit"
className="btn btn-primary btn-block btn-flat"
>
Confirm
</button>
</div>
</div>
</form>
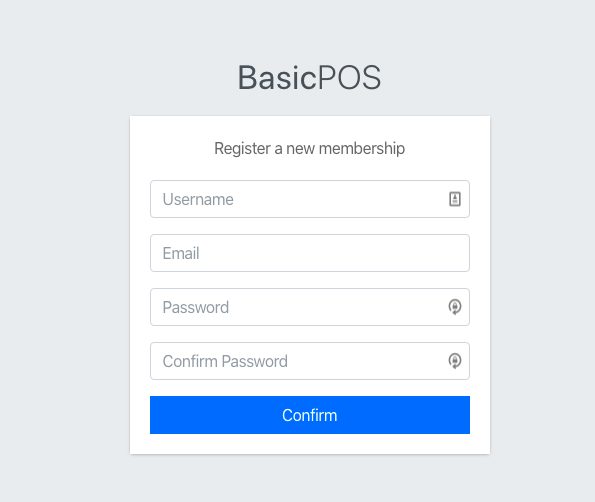
);You can now see the resulting register form.
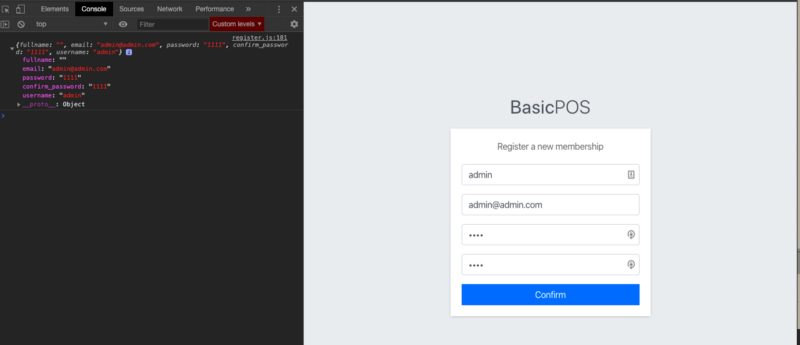
Try to submit the form and see what happens. Read the output of the console.
Though we have finished creating the form, we need to add client-side validation to the form before sending data to the server.
Validation with Yup
We can create a validation schema as expected using Yup.
const SignupSchema = Yup.object().shape({
  username: Yup.string()
    .min(2, "username is Too Short!")
    .max(50, "username is Too Long!")
    .required("username is Required"),
  email: Yup.string()
    .email("Invalid email")
    .required("Email is Required"),
  password: Yup.string().required("Password is required"),
  confirm_password: Yup.string().oneOf(
    [Yup.ref("password"), null],
    "Both password need to be the same"
  )
});
Then add the validation schema to Formik.
           <Formik
              initialValues={{
                fullname: "",
                email: "",
                password: "",
                confirm_password: ""
              }}
              onSubmit={(values, { setSubmitting }) => {
                console.log(values);
                setSubmitting(false);
              }}
           validationSchema={SignupSchema}
           >
Now we add CSS that is used to display an error message and change the input border color.
Add the CSS class is-invalid to change the border color to red.
           className={
              errors.username && touched.username
                ? "form-control is-invalid"
                : "form-control"
            }
Display the error message from the validation schema.
         {errors.fullname && touched.fullname ? (
            <small id="passwordHelp" class="text-danger">
              {errors.username}
            </small>
          ) : null}
You can see the full form code below.
return (
<form onSubmit={handleSubmit}>
<div className="form-group has-feedback">
<input
type="text"
name="username"
onChange={handleChange}
value={values.username}
className="form-control"
placeholder="Username"
className={
errors.username && touched.username
? "form-control is-invalid"
: "form-control"
}
/>
{errors.fullname && touched.fullname ? (
<small id="passwordHelp" class="text-danger">
{errors.username}
</small>
) : null}
</div>
<div className="form-group has-feedback">
<input
type="text"
name="email"
onChange={handleChange}
value={values.email}
className={
errors.email && touched.email
? "form-control is-invalid"
: "form-control"
}
placeholder="Email"
/>
{errors.email && touched.email ? (
<small id="passwordHelp" class="text-danger">
{errors.email}
</small>
) : null}
</div>
<div className="form-group has-feedback">
<input
type="password"
name="password"
onChange={handleChange}
value={values.password}
className="form-control"
placeholder="Password"
className={
errors.password && touched.password
? "form-control is-invalid"
: "form-control"
}
/>
{errors.password && touched.password ? (
<small id="passwordHelp" class="text-danger">
{errors.password}
</small>
) : null}
</div>
<div className="form-group has-feedback">
<input
type="password"
name="confirm_password"
onChange={handleChange}
className={
errors.confirm_password && touched.confirm_password
? "form-control is-invalid"
: "form-control"
}
placeholder="Confirm Password"
/>
{errors.confirm_password && touched.confirm_password ? (
<small id="passwordHelp" class="text-danger">
{errors.confirm_password}
</small>
) : null}
</div>
<div className="row">
<div className="col-md-12">
<button
disabled={isSubmitting}
type="submit"
className="btn btn-primary btn-block btn-flat"
>
Confirm
</button>
</div>
{/* /.col */}
</div>
</form>
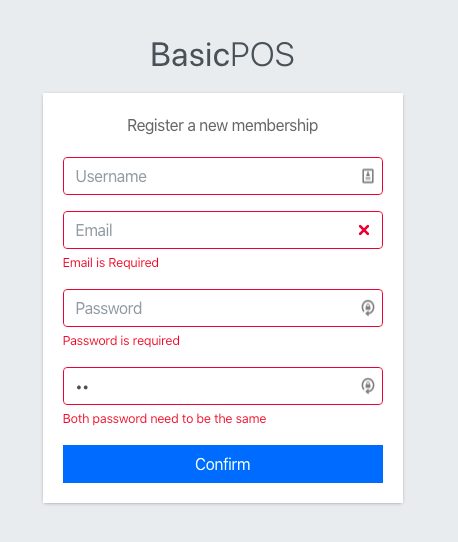
);The registration form now looks like this.
Now we can send an HTTP request with Axios to submit the form.
First, install and import Axios.
yarn add axios
Import axios to register.js.
import axios from "axios";
Create a function to send a post request to the backend.
submitForm = (values) => {
    axios
      .post("http://localhost:8080/register", values)
      .then(res => {
        console.log(res);
      })
      .catch(error => {
        console.log(error);
      });
  };
Add this function to the onSubmit function inside Formik and pass the form values and the history object to navigate to another page.
           <Formik
              initialValues={{
                fullname: "",
                email: "",
                password: "",
                confirm_password: ""
              }}
              onSubmit={(values, { setSubmitting }) => {
                this.submitForm(values, this.props.history);
                setSubmitting(false);
              }}
              validationSchema={SignupSchema}
            >
We have completed the frontend implementation of authentication. Next. we will configure the backend to receive the submitted registration form.
Backend: Create a User on the Database
Create a new folder named models and create a file named user_schema.js inside the folder.
const mongoose = require("mongoose");
const schema = mongoose.Schema({
  username: String,
  email: String,
  password: String,
  level: { type: String, default: "normal" },
  created: { type: Date, default: Date.now }
});schema.index({ username: 1 }, { unique: true });
module.exports = mongoose.model("users", schema);
Now we have a table structure to store user data.
Next import user_schema to index.js.
require("./db");
const Users = require("./models/user_schema");
We can use the create function to create a new user.
app.post("/register", async (req, res) => {
  try {
    req.body.password = await bcrypt.hash(req.body.password, 8);
    await Users.create(req.body);
    res.json({ result: "success", message: "Register successfully" });
  } catch (err) {
    res.json({ result: "error", message: err.errmsg });
  }
});
Let’s go back to the frontend to handle the response sent by the server.
Add SweetAlert
To handle the response message, we use SweetAlert. First, install the package using the command yarn add sweetalert. Import the package to register.js as the following line of code shows.
import swal from "sweetalert";
Now use SweetAlert to handle the success or error response accordingly.
submitForm = (values, history) => {
    axios
      .post("http://localhost:8080/register", values)
      .then(res => {
        console.log(res.data.result);
        if (res.data.result === "success") {
          swal("Success!", res.data.message, "success")
          .then(value => {
            history.push("/login");
          });
        } else if (res.data.result === "error") {
          swal("Error!", res.data.message, "error");
        }
      })
      .catch(error => {
        console.log(error);
        swal("Error!", "Unexpected error", "error");
      });
  };
Now add submitForm to onSubmit.
             onSubmit={(values, { setSubmitting }) => {
                this.submitForm(values, this.props.history);
                setSubmitting(false);
              }}
Submit valid data through the form and see how the form works.
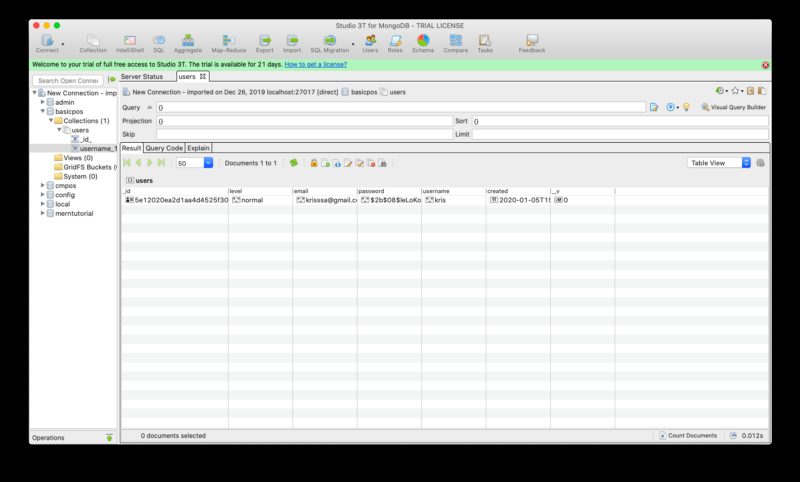
success submission resultNow you can view the registered user data.
LOG IN
Backend: Authentication with JWT
We use JWT to handle login by generating a JSON Web Token which can be sent back to the browser to be stored in the LocalStorage.
Create a file named jwt.js inside the backend folder.
Import fs and path libraries to read private and public keys.
const fs = require('fs');
const path = require('path');
const jwt = require('jsonwebtoken');
var publicKEY = fs.readFileSync(path.join(__dirname + '/public.key'), 'utf8');
var privateKEY = fs.readFileSync(path.join(__dirname + '/private.key'), 'utf8');
Then, define the issuer as follows.
var i 	= 'Krissio';    	// Issuer (Software organization who issues the token)
var s 	= 'admin@kriss.io';	// Subject (intended user of the token)
var a 	= 'https://kriss.io';	// Audience (Domain within which this token will live and function)
Create a function named sign to create JWTs.
module.exports = {
    sign : (payload)=>{
         // Token signing options
         var signOptions = {
            issuer: 	i,
            subject: 	s,
            audience: 	a,
            expiresIn: "30d",    // 30 days validity
            algorithm: "RS256"
        };
        return jwt.sign(payload, privateKEY, signOptions);
    },
}
Now import the file to index.js.
const jwt = require("./jwt");We can now implement the login-from database. We search the user from the database and compare the stored and sent passwords using bcrypt.
app.post("/login", async (req, res) => {
  let doc = await Users.findOne({ username: req.body.username });
  if (doc) {
    if (bcrypt.compareSync(req.body.password, doc.password)) {
      const payload = {
        id: doc._id,
        level: doc.level,
        username: doc.username
      };

      let token = jwt.sign(payload);
      console.log(token);
      res.json({ result: "success", token, message: "Login successfully" });
    } else {
      // Invalid password
      res.json({ result: "error", message: "Invalid password" });
    }
  } else {
    // Invalid username
    res.json({ result: "error", message: "Invalid username" });
  }
});
Login Frontend
We can copy the code from register.js and paste it to login.js. Update the form by removing the username and confirm_password input fields. You can view all updates here.
We need to change how the response is handled in the frontend by adding the code to store the JWT token in LocalStorage. Then, redirect to the dashboard screen.
submitForm = (values, history) => {
axios
.post("http://localhost:8080/login", values)
.then(res => {
if (res.data.result === "success") {
localStorage.setItem("TOKEN_KEY", res.data.token);
swal("Success!", res.data.message, "success")
.then(value => {
history.push("/dashboard");
});
} else if (res.data.result === "error") {
swal("Error!", res.data.message, "error");
}
})
.catch(error => {
console.log(error);
swal("Error!", error, "error");
});
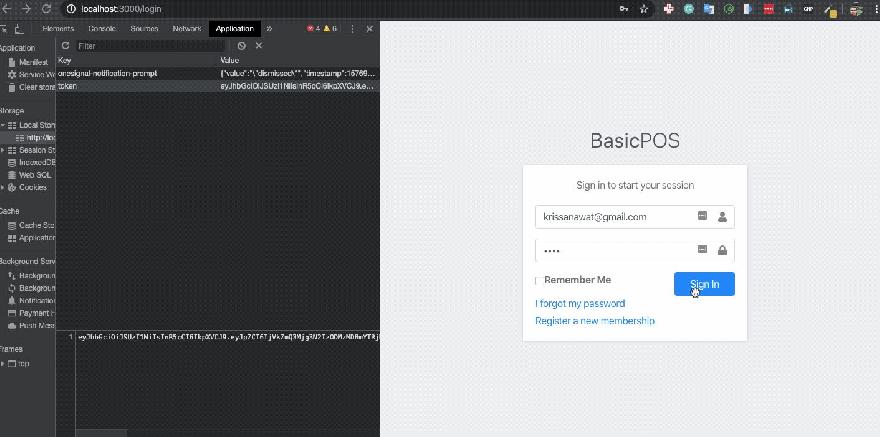
};The resulting login page looks like this.
Conclusion
In this chapter, we learned how to use Formik and Yup to create registration and login forms. We learned how to add a user table to the database with mongoose and use JWT to authenticate a logged-in user. In the next chapter, we will add log out and handle the auth state to our application. You can find the full code of the application on Github.