In the last article, we have built the GraphQL server that provides the data from the Github API. In this second part, we will be building the client-side app using React.js and Apollo Client to get our full-stack Github Jobs App. Let’s get started.
Prerequisites
This guide assumes that you have at least a basic understanding of React, React Router, and GraphQL. Knowledge of Apollo Client would help to get the most out of this article but is not required. In this tutorial, you will learn how to use Apollo Client with React by building an app from scratch. This tutorial would benefit to folks who want to dive into Apollo Client and start learning how to query data from a GraphQL backend. So, let’s start by setting up a new React app.
What is Apollo Client?
Apollo Client is a comprehensive state management library for JavaScript. It allows you to manage both local and remote data with GraphQL. Apollo Client is framework-agnostic and can be used with any framework or just vanilla JavaScript. It’s a popular tool on the React ecosystem when dealing with GraphQL backend. There are some alternatives for Apollo Clent you can use to retrieve the data from your GraphQL API. So, feel free to use what works best for you. Without further ado, let’s create a new React app and then install Apollo Client to fetch the data from the GraphQL API.
Setting up
We will be using Create React App to start a new app. But, you can alternatively set up a new one with Webpack if you want too. Now, open your command-line interface (CLI) and execute this following command:
npx create-react-app github-jobs-react
Once the project is initialized, let’s install the dependencies needed to use Apollo Client in this app. So, browse to the root of the project folder and run this command in your CLI:
yarn add apollo-boost @apollo/react-hooks graphql react-router-dom
Or when using npm.
npm install apollo-boost @apollo/react-hooks graphql react-router-dom
Now, let’s structure the project as follows:
├── src
| ├── components
| | ├── Job.js
| | └── Profile.js
| ├── App.js
| ├── index.js
| ├── style.css
| ├── useRequest.js
| └── package.json
Here, we have a simple file structure. The components folder holds the Job component that is using for the preview of a Github job and the Profile file that shows full job details. Next, we have the useRequest.js file, which contains a hook that relies on Apollo Client to fetch the data from the GraphQL server. With this in place, we can now set up Apollo Client and then connect it to our React App.
Connecting React to Apollo Client
Apollo Client offers a bunch of useful features that make the connection to React easier.
- index.js
import  React  from  "react";
import  ReactDOM  from  "react-dom";
import  ApolloClient  from  "apollo-boost";
import  {  ApolloProvider  }  from  "@apollo/react-hooks";
import  App  from  "./App";

const  client  =  new  ApolloClient({
	uri:  "https://your-back-end.com"
});

const  rootElement  =  document.getElementById("root");

ReactDOM.render(
	<React.StrictMode>
		<ApolloProvider  client={client}>
			<App  />
		</ApolloProvider>
	</React.StrictMode>,
	rootElement
);
As you can see, we start by importing ApolloClient that enables us to create a new client and then connect it to our GraphQL server. Here, you have to pass in the URL of your server to the uri property. Apollo Client will take the URL of your GraphQL server and then append /graphql to it. Meaning that, now, you can omit /graphql in the server URL. Next, we have to pass the client object to the ApolloProvider component to connect our React App to Apollo Client. With this, React is connected now to Apollo. So, let’s now build the components in the next section to query the data from our GraphQL server using Apollo.
Building the components to display the jobs
In this React app, we need two components to handle the display. The first (Job) will serve as a component to preview all jobs, and the second (Profile) will help to display a full Github job.
- components/Job.js
import  React  from  "react";
import  {  Link  }  from  "react-router-dom";

const  Job  =  ({ job })  =>  {
const { title,  type,  company,  id } =  job;
	return  (
		<div  className="Card">
			<h1 className="Card--title">{title}</h1>
			<ul>
				<li>Company: {company}</li>
				<li>Type: {type}</li>
			</ul>
			<Link  to={`/profile/${id}`}>Read more</Link>
		</div>
);
};

export  default  Job;
This component allows us to preview all Github jobs. It receives the data to show as a parameter, and then we use destructuring to pull out the data to display. Next, we pass in the id of the job to the Link component to be able to fetch the full job details when the user visits the Profile page. With this step forward, we can now work on the Profile component.
- components/Profile.js
import  React  from  "react";
import  {  useParams  }  from  "react-router-dom";
import  gql  from  "graphql-tag";

import  useRequest  from  "../useRequest";

const  GET_JOB  =  gql`
	query  job($id: ID!) {
		job(id: $id) {
			id
			title
			type
			company
			description
			url
			location
		}
}`;

const  Profile  =  ()  =>  {
const { id } =  useParams();
const { loading,  error,  data } =  useRequest(GET_JOB,  id);

if  (error)  return  <h1>Something went wrong!</h1>;
if  (loading)  return  <h1>Loading...</h1>;

return  (
	<div  className="Profile">
		<h1  className="Profile--title">{data.job.title}</h1>
		<p  className="Profile--description">
		Job Description: {data.job.description}
		</p>
	<ul>
		<li>Company: {data.job.company}</li>
		<li>Job Type: {data.job.type}</li>
		<li>Job Location: {data.job.location}</li>
	</ul>
	<a  href={data.job.url}>See more</a>
	</div>
);
};

export  default  Profile;
Here, we start by defining a new GraphQL query that enables us to fetch the full job from the server. And to do so, we have to pass in the id to the GraphQL query, which is why we pull it from the route params using the useParams() hook. Next, we pass in the GraphQL query and the id of the object as arguments to useRequest() meaning that the data are fetched now with Apollo Client. With this, we can now update the code on the useRequest hook to complete the fetching action.
Fetching the data from the GraphQL Server
Using this hook is optional. You are more than welcome to use the useQuery hook provided by Apollo Client directly in your files. But, I highly recommend using this way to keep your code concise and not repeating yourself.
- useRequest.js
import  {  useQuery  }  from  "@apollo/react-hooks";

export  default  function  useRequest(gqlQuery,  id)  {
	const { data,  loading,  error } =  useQuery(gqlQuery,  {
		variables:  { id:  id  }
});

return  {  loading,  error,  data  };
}
This function receives the GraphQL query and optionally, the id of the job to retrieve. Then, it returns the data fetched, an error, and loading states. With this step forward, we can now edit the App.js file and finish up building the Github Jobs App.
Displaying the data
Here, I enabled the routing in the App component. But, you can alternatively separate your components and the routing file if you want to – It’s up to you.
- App.js
import  React  from  "react";
import  {  BrowserRouter  as  Router,  Route  }  from  "react-router-dom";
import  gql  from  "graphql-tag";

import  useRequest  from  "./useRequest";
import  Job  from  "./components/Job";
import  Profile  from  "./components/Profile";
import  "./styles.css";

const  GET_JOBS  =  gql`{
	jobs {
		id
		title
		type
		company
	}
}`;

export  default  function  App()  {
const { loading,  error,  data } =  useRequest(GET_JOBS);

	if  (loading)  return  <h1>Loading...</h1>;
	if  (error)  return  <h1>Something went wrong!</h1>;

return  (
<Router>
	<div  className="App">
		<h1>Github Jobs</h1>
	<Route  path="/"  exact>
	{data.jobs.map((job) => (
		<Job  key={job.id} job={job} />
	))}
	</Route>
	<Route  path="/profile/:id">
		<Profile  />
	</Route>
</div>
</Router>
);
}
As you can see here, we start by importing the useRequest hook created earlier. It expects the GraphQL Query and, optionally, the id of the job object. Next, we create the GraphQL query needed to retrieve all jobs from the server. Once the jobs fetched is returned by useRequest, we can now loop through the data and then use the Job component for the display of the object. With this change, we can now test if the app works. To do so, execute the following command in the CLI:
yarn start
Or for npm.
npm start
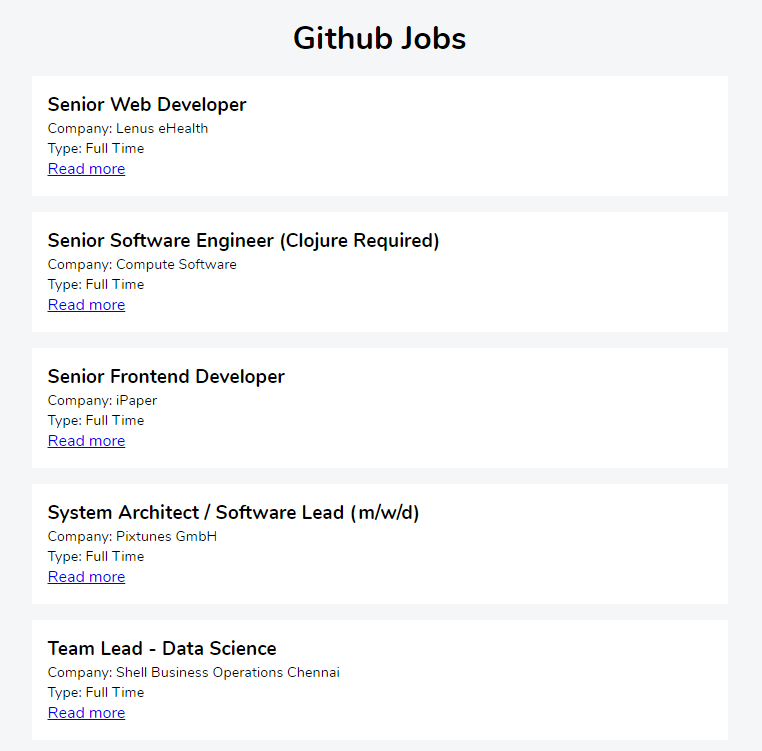
Now, visit http://localhost:3000 to check if all jobs are displayed as expected.
- Home page
Let’s browse to http://localhost:3000/profile to check the full Github job details.
- Profile page
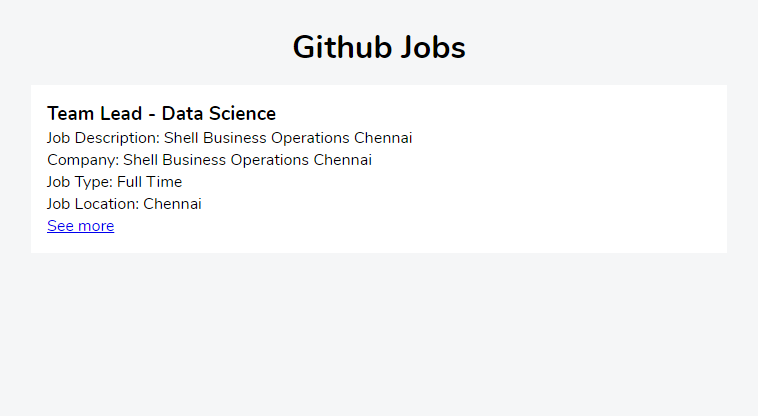
Great! Our app looks good. That’s it. This final step ends our mini-series on how to build a Github Jobs app using React, Apollo Client, and GraphQL.
Conclusion
Throughout this tutorial, we have learned what Apollo Client is and why it is handy when dealing with a GraphQL API or Server. We also finished up the Github Jobs App by building the client-side with React and Apollo Client. It’s definitely something to try on your next project.
You can find the finished project in this CodeSandbox. You can find other great content like this on my blog or follow me on Twitter to get notified. Thanks for reading.
Resources
Check out these resources to dive deeper into the content of this tutorial:
React Docs
Apollo Client Docs
Apollo Client – useQuery Docs
Apollo Client – GraphQL basics

