
To make your code supportable, we need to specify what types of props our component can expect.
Add the following to your comments.js file:
Comment.propTypes = {
    comment: PropTypes.shape({
        text: PropTypes.string.isRequired,
        user: PropTypes.string
    })
We’re expecting to receive comments from users as evidenced in Line 2 in the code snippet above. In .shape, we define what data type we’re expecting — some examples are text and user, which we’ve used just now.
Let’s add this line to Article.js:
First, you have to install the PropTypes package. Run npm install prop-types: or yarn install prop-types from the project folder.
Then, change your first line to:
import React, { Component } from 'react'
import PropTypes from 'prop-types';
Your class will look just like that:
class Article extends Component {
    state = {
        isOpen: false
    }
    static propTypes = {
        article: PropTypes.object.isRequired
    }
}
Let’s talk about decorators now. What are they? They are a function which can decorate our component (i.e. fill it with some functionality). In return, this function returns a new component. Let’s write this decorator for comments.
import React from 'react'

export default (Component) => class DecoratedComponent extends React.Component {
    state = {
        isOpen: false
    }

    toggleOpen = (ev) => {
        ev.preventDefault()
        this.setState({
            isOpen: !this.state.isOpen
        })
    }

    render() {
        return <Component {...this.props} isOpen = {this.state.isOpen} toggleOpen = {this.toggleOpen}/>
    }
}
In our case, we’ll finally enrich an old component with some new functionality.
Let’s also import a decorator to CommentList:
import toggleOpen from './decorators/toggleOpen'
We’ll describe our class just the same way as we did before, but we’ll also provide a wrapper around it. Change the last line:
export default toggleOpen(CommentList)
Let’s add State and toggleOpen to the decorator by removing them from the CommentList file. For our component to be aware of those states we describe, we write about states as props in Line 16. Thus, our component will not only contain comments, but also isOpen and toggleOpen. Add a note about it to CommentList:
const { comments, isOpen, toggleOpen } = this.propsRemove the lines:
const { isOpen } = this.stateAnd change the OnClick line as follows:
<a href="#" onClick = {toggleOpen}>{linkText}</a>This approach is far more convenient and clear. This is how your CommentList will look like:
import React, { Component, PropTypes } from 'react'
import Comment from './Comment'
import toggleOpen from './decorators/toggleOpen'

class CommentList extends Component {
    render() {
        const { comments, isOpen, toggleOpen } = this.props
        if (!comments || !comments.length) return <h3>no comments yet</h3>

        const commentItems = comments.map(comment => <li key = {comment.id}><Comment comment = {comment}/></li>)
        const body = isOpen ? <ul>{commentItems}</ul> : null
        const linkText = isOpen ? 'close comments' : 'show comments'
        return (
            <div>
                <a href="#" onClick = {toggleOpen}>{linkText}</a>
                {body}
            </div>
        )
    }
}

export default toggleOpen(CommentList)
The components that we created are rather simple. Let’s look at the component life cycle in React:
Mounting is the first stage, before the component initialization and its emergence on the DOM tree (this block is marked with a red square on the picture). You can use the constructor to setup initial state for the component. State can be also changed in the getDerivedStateFromProps, but it’s typically reserved to rare cases like animation or data fetch based on props. You can read more about this topic here.
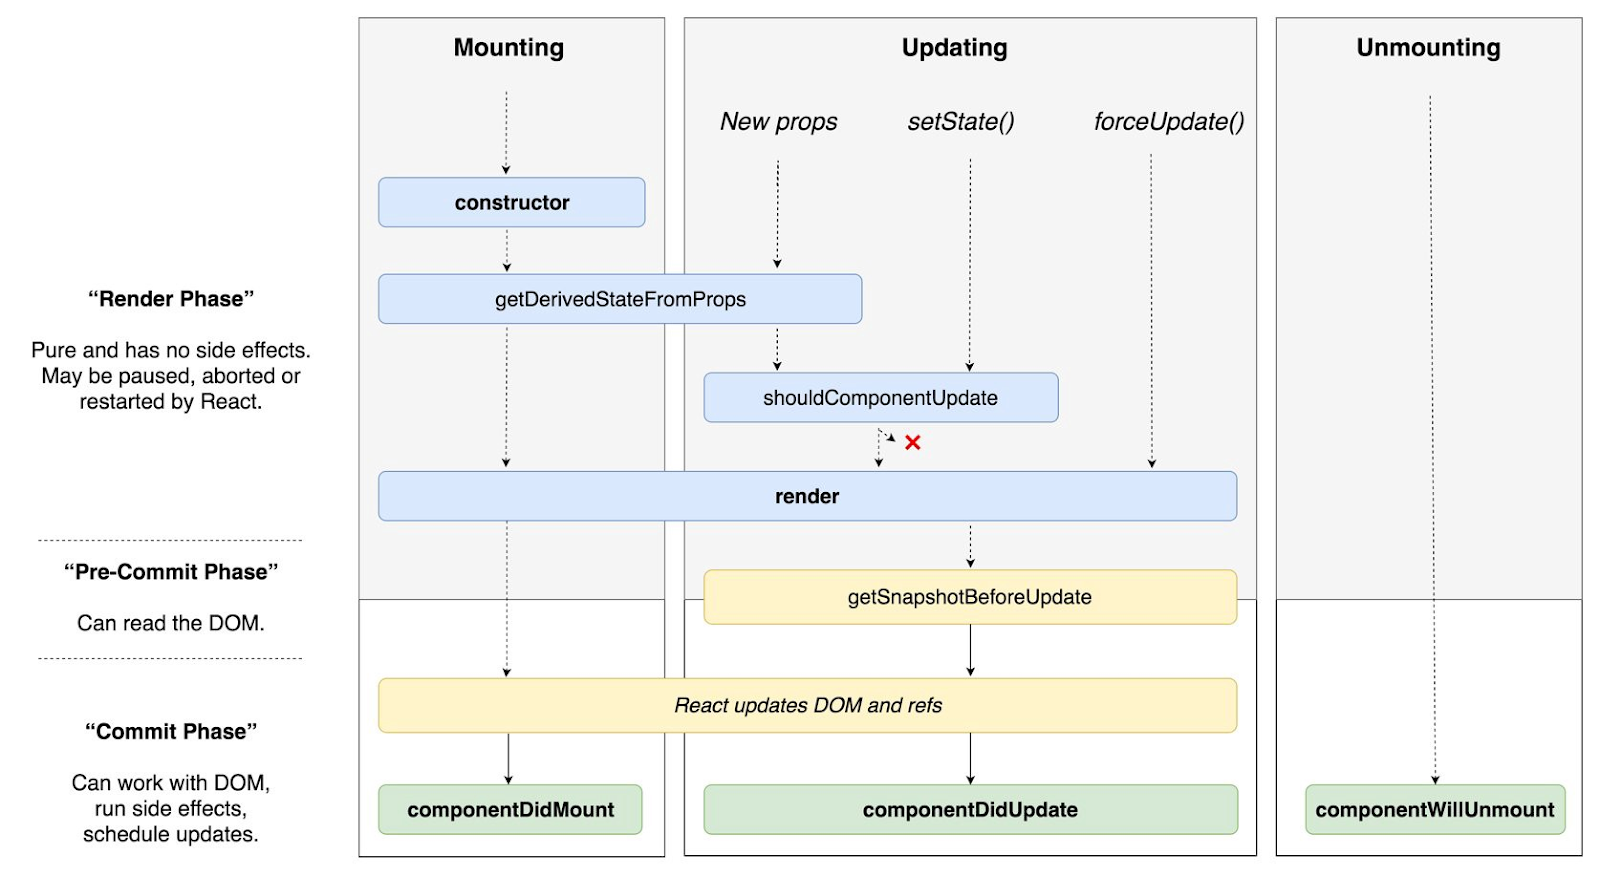
Please notice that this lifecycle was changed since earlier React versions.
Next we do rendering, build a virtual DOM and later, when we’re ready to insert it into a real DOM, we request componentDidMount. Sometimes (just like with CommentList), our component contains a number of other components: for example, Comment in our case, which has its own Lifecycle methods. So, what would be the proper execution order? First, a parent constructor and getDerivedStateFromProps have to be operational, then render and later, the same methods will be called for the child. After that a render method is over and it starts to get built in a DOM tree. First, componentDidMount of child components finishes its work and only once all child components are ready, a parent componentDidMount will be requested.
Next stage in the component Lifecycle is the update stage, marked with green. It will be executed in three cases: change of the state, change of the props, or call of forceUpdate. Same as in mounting phase, you can use getDerivedStateFromProps if a component state depends on props – it means, you need to control, when they get updated, and change “state” to support its current and updated state.
That’s why you can return new state from getDerivedStateFromProps. It means that the app won’t do rendering more than once. Next render will take place with ComponentDidUpdate (where we’ve already updated). In ComponentDidUpdate, we will have access to both old and new props; while the new ones will be kept in “this,” and the old ones will stay as an argument (prevProps, nextProps). TheshouldComponentUpdate method will be studied in the upcoming lessons.
This scheme works until the component gets fully updated, which will lead to componentWillUnmount – this means that the component is still in DOM but will soon be removed from there. It’s a common situation for clearing some sort of subscriptions.
To understand the working principle of Lifecycle better, let us add the following coding part to class CommentList of our component CommentList:
constructor() {
    console.log('---', this.props)
}
componentDidMount() {
    console.log('---', 'mounted')
}

static getDerivedStateFromProps(props, state) {
    console.log('---', props.isOpen)
}

componentWillUnmount() {
    console.log('---', 'unmounting')
The work result can be seen in console.
During the Lifecycle stage the component in our DOM tree can be added with new props, and it will be constantly updating. Remember the keys from our previous lessons — we coded the basis for our Articles in those. If we don’t use them, every time our article gets removed for the list, our component will be updated – this means that it won’t get through all Lifecycle stages. But if a key changes, it will force the re-initialization of the whole component. If a key changes, React will remove the previous one and add a new one – it’s extremely convenient if you use third-party libraries like D3 in order to avoid managing all of the components manually.
Sometimes you will need to work with real DOM. React knows this structure – you only need to request it. Use ref. for this purpose. For example, let us add ref to CommentList for an element with Link:
<a href="#" onClick = {toggleOpen} ref={this.togglerRef}>{linkText}</a>Write the following coding piece in the same file:
constructor(props) {
    super(props);
    this.togglerRef = React.createRef();
  }
componentDidMount() {
    console.log('---', 'mounted', this.togglerRef.current)
Right now we’ve got an access to a real DOM element with Link and can work with it. How can we work with JQuery components? For that purpose, let’s create a file for this JqueryComponent. Write the following:
import React, { Component, PropTypes } from 'react'

class JqueryComponent extends Component {
    static propTypes = {

    };

    constructor(props) {
        super(props);
        this.component = React.createRef();
   }
    componentDidMount() {
        console.log('---',this.component)
    }

    render() {
        return (
            <div ref={this.component}/>
        )
    }
}

export default JqueryComponent
For example, this kind of construction will be OK for initializing a JQuery plugin. It isn’t the best practice, though, but sometimes it’s necessary in order to avoid too complicated solutions.
Let’s talk about data flows. Sometimes we cannot organize a data flow only in one direction and use a reversed data flow. By default, all data in React gets delivered downwards, but sometimes there can be a need to manage a parent component from a child one. For example, we want to have one article opened at a certain time period and others need to be automatically closed. It means that the information will be kept above, in the parent, and you need to organize a reverse data flow as our components know nothing about each other.
First, we cannot use Functional Component Article List anymore, as we will get a Functional list. Let us start our work on ArticleList coding.
Let’s change import coding in the first line, create class instead of a function, and add “render.” Do not forget to change “import” in the second line. Now let’s create “state” in the fifth line. To do this, we need to know what article is opened; let’s describe it in Line 6. You will also need a method that will be able to open and close your article, so let’s create it in Line 9. In Article we will give the state and function of opening the article – Line 20.
import React, { Component }  from 'react'
import Article from './Article'

class ArticleList extends Component {
    state = {
        openArticleId: null
    }

    openArticle = id => ev => {
        if (ev) ev.preventDefault()
        this.setState({
            openArticleId: id
        })
    }

    render() {
        const { articles } = this.props

        const listItems = articles.map((article) => <li key={article.id}>
            <Article article = {article}
                isOpen = {article.id == this.state.openArticleId}
                openArticle = {this.openArticle(article.id)}
            />
        </li>)
        return (
            <div>
                <h1>Article list</h1>
                <ul>
                    {listItems}
                </ul>
            </div>
        )
    }
}
Now you need to change the article by removing unnecessary coding and getting all needed data from props:
import React, { Component} from 'react'
Import PropTypes from 'prop-types'
import CommentList from './CommentList'

class Article extends Component {

    static propTypes = {
        article: PropTypes.object.isRequired
    }

    render() {
        const { isOpen, openArticle, article: { title, text, comments } } = this.props
            const body = isOpen ? <section>{ text } <CommentList comments = {comments} /></section> : null

            return (
                <div>
                    <h1 onClick = {openArticle}>{ title }</h1>
                    {body}
                </div>
            )
    }
}

export default Article
Please download the source code here.
Your Home Assignment
You need to create a mixin and decorator for the functionality that we’ve described in this lesson: display of only one opened article, as well as an option of closing all articles and displaying only its titles.
Previous lessons can be viewed here: https://soshace.com/category/javascript/react/react-lessons/