


TL;DR In this article you’ll learn how to implement role-based access control in a Node.js application.
What is Role-Based Access Control?
Role-based access control (RBAC) is an approach used to restrict access to certain parts of the system to only authorized users. The permissions to perform certain operations are assigned to only specific roles. Users of the system are assigned those roles, and through those assignments, they acquire the permissions needed to perform particular system functions. Since users are not assigned permissions directly, but only acquire them through the roles that have been assigned to them, management of individual user rights becomes a matter of simply assigning appropriate roles to a particular user.
With that explained, let’s build a simple user management system/application and use role-based access control to restrict access to certain parts of the application to only users with authorized roles. If needed, you can find the code of the application developed all through this tutorial in this Github repository.
Prerequisites
You’ll need to have a basic understanding of Node.js and Javascript to follow along with this article. It is also required that you have the Node package installed, if you don’t have this you can get it from the official Node.js website, adequate instructions are provided there on how to get it setup. The application will also be using the MongoDB database to store user details, so it’s important you get that set up if you haven’t. There are detailed instructions on the MongoDB website on how to download and set up the database locally.
Scaffolding the Application
Firstly, let’s create a directory for the application, head over to a convenient directory on your system and run the following code in your terminal:
mkdir rbac
Now, navigate to the created directory and initialize NPM(package manager):
cd rbac

// Initializes a package.json file
npm init
The command above initializes an npm project in the application directory and creates a package.json file, this file will hold necessary information regarding the application and also related project dependencies that will be used by the application.
The application we’ll build won’t be complex therefore the directory structure for the application would be simple as well:
- server
-- controllers
--- userController.js
-- models
--- userModel.js
-- routes
--- route.js
-- server.js
-- roles.js
- .env
- package.json
Installing the necessary packages
As previously mentioned, we’ll be using some dependencies/packages to help in building parts of our application so let’s go ahead and install them. In your terminal, run the following command:
npm install dotenv accesscontrol bcrypt body-parser express jsonwebtoken mongoose
Here’s a brief rundown of what each installed package actually helps us with:
dotenv: This package loads environmental variables from a.envfile into Node’sprocess.envobject.bcrypt: is used to hash user passwords or other sensitive information we don’t want to plainly store in our database.body-parser: is used to parse incoming data from request bodies such as form data and attaches the parsed value to an object which can then be accessed by an express middleware.jsonwebtoken: provides a means of representing claims to be transferred between two parties ensuring that the information transferred has not been tampered with by an unauthorized third party, we’ll see exactly how this works later on.mongoose: is an ODM library for MongoDB, provides features such as schema validation, managing relationships between data, etc…express: makes it easy to build API’s and server-side applications with Node, providing useful features such as routing, middlewares, etc..accesscontrol: provides role and attribute-based access control.
It’s perfectly fine if you aren’t familiar with all the packages now. As we go through the article, things will get much clearer and we’ll see exactly what role each package plays in helping us build our application.
Setting up the Database Model
As stated earlier, we’ll be using MongoDB as the preferred database for this application and particularly mongoose for data modeling, let’s go ahead and set up the user schema. Head over to the server/models/userModel.js file and insert the following code:
// server/models/userModel.js
const mongoose = require('mongoose');
const Schema = mongoose.Schema;

const UserSchema = new Schema({
 email: {
  type: String,
  required: true,
  trim: true
 },
 password: {
  type: String,
  required: true
 },
 role: {
  type: String,
  default: 'basic',
  enum: ["basic", "supervisor", "admin"]
 },
 accessToken: {
  type: String
 }
});

const User = mongoose.model('user', UserSchema);

module.exports = User;
In the file above, we define what fields should be allowed to get stored in the database for each user and also what type of value each field should have. The `accessToken` field will hold a JWT(JSON web token), this JWT contains claims or you could say information that will be used to identify users across the application.
Each user will have a specific role and that’s very important. To keep the application fairly simple, we’ll allow just three roles as specified in the `enum` property, permissions for each role will be defined later on. Mongoose provides a handy `default` property that enables us specify what the default value for a field should be if one isn’t specified when a user is created.
With that sorted, let’s set up some basic user authentication.
Setting up User Authentication
To implement role-based access control in our application, we’ll need to have users in our application which we’ll grant access to certain resources based on their roles. So in this section, we’ll set up some logic to handle user signup, login and everything that has to do with authentication. Let’s start with sign up.
User Signup
All authentication and authorization logic will live inside the `server/controllers/userController.js` file. Go ahead and paste the code below into the file and we’ll go through it in detail right after :
// server/controllers/userController.js

const User = require('../models/userModel');
const jwt = require('jsonwebtoken');
const bcrypt = require('bcrypt');

async function hashPassword(password) {
 return await bcrypt.hash(password, 10);
}

async function validatePassword(plainPassword, hashedPassword) {
 return await bcrypt.compare(plainPassword, hashedPassword);
}

exports.signup = async (req, res, next) => {
 try {
  const { email, password, role } = req.body
  const hashedPassword = await hashPassword(password);
  const newUser = new User({ email, password: hashedPassword, role: role || "basic" });
  const accessToken = jwt.sign({ userId: newUser._id }, process.env.JWT_SECRET, {
   expiresIn: "1d"
  });
  newUser.accessToken = accessToken;
  await newUser.save();
  res.json({
   data: newUser,
   accessToken
  })
 } catch (error) {
  next(error)
 }
}

.... // More content
Let’s break down the code snippet above, we have two utility functions: `hashPassword` which takes in a plain password value then uses `bcrypt` to hash the value and return the hashed value. `validatePassword` on the other hand, will be used when logging in to verify if the password is the same with the password the user provided when signing up. You can read more about bcrypt from the official documentation.
Then there’s the signup function, the email and password values will ideally be sent from a form then the `bodyParser` package will parse the data sent through the form and attach it to the `req.body` object. The provided data is then used to create a new user. Finally, after the user is created we can use the user’s ID to create a JWT, that JWT will be used to identify users and determine what resources they’ll be allowed to access.
The `JWT_SECRET` environmental variable holds a private key that is used when signing the JWT, this key will also be used when parsing the JWT to verify that it hasn’t been compromised by an authorized party. You can easily create the `JWT_SECRET` environmental variable by adding it to the `.env` file in the project directory, you can set the variable to any value of your choice:
//.env
JWT_SECRET={{YOUR_RANDOM_SECRET_VALUE}}
There are multiple functions above prefixed with the async keyword, this is used to indicate that an asynchronous operation using Javascript Promises is going to take place. If you aren’t quite familiar with how Async/Await works, you can read more about it here.
With that done, let’s set up the login logic.
User Login
Let’s also set up user login, go ahead and paste the following code below at the bottom of the `server/controllers/userController.js` file:
// server/controllers/userController.js

...

exports.login = async (req, res, next) => {
 try {
  const { email, password } = req.body;
  const user = await User.findOne({ email });
  if (!user) return next(new Error('Email does not exist'));
  const validPassword = await validatePassword(password, user.password);
  if (!validPassword) return next(new Error('Password is not correct'))
  const accessToken = jwt.sign({ userId: user._id }, process.env.JWT_SECRET, {
   expiresIn: "1d"
  });
  await User.findByIdAndUpdate(user._id, { accessToken })
  res.status(200).json({
   data: { email: user.email, role: user.role },
   accessToken
  })
 } catch (error) {
  next(error);
 }
}
The code above is very similar to that of signing up. To log in, the user sends the email and password used when signing up, the `validatePassword` function is used to verify that the password is correct. When that’s done, we can then create a new token for that user which will replace any previously issued token. That token will ideally be sent by the user along in the header when trying to access any restricted route.
That’s all for authentication, next we’ll create the three roles previously specified and also define permissions for each role.
Creating roles with AccessControl
In this section, we’ll create specific roles and define permissions on each role for accessing resources. We’ll do this in the `server/roles.js` file, once again copy and paste the code below into that file and we’ll go through it after:
// server/roles.js
const AccessControl = require("accesscontrol");
const ac = new AccessControl();

exports.roles = (function() {
ac.grant("basic")
 .readOwn("profile")
 .updateOwn("profile")

ac.grant("supervisor")
 .extend("basic")
 .readAny("profile")

ac.grant("admin")
 .extend("basic")
 .extend("supervisor")
 .updateAny("profile")
 .deleteAny("profile")

return ac;
})();
All roles and permissions were created using the `Accesscontrol` package, it provides some handy methods for creating roles and defining what actions can be performed by each role, the `grant` method is used to create a role while methods such as `readAny`, `updateAny`, `deleteAny`, etc… are called action attributes because they define what actions each role can perform on a resource. The resource, in this case, is `profile`. To keep our application simple and to the point, we defined minimal actions for each role.
Inheritance between roles can be achieved using the `extend` method, this allows a role to inherit all attributes defined on another role. The `Accesscontrol` package provides a plethora of features and if you want to dig deeper, there’s an in-depth official documentation available.
Setting up Routes
Next up, we’ll create routes for parts of our application. Some of these routes contain resources that we want to limit to only users with specific roles.
But before that let’s set up the logic for the routes, functions which will be plugged in as middlewares into the various routes. We’ll be creating functions for retrieving all users, getting a particular user, updating a user and then deleting a user.
Once again, paste the code below to the bottom of the `server/controllers/userController` file:
// server/controllers/userController.js

...

exports.getUsers = async (req, res, next) => {
 const users = await User.find({});
 res.status(200).json({
  data: users
 });
}

exports.getUser = async (req, res, next) => {
 try {
  const userId = req.params.userId;
  const user = await User.findById(userId);
  if (!user) return next(new Error('User does not exist'));
   res.status(200).json({
   data: user
  });
 } catch (error) {
  next(error)
 }
}

exports.updateUser = async (req, res, next) => {
 try {
  const update = req.body
  const userId = req.params.userId;
  await User.findByIdAndUpdate(userId, update);
  const user = await User.findById(userId)
  res.status(200).json({
   data: user,
   message: 'User has been updated'
  });
 } catch (error) {
  next(error)
 }
}

exports.deleteUser = async (req, res, next) => {
 try {
  const userId = req.params.userId;
  await User.findByIdAndDelete(userId);
  res.status(200).json({
   data: null,
   message: 'User has been deleted'
  });
 } catch (error) {
  next(error)
 }
}

...
The functions above are quite straightforward and can easily be understood without much explanation. Let’s focus rather on creating middleware for restricting access to only logged in users and also a middleware for allowing access to only users with specific roles.
Once again paste the following code at the bottom of the `server/controllers/userController.js` file:
// server/controllers/userController.js

...

// Add this to the top of the file
const { roles } = require('../roles')

exports.grantAccess = function(action, resource) {
 return async (req, res, next) => {
  try {
   const permission = roles.can(req.user.role)[action](resource);
   if (!permission.granted) {
    return res.status(401).json({
     error: "You don't have enough permission to perform this action"
    });
   }
   next()
  } catch (error) {
   next(error)
  }
 }
}

exports.allowIfLoggedin = async (req, res, next) => {
 try {
  const user = res.locals.loggedInUser;
  if (!user)
   return res.status(401).json({
    error: "You need to be logged in to access this route"
   });
   req.user = user;
   next();
  } catch (error) {
   next(error);
  }
}
The `allowIfLoggedIn` middleware will filter and only grant access to users that are logged in, the `res.locals.loggedInUser` variable holds the details of the logged-in user, we’ll populate this variable very soon.
The `grantAccess` middleware, on the other hand, allows only users with certain roles access to the route. It takes two arguments `action` and `resource`, `action` will be a value such as `readAny`, `deleteAny`, etc.. this indicates what action the user can perform while `resource` represents what resource the defined action has permission to operate on e.g `profile`. The `roles.can(userRole)[action](resource)` method determines if the user’s role has sufficient permission to perform the specified action of the provided resource. We’ll see exactly how this works next.
Let’s create our routes and plug in the necessary middleware, add the code below to the `server/routes/route.js` file:
// server/routes/route.js
const express = require('express');
const router = express.Router();
const userController = require('../controllers/userController');

router.post('/signup', userController.signup);

router.post('/login', userController.login);

router.get('/user/:userId', userController.allowIfLoggedin, userController.getUser);

router.get('/users', userController.allowIfLoggedin, userController.grantAccess('readAny', 'profile'), userController.getUsers);

router.put('/user/:userId', userController.allowIfLoggedin, userController.grantAccess('updateAny', 'profile'), userController.updateUser);

router.delete('/user/:userId', userController.allowIfLoggedin, userController.grantAccess('deleteAny', 'profile'), userController.deleteUser);

module.exports = router;
We’ve created our routes and plugged in the created functions as middleware to enforce certain restrictions on some of these routes. If you look closely at the `grantAccess` middleware you can see we specify that we only want to grant access to roles that are permitted to perform the specified action on the provided resource.
Lastly, let’s add the base server file located at `server/server.js`:
// server/server.js
const express = require('express');
const mongoose = require('mongoose');
const bodyParser = require('body-parser');
const jwt = require('jsonwebtoken');
const path = require('path')
const User = require('./models/userModel')
const routes = require('./routes/route.js');

require("dotenv").config({
 path: path.join(__dirname, "../.env")
});

const app = express();

const PORT = process.env.PORT || 3000;

mongoose
 .connect('mongodb://localhost:27017/rbac')
 .then(() => {
  console.log('Connected to the Database successfully');
 });

app.use(bodyParser.urlencoded({ extended: true }));

app.use(async (req, res, next) => {
 if (req.headers["x-access-token"]) {
  const accessToken = req.headers["x-access-token"];
  const { userId, exp } = await jwt.verify(accessToken, process.env.JWT_SECRET);
  // Check if token has expired
  if (exp < Date.now().valueOf() / 1000) {
   return res.status(401).json({ error: "JWT token has expired, please login to obtain a new one" });
  }
  res.locals.loggedInUser = await User.findById(userId); next();
 } else {
  next();
 }
});

app.use('/', routes); app.listen(PORT, () => {
  console.log('Server is listening on Port:', PORT)
})
In the file above we did some more package configurations, set up what port our server should listen on, used `mongoose` to connect to our local MongoDB server and also configured some other necessary middleware.
There’s an important middleware above and we’ll go through it next:
...

app.use(async (req, res, next) => {
  if (req.headers["x-access-token"]) {
   const accessToken = req.headers["x-access-token"];
   const { userId, exp } = await jwt.verify(accessToken, process.env.JWT_SECRET);
   // Check if token has expired
   if (exp < Date.now().valueOf() / 1000) {
    return res.status(401).json({
     error: "JWT token has expired, please login to obtain a new one"
    });
   }
   res.locals.loggedInUser = await User.findById(userId);
   next();
  } else {
   next();
  }
});

...
Remember, a token is sent by the user whenever they want to access a secure route. The above middleware retrieves a token from the `x-access-token` header, then uses the secret key used in signing the token to verify that the token hasn’t been compromised. When that check is complete, the token is then parsed and the user’s ID is retrieved, we also add an extra verification to make sure the token hasn’t expired. When all that is done, the user’s ID is then used to retrieve all other necessary details about the user and that is stored in a variable which can be accessed by subsequent middleware.
Testing the Application
We’ve just finished developing our app, it’s time to use it. Make sure you’re still in your project directory, then issue the following command to your terminal:
node server/server.js
This will start up the Node server and tell it to listen on port 3000.
To avoid errors, make sure you have your MongoDB server running locally, if you aren’t too familiar with how to do this, there’s a detailed documentation showing relevant steps on how to get the MongoDB server running locally.
Finally, we’ll be using Postman to test our application, it provides handy tools that we can use to send requests to an API. First of all, let’s create a user with a `basic` role:
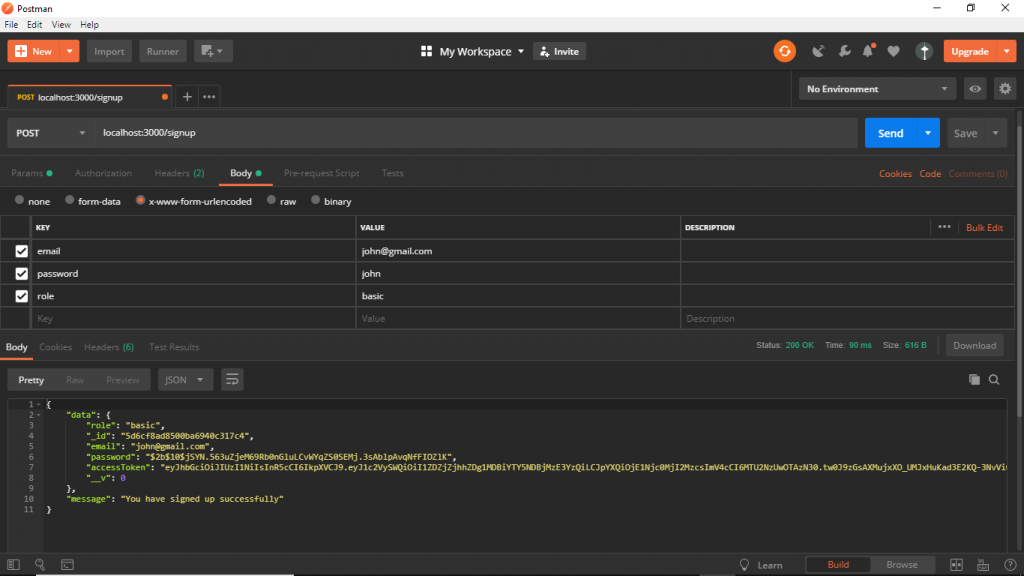
In the image above, we use Postman to send a request to our Node API to create a new user with a `basic` role, the response contains the created user details along with an access token, which will be sent along in the header when making a request to any secure route, so make sure you store that token somewhere.
Let’s try and access one of the secure routes, specifically the route that allows a user to retrieve all existing users. It is expected that the user wouldn’t be granted access to that route because they have a role with insufficient permissions. Once again we’ll use Postman to test this:
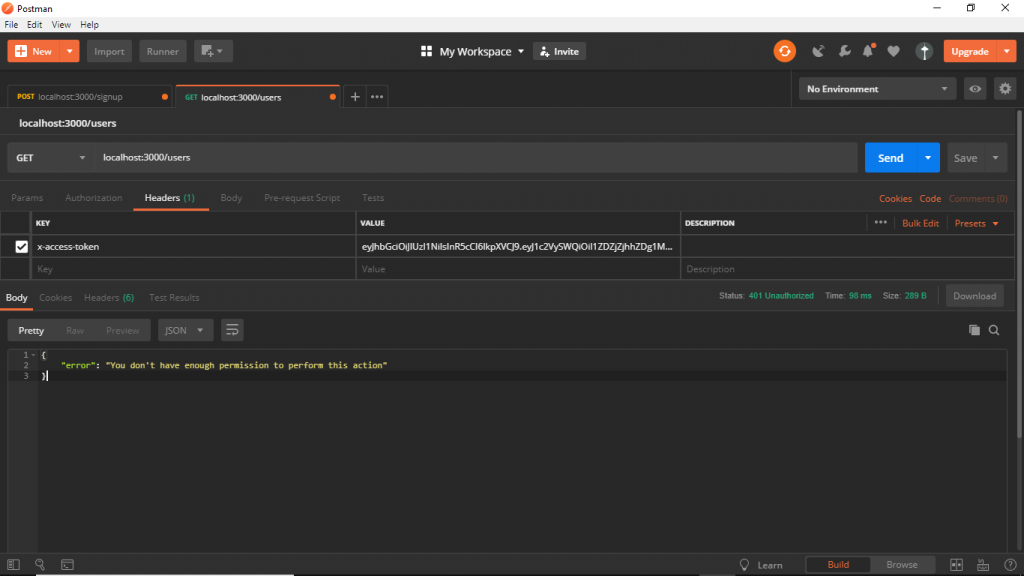
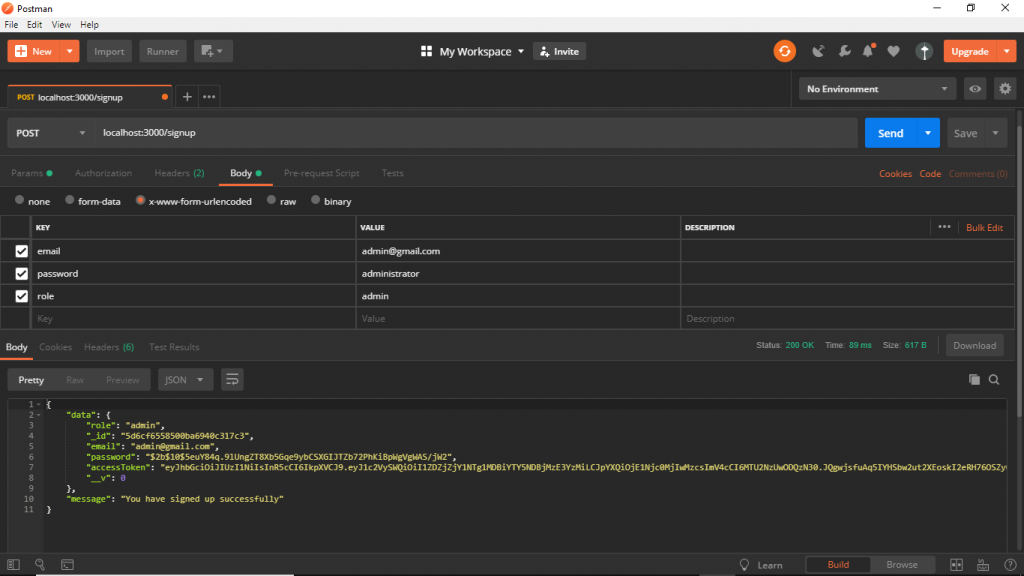
As you can see above, an error is thrown when the user tries to access that route because they don’t have enough permission attributed to their role to perform the required action there. Lastly, create a new user with an `admin` role and then try accessing any of the restricted routes.
And then let’s try accessing the route to get the information of all users that have signed up:
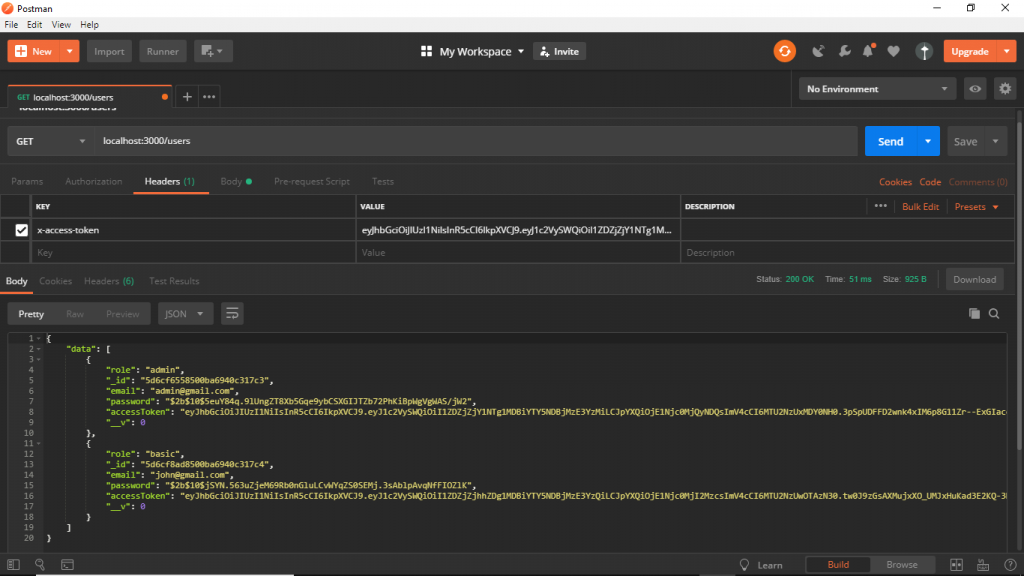
As we can see, the user was allowed to access the route and was able to get the details of all existing users. You can go ahead and play around by creating more restricted routes, roles, and users.
Conclusion
In this article, you learned how to add role-based access control to a Node application by restricting access to certain parts of your application to only users with specific roles. On the side, you also got to learn how to add authentication to your Node application using a JWT which is pretty cool. In the end, you’ve been able to get a pretty solid and practical implementation which will enable you to easily implement similar solutions in current and future projects.
Did you enjoy the article and the tools used? let me know in the comments below.


Nice article. can you share de source code? thanks
Thanks for the feedback.
I’ll add a link to the source code
thanks.
hi bro i need your help
i add more feilds in schema like first name last name address etc when i signup api chek in post man so i see this error so plz help me thanks: Error(user validation failed: address: Path `address` is required.)
Thanks man, this was very helpful regarding the accesscontrol package and how to use it.
we are very glad you found the article of value!
Hello Adrien,
Happy to hear you found the article helpful, thanks for the feedback
great one sir more grace to you sir…. I appreciate you sir.. but would appreciate if we can have the react version of this so as to give us a full stack experience sir
hey! thanks for your message! i’ll forward your request to the writer!
Hello Jeremiah,
Thanks a lot for your kind words and for the feedback
I’ll certainly take your request under consideration and would let you know when another article of such is in the works, thank you.
Hiii,
i need help..!
when i access getting all users using postman it throws an error stating “You need to be logged in to access this route”
but i have provided token in headers as mention in above tutorial
Can you please help?
Hello,
If possible, could you send a link to your repo where your code is hosted or some snapshots of your code
i have got the same problem please help!!
Can you please tell how you solved this problem? Because, i have the same
I have the same problem, in postman when i try to access ‘\users’ route , i have an error “You need to be logged in to access this route”. But I but i have provided token in headers as mention in above tutorial. Can you please help me?
Hey man great article. Could you help with, how can I implement multiple actions for the same routes? For example, for deleting and updating user both basic and admin has permission. But how do I pass that value in routes?
router.put(‘/user/:userId’, userController.allowIfLoggedin, userController.grantAccess(‘updateAny’ or ‘updateOwn, ‘profile’), userController.updateUser);
router.delete(‘/user/:userId’, userController.allowIfLoggedin, userController.grantAccess(‘deleteAny’ or ‘deleteOwn’, ‘profile’), userController.deleteUser);
Amazing work!
The only point I see is that your are creating the access control and providing grants in an IIFE function. When you retrieve these permissions from a data base and you modify this permissions, this function cannot be called again in order to update the access control.
Hi Tamzid,
I’m glad you liked the article
That should be possible although I’d recommend you separate concerns
At a glance, a way to this would be to send an object as the first parameter of the `grantAccess` method e.g
…`userController.grantAccess({ updateAny : true, updateOwn : true }, ‘profile’);`
However, If you use the above method, you’d have to make quite some changes to the `userController.grantAccess` method to handle any alternative flows.
If you want to discuss more about it you could send me an email, thanks!.
Awsome article, this is gold.
One question, though, Where does “profile” come from?
did you make angular project with this style of code
Hi Marawan,
Not yet, but I’ll see if I can work on that
Hi Jorge,
Thanks a lot for the feedback, happy you found the article useful.
You can think of “profile” as a custom resource. We use the word “profile” to indicate a user’s profile, any other word could be used as well, it isn’t necessarily fixed or imported from anywhere else.
Then we specify that only certain roles should be allowed to perform a particular action on that resource(in this case the user profile). E.g A user with a “supervisor” role can view a user’s profile but only a user with the “admin” role should be allowed to update or delete a profile
Is that a bit clearer?
Thanks buddy. This is very helpful article. How it will work with Front-End (Angular 2+)? Can you please create article for this? I am Fresher and want to learn Angular also. Thanks.
Hi Nitin,
Thanks for your comment, great to hear you found the article helpful.
I’ll take your reply into consideration and see if I can create something that’ll work together with Angular 2+.
i will try convert to Typescript but also error in defined action parameter
He said ” Element implicitly has an ‘any’ type because expression of type ‘any’ can’t be used to index type ‘Query’ “, any suggestions about this
Hi Sebastianus,
I believe this error can be solved by explicitly specifying a type for that variable
thank you so much I learned good things, it would be great if make a post on ui handling according to authorization
Hi,
It is not recognizing roles.can as a function. can u help me with this.
This article was helpful to me. Thank you
Controller functions are not good.
Please share source code.
Hi Vedret,
Here’s a link to the source code: https://github.com/devgson/soshace-rbac
Hi Godson Obielum,
i tried Implementing Role-Based Access Control in a Nodejs application , its a nice article regarding the RBAC , but i have few quires regarding this
1. when i tried the implementation of RBAC – i signed up and tried to get users information , i got a msg saying you need to login to access this route, after login also am getting the same msg you need to login to access this route why?
2. so i tried to clone your project from the git hub repository and again i tried. this time it showed the users information without login just i signed up the user.
3. Actually when a user is signed up and login then only need to display the users information right? without login it shouldn’t show the user information, but why its showing the users information.
I hope you got my quires and waiting for a response from your end.
Thanks
NagaTeja
Thank you for this tutorial, it was very helpful to me
@Godson Obielum,
Nice article you are sharing us! It is easy to understand! Thanks for that!
Can you add a logout functionality if it is possible?
It is easy to apply with cookie but when I try to delete x-access-token, I couldn’t.
Can you suggest me how to apply logout functionality? Thanks
Really nice article. Example given with exact steps gives detailed understanding of RBAC using accesscontrol npm package.
Hi, Great Article! I just have one question. How will you be able to integrate this into the front-end?
First of all, thank you, Godson. I have one question regarding the passing [action] and (resources) now what if I want to pass for admin “readAny” and for basic “readOwn” on the same route? Thanks in advance
hi bro i need your help
i add more feilds in schema like first name last name address etc when i signup api chek in post man so i see this error so plz help me thanks: Error(user validation failed: address: Path `address` is required.)
where is source code link??
I found one issue with this or my understanding might be wrong, Here the role is passed in request body, based on role the permissions are granted. But the whether the role belongs to that user or not is not checked, a user can send an api request by changing a role, may be via postman or curl request. In my opinion role should be encapsulated in JWT while authenticating a user , so that it will be immutable by user.
I have read your blog on Securely Manage User Access and Permissions in Web Applications.It was very interesting and helpful but I can add some extra points in your article. Here some extra points:
1.Maintain Security During Web App Development.
2.Be Paranoid: Require Injection & Input Validation (User Input Is Not Your Friend)
3.Encrypt your data.
4.Use Exception Management.
5.Apply Authentication, Role Management & Access Control.