
This series of articles is written purely for learning purposes. I do not want to be part of the “Web Components vs Frameworks” beef and I have no opinion on this matter!
The series aims to show what Web Components are, put them in parallel for comparison with Frameworks to understand the differences and the needs each of them answer. You’re looking at part 1 here, in which I talk about Native support vs Virtual DOM.
Using a JavaScript framework raises a couple of problems. Say you’re a company looking to build an App. You put together a team of developers who will spend hours discussing which tools to use until deciding on a JS Framework that “everybody’s using”.
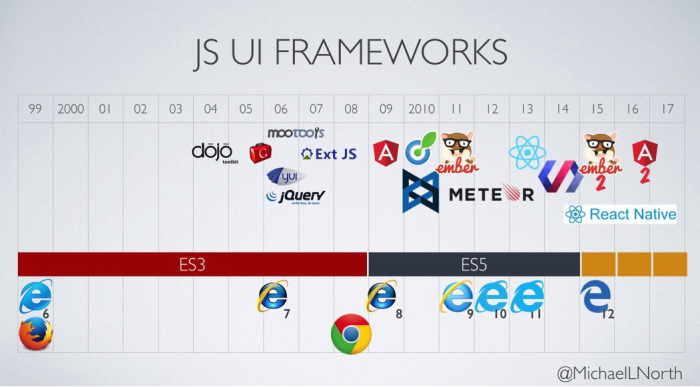
A lot of these trendy frameworks end up “legacy” in a couple of years, which in the Web Development World translates to ages. This leads to either costing in maintenance or in technical debt.
Will X framework last? Is framework Y better ? Will either even exist in Z years?
… Enter Web Components✨
First things first, let’s try to understand what Web Components are, and how Frameworks such as React compares to them.
Web Components
Web Components is an umbrella term for many technologies allowing you to create your own reusable HTML elements. According to the MDN Web Docs, they consist of the following:
- Custom elements: A set of JavaScript APIs that allow you to define custom elements and their behaviour, which can then be used as desired in your user interface. They follow the HTML specifications. We’ll take a look at them in the second part of the series.
- HTML templates: The
<template>and<slot>elements are user-defined HTML templates that enable you to write markup templates that are not rendered until called upon. These can then be reused multiple times as the basis of a custom element’s structure. We’ll talk about them later in the series. - Shadow DOM: It provides a way to attach a hidden separated ‘shadow’ DOM tree to an element “shadow host”, which is rendered separately from the main document DOM. This is this article’s main focus!
Frameworks
Frameworks are libraries that help you develop your application faster and smarter! React for instance provides a declarative library that keeps the DOM up to date with your data. It introduces the Virtual DOM that allows developers to take advantage of the performance of Server Side Rendering (SSR), without having to update the entire view every time a user made a small change to the User Interface.
Hold on… What’s SSR? It enables the app to render the initial state of the view before showing it to the user!
Shadow DOM
a) Properties
Web components use the shadow DOM, one of the four Web Component standards: HTML Templates, Shadow DOM , Custom elements and HTML Imports.
Anything in the shadow DOM becomes local to the hosting element. This includes the styling of the shadow DOM’s children as well as other properties such as selectors. Let’s go over a small example quickly.
Say we wish to create an element called <my-element></my-element> and we want it to have completely different styling than its parent.
Let’s first set up our index.html page from which we call our <my-element> :
<!DOCTYPE html>
<html>
  <head>
    <meta charset="UTF-8" />
    <meta name="viewport" content="width=device-width, initial-scale=1.0" />
    <meta http-equiv="X-UA-Compatible" content="ie=edge" />
    <script src="index.js"></script>
  </head>
  <body>
    <style>
      div {
        padding: 10px;
        background: brown;
        font-size: 25px;
      }
      label {
        color: black;
        font-weight: lighter;
      }
    </style>
    <div class="root">
      <label>Knock Knock...</label>
      <my-element></my-element>
    </div>
  </body>
</html>
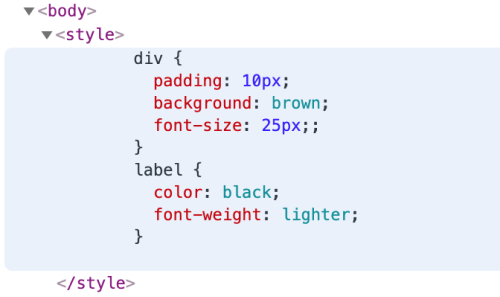
As you can see here, our <div>s have a styling assigned to them from the <style> element. Our goal here is to make sure that any <div> child of my-element will have different styling than the <div>s that are not its children, so in our case the <div> wrapping “Knock Knock…” and the one wrapping all of our components.
Let’s now go to our index.js file. We attach a shadow DOM to our element to make use of the shadow DOM’s scoped CSS property.
// Select my element
const el = document.querySelector("my-element");

// Attack shadow dom mode: open or closed
el.attachShadow({ mode: "open" });

// Get the shadow root
const shadowRoot = el.shadowRoot;
The mode can be either open or closed depending on whether you want to the shadow DOM to be attached to the main DOM tree (and be able to see our show DOM) or not.
Having an open mode also means that we can access the shadow DOM’s properties from outside using JavaScript from index.js file. This means that if we have a closed mode, we cannot access the shadow DOM’s properties, such as shadowRoot which is essential if we want to configure its inner HTML (add styling and some children HTML elements).
Keeping that in mind, let’s add some styling 💅
if (shadowRoot) {
  shadowRoot.innerHTML = `
  <style>
    :host { /* Selects a shadow root host,*/
      all: initial; /* Specifies that all the element's properties should be changed to their initial values. */
      display: flex;
      flex-direction: column;
      background: black;
      font-size: 2.5rem;
    }
    label {
      color: white;
    }
  </style>
  <div>
    <label>Who's there?</label>
  </div>
`;
}
Note: The
if(shadowRoot)statement prevents crashing the page with a null pointer error if we choose the shadow DOM’s mode to be closed. So here we’re basically saying if the shadow DOM’s mode is open (as in, ifshadowRootis not null), then we configure its inner HTML by adding a div wrapping the “Who’s there” sentence, and a styling to that div that is completely different than the styling from the index.html file.
You can play around the modes as you like here:

Notice in the main DOM tree as we said before, the difference between having the shadow DOM’s mode be closed:
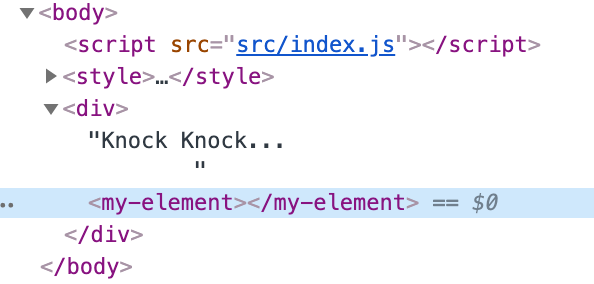
… and when it’s open:
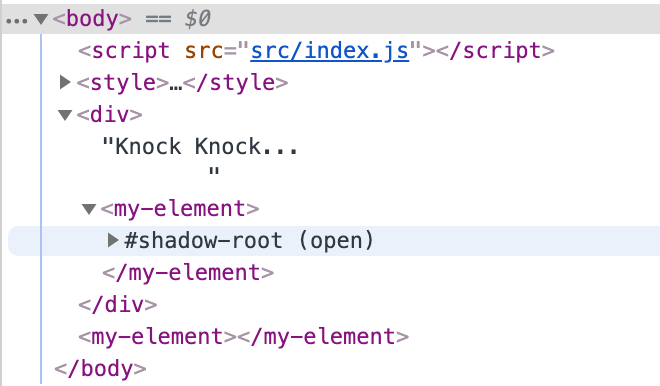
Let’s expand our my-element’s shadow root:
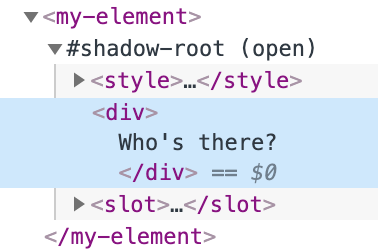
We can see our element’s shadow root children here ✨And you’ll notice once again that the styling of the shadow DOM:
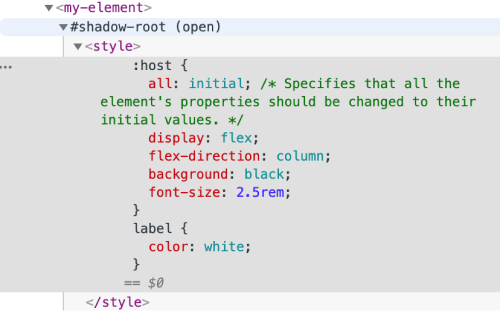
b) Performance
Shadow DOM also follows the Living Standard DOM specifications, so unlike Frameworks, Web Components provide native browser support. Here are the properties associated to it:
align, onwaiting, onvolumechange, ontimeupdate, onsuspend, onsubmit, onstalled, onshow, onselect, onseeking, onseeked, onscroll, onresize, onreset, onratechange, onprogress, onplaying, onplay, onpause, onmousewheel, onmouseup, onmouseover, onmouseout, onmousemove, onmouseleave, onmouseenter, onmousedown, onloadstart, onloadedmetadata, onloadeddata, onload, onkeyup, onkeypress, onkeydown, oninvalid, oninput, onfocus, onerror, …
Which leans to the following question: In terms of speed/performance, what does this translate to? This means that whenever any change occurs on the page, the entire DOM gets updated. More precisely re-rendering can put our app’s performance in danger.
Is there a way to only update only necessary changes? Enters the Virtual DOM…
Virtual DOM
The Virtual DOM works by modelling two copies of the DOM, the original and an updated version that reflects changes received from the view. It solves issues related to performance:
- Each element of your page is a child of the virtual DOM tree.
- If an element’s state is changed, a snapshot of the current virtual DOM tree is taken, and a new tree with the updates is created.
- Both trees, as in the snapshot and newly updated tree, are compared in a process called “diffing”. With this, the virtual DOM can see which changes have been performed to the pre-updates tree to get the new one.
- The virtual DOM then performs the minimum number of operations required to perform the previously computed changes. So it only updates the parts of the main DOM tree that have changed.
Here’s an image to better visualise this:
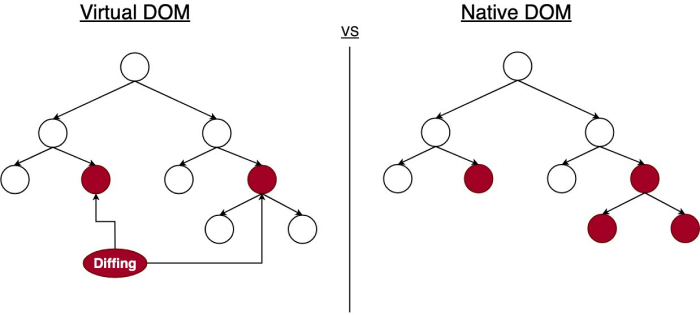
Steven Luscher made a great presentation on the differences of performance of the Virtual DOM compared to the native DOM in terms of fps!
In this way, the Virtual DOM overcomes a previous shortcoming of Server Side Rendering, where it was necessary to recreate the entire updated view.
Finally, unlike the Shadow DOM the Virtual DOM such the one from React only has a few properties:
"props": {},
  "_owner": null,
  "_lifeCycleState": "UNMOUNTED",
  "_pendingProps": null,
  "_pendingCallbacks": null,
  "_pendingOwner": null
Which again means better performance ✨
Conclusion
Native support uses the shadow DOM. So anything becomes local to the hosting element which gives the shadow DOM the following properties:
- Isolated DOM: We cannot access the shadow DOM from outside using JavaScript.
- Scoped CSS: Remember, we said that anything in the shadow DOM becomes local. This includes the
<style>component which means the styling in the shadow DOM is different from the rest of the main DOM. - Simplified CSS: We can use simple CSS selectors without worrying about name conflicts.
- Better reasoning: By dividing the main DOM tree into multiple shadow DOM trees.
This comes with a cost of performance, although only when comparing the use of shadow DOM vs virtual DOM.
As your app grows larger, you might want to use and re-use your native element. Stay tuned for what’s next we’ll look at how we can take advantage of custom elements to build customisable and re-usable components for your app. 👀 🔥
Notice: I hope this article was helpful, or that you gained something from it! My brothers and I are learning more about Web Dev and publish articles on a monthly basis. Follow me on twitter @anssam_ghezala to get in touch! 🙂


