

In this article, we are going to explore all the popular design patterns used in JavaScript. We will discuss how to implement these patterns and why we need to build them.
We will discuss:
- Creational Patterns
- Factory pattern
- Abstract factory pattern
- Prototype pattern
- Builder pattern
- Structural Patterns
- Adapter Pattern
- Decorator
- Composite
- Behavioral Patterns
- Chain of Responsibility
- Observer
- Mediator
By the end of this article, you will have a better understanding of the design patterns and when and why to apply them. Let’s dive in 🔥
🏭Factory pattern
This is one of the very basic patterns in JavaScript. You may already be using this pattern without knowing about it. In factory patterns, we define a function (a factory function) that is responsible for creating similar objects.
Let’s elaborate on this with a simple example. Let’s say we are building an application for a delivery company. So whenever a new delivery request is created we handle that in our application like this:
class Delivery {
  constructor(address, item) {
    this.address = address;
    this.item = item;
  }
  //... rest of the class
}

const delivery = new Delivery(
  "178 Deli Ave, Toronto, ON, Canada",
  "Nitendo 360"
);
It is a very basic class. We pass in two parameters, the address and the delivery item, and create a new instance of that class. So let’s say when we started our business, we were only delivering by bikes. Now after a couple months, our user base has grown: we have more clients and need to deliver to distant places. So we’ve decided that based on the address — if the distance is more than 10 km, we will deliver by car, and if the distance is more than 50 km, we will deliver by truck. Now the problem is how we encapsulate our business logic so that it is decoupled and in the future, we can introduce new changes as easily as necessary. For instance, maybe in the future, we want to add the delivery by air or by sea options.
🏭Factory Pattern to rescue….
We can create a `factory method` which will dynamically create the delivery instance. Let’s take a look at the code below.
function deliveryFactory(address, item) {
  // ... calculate the distance first
  if (distance > 10 && distance < 50) {
    return new DeliveryByCar(address, item);
  }

  if (distance > 50) {
    return new DeliveryByTruck(address, item);
  }

  return new DeliveryByBike(address, item);
}
Above we have our factory function that calculates the distance first and then initiates a proper delivery class instance. We have our different delivery method classes declared like this
class DeliveryByBike {
  constructor(address, item) {
    this.address = address;
    this.item = item;
  }
  // rest of the class
}

class DeliveryByTruck {
  constructor(address, item) {
    this.address = address;
    this.item = item;
  }
  // rest of the class
}

class DeliveryByCar {
  constructor(address, item) {
    this.address = address;
    this.item = item;
  }
  // rest of the class
}
We can create the delivery instance through the factory method like below.
const newDelivery = deliveryFactory(
 "121 baily ave, Toronto, canada",
 "nitendo 360"
);
This allows us to encapsulate our delivery logic. Our code is now decoupled. We can add new delivery classes (i.e. delivery by air or delivery by sea) if we want to without touching the existing logic. We can also introduce changes easily if we have to. For example, let’s say we want to add additional fees if it is delivered by truck. We can just add that to the truck class without worrying about breaking anything.
💡 Would you like to know how to implement factory pattern in React.js? Head over to the this article
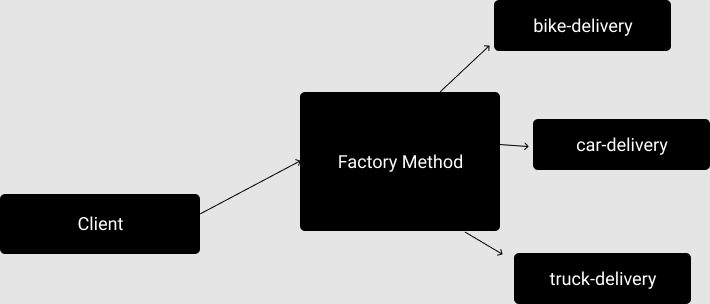
above is the visualization for factory pattern.
Abstract Factory
We can take the idea of a factory pattern one step further. We can introduce another layer of abstraction around the factory method. But why would we want to do that?
Let’s imagine our business logic has become more complex. We added two new features. The first is the same day delivery and second is express delivery. Same day delivery is only available for some address, so now we have to check for that logic and express delivery is only available by truck and air. So we would want to add another layer of abstraction around our factory.
Let’s take a look at the diagram below.
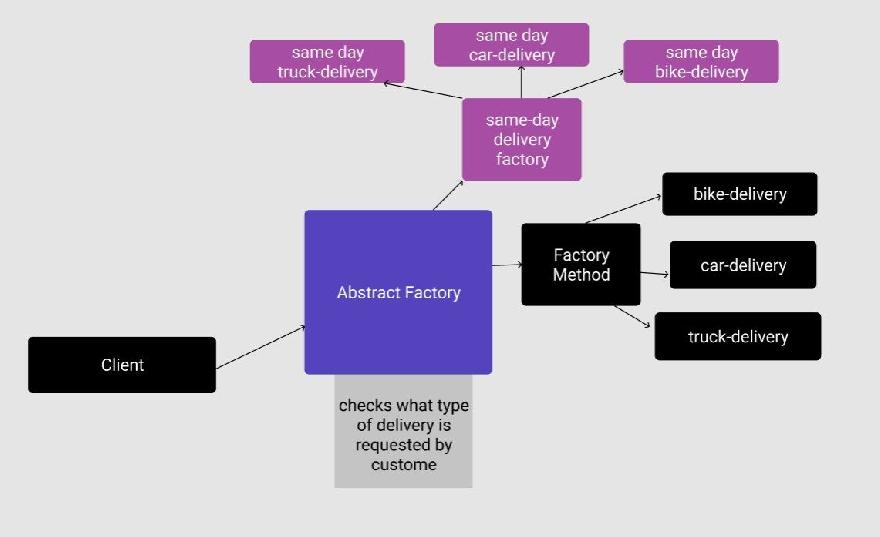
We will have an `abstract factory` function that will call our factory functions and factories will do the instantiations.
Let’s take a look at the code to implement this
function abstractFactory(address, item, options) {
 if (options.isSameday) {
   return sameDayDeliveryFactory(address, item);
 }
 if (options.isExpress) {
   return expressDeliveryFactory(address, item);
 }

 return deliveryFactory(address, item);
}
`sameDayDeliveryFactory` and `expressDeliveryFactory` are other factory functions that create and return an appropriate instance of the class.
🤖Prototype pattern
JavaScript language is based on prototype-based inheritance. Therefore prototype pattern is one of the most commonly used patterns. Chances are you are already using it. In a prototype pattern, we create new instances of objects by cloning them from a prototype. We also add new properties to that newly created object in run-time. Let’s elaborate on this with a simple example.
const vehicle = {
type: "",
transport(item) {
console.log("transport", item);
}
};
const car = Object.assign({}, vehicle);
car.type = "civic";
car.engine = "v6";
const car2 = Object.assign({}, vehicle);
car2.type = "ford";
car2.engine = "v8";
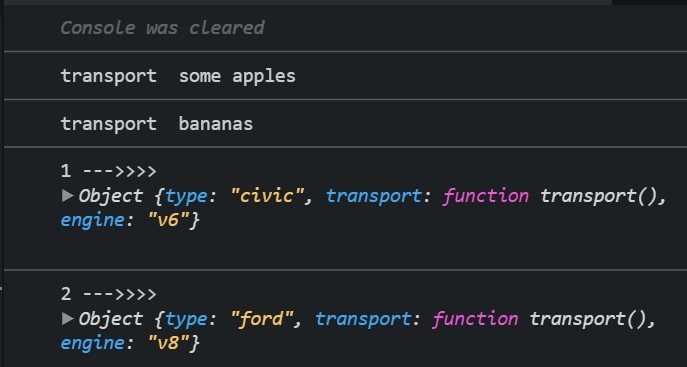
car.transport("some apples");
car2.transport("bananas");
console.log("1 --->>>>", car);
console.log("2 --->>>>", car2);
We have a vehicle object. Which is our prototype. We create `car` and `car2` instances of that object and we automatically inherit a vehicle’s behavior. The code above outputs the following.
👷 Builder Pattern
This creational pattern is used to build complex objects step by step. This pattern allows you to create a different representation of an object using the same class constructor. This pattern is more common in pure OOP languages such as Java and C#.
Let’s look at a scenario to better understand why we would need something like a builder pattern. Let’s say we have an application where a user can have a customized profile. We will give the user the ability to change certain attributes like
- Menu location
- Profile Picture
- Theme
- Menu Items
So to do this we will have a class that looks like this
class Profile {
 constructor(
   menuLocation = "top",
   borders = "normal"
   theme = "dark",
   profileImage = "default.jpg"
 ) {
   this.menuLocation = menuLocation;
   this.borders = borders;
   this.theme = theme;
   this.profileImage = profileImage;
 }
}
This works. However, soon we realize that we need to pass more arguments to our constructor because our app is getting popular, and users want more customization.
class Profile {
 constructor(
   menuLocation = "top",
   borders = "normal",
   theme = "dark",
   profileImage = "default.jpg",
   backgroundImage = "default.png",
   backgroundColor = "cyan",
   profileFont = "Roboto Mono"
 ) {
   this.menuLocation = menuLocation;
   this.borders = borders;
   this.theme = theme;
   this.profileImage = profileImage;
   this.backgroundImage = backgroundImage;
   this.backgroundColor = backgroundColor;
   this.profileFont = profileFont;
 }
}

new Profile(null, "soft", "dark", null, null, "red");
Now we are passing in too many arguments in our Profile class as it grows. This will result in a messy code that is hard to test and prone to errors.
To avoid such situation we create a builder class
class ProfileBuilder {
 constructor(){ }

 /* Define all the steps needed to create a profile */

 setMenu(position) {
     this.menuLocation = position;
     return this;
 }

 setBorders(style) {
     this.borders = style;
     return this;
 }

 setTheme(style) {
     this.theme = style;
     return this;
 }

 setCoverImage(url) {
     this.coverImage = url;
     return this;
 }

 setBackgroundColor(color) {
     this.backgroundColor = color;
     return this;
 }

 setMenuColor(color) {
     this.menuColor = color;
     return this;
 }

 setProfileFont(fontFamily) {
     this.profileFont = fontFamily;
     return this;
 }

 /* Could also be called getProfile() */
 build() {
     return new Profile(this);
 }
}
We will also change our `Profile`class to accept a builder instance instead of each argument.
class Profile {
 constructor(builder) {
   this.menuLocation = builder.menuLocation;
   this.borders = builder.borders;
   this.theme = builder.theme;
   this.profileImage = builder.profileImage;
   this.backgroundImage = builder.backgroundImage;
   this.backgroundColor = builder.backgroundColor;
   this.profileFont = builder.profileFont;
 }
}
Now we can explicitly call the builder class for our object creation and we can customize it as we want.
const userA = new ProfileBuilder()
 .setBorders("dotted")
 .setMenu("left")
 .setProfileFont("San Serif")
 .build();

console.log("user A", userA);
And that’s it. Builder pattern gives us a nice abstraction layer, as our application grows we require to create more custom objects and test them. This pattern makes that easier.
🔌Adapter Pattern
This pattern is used to convert one interface to another. Let’s say we have a flight ticket booking application. There are existing customers that are already using this application. So our old interface looks like this
// old interface
function TicketPrice() {
 this.request = function(start, end, overweightLuggage) {
   // price calculation ...
   return "$150.34";
 };
}
Now let’s say we want to add a new feature that calculates our ticket prices with a discount added feature. We want to give this discount to certain users. So some of our users will have to use the new interface.
// new interface
function NewTicketPrice() {
 this.discount = function(discountCode) { /* process credentials */ };
 this.setStart = function(start) { /* set start point */ };
 this.setDestination = function(destination) { /* set destination */ };
 this.calculate = function(overweightLuggage) {
     //price calculation ...
     return "$120.20";
 };
}
We don’t want the client application to make any changes to their API. How do we apply this new `interface` to the existing API? We use an adapter interface. Let’s take a look at the code below.
// adapter interface
function TicketAdapter(discount) {
 var pricing = new NewTicketPrice();

 pricing.discount(discount);

 return {
   request: function(start, end, overweightLuggage) {
     pricing.setStart(start);
     pricing.setDestination(end);
     return pricing.calculate(overweightLuggage);
   }
 };
}

const pricing = new TicketPrice();
const discount = { code: "asasdw" };
const adapter = new TicketAdapter(discount);

// old ticket pricing
var price = pricing.request("Toronto", "London", 20);
console.log("Old --->>> " + price);

// new ticket pricing
price = adapter.request("Toronto", "London", 20);
console.log("New ---->>>: " + price);
Rather using the new interface directly we create an adapter so that the client program can work without any significant changes.
🎍Decorator
In classical object-oriented programing, this pattern is used to give individual classes additional functionality. In JavaScript, we can apply the decorator pattern using higher-order functions.
ℹ️ P.S. Don’t confuse decorator patterns with Typescript/ES7 decorators. As these topics are beyond the scope of this article we will not be discussing them.
Let’s say we have a sandwich shop application. We have the following code for our sandwiches
let ingredients = {
  bread: "plain",
  meat: "chicked",
  mayo: true,
  mastard: true,
  lettuce: true,
  type: "6 inch"
};
class Sandwich {
  constructor(ingredients) {
    this.ingredients = ingredients;
  }

  getPrice() {
    return 5.5;
  }

  setBread(bread) {
    this.ingredients.bread = bread;
  }
}

let chickenSandwitch = new Sandwich(ingredients);
console.log(chickenSandwitch.getPrice());
Now once in a while, some clients order footlong. In our application, 6 inches is the default size of the sandwich. Some of the property of the sandwich needs to be changed but not all of them. In this case, we want to avoid code rewrites and use our existing codebase as much as possible. So we create a decorator function that adds in the additional logic like below.
function footLong(ingredients) {
 let sandwich = new Sandwich(ingredients);

 sandwich.ingredients.type = "foot long";

 let price = sandwich.getPrice();
 sandwich.getPrice = function() {
   return price + 3;
 };
 return sandwich;
}

let footlong = footLong(ingredients);
console.log("---->>", footlong.getPrice());
console.log("type", footlong.ingredients);
We can have any number of custom objects. For example, if we need to create a footlong beef sandwich in the future, we will just create another decorator function. Take a look at the code below.
function beefSandwichFootLong(ingredients) {
 let sandwich = footLong(ingredients);
 sandwich.ingredients.meat = "beef";
 let price = sandwich.getPrice();
 sandwich.getPrice = function() {
   return price + 1;
 };
 return sandwich;
}

let beefFootLong = beefSandwichFootLong(ingredients);
console.log("Beef foot", beefFootLong.ingredients.meat);
console.log("Beef foot price", beefFootLong.getPrice());
With our decorators, we have created a pattern that allows us to keep our code DRY (Do not repeat yourself). We are able to reuse our code through functional composition.
🌳Composite
Composite pattern is used to structure our code into a tree-like hierarchy. We have a root node which is our base object or class. This node will have many children which will inherit the parent functionality and add additional functionality to it. Children can have their own children to further enhance the functionality.
It may sound confusing at first. Let’s take a look at the structure for our imaginary application.
We will have a base class called vehicle and we will sub children that will inherit the vehicle properties and then override some of the properties.
class Vehicle {
 constructor() {
   this.type = "Car";
   this.model = "Honda Civic";
   this.engine = "v6";
   this.speed = "180 km/h";
   this.weight = "4000 kg";
   this.engineType = "gasoline";
 }

 drive() {
   console.log(`driving ${this.type} ${this.model} with ${this.speed}`);
 }

 refuel() {
   console.log("Fueling with regular gas");
 }

 getEngine() {
   console.log(`Getting Engine ${this.engine}`);
 }
}

const generic = new Vehicle();
generic.getEngine();
So here we got our vehicle class. Which is the root node in our composite tree? Now let’s say we would like to have a car, truck and SUV classes with slight modifications. We can implement that with es6 `extends`keyword and make a composite structure.
class Car extends Vehicle {
 drive() {
   super.drive();
   console.log("Also a car :) subclass");
 }
}

const car = new Car();
console.log(car.drive());

class Truck extends Vehicle {
 constructor() {
   super();
   this.type = "Truck";
   this.model = "Generic Truck Type";
   this.speed = "220 km/h";
   this.weight = "8000 kg";
 }

 drive() {
   super.drive();
   console.log(`A ${this.type} with max speed of ${this.speed}`);
 }
}

const truck = new Truck();
console.log("truck", truck.drive());
As you can see, we are overriding some of the behaviors of the parent and adding additional functionality. You can keep creating children like so with more complex functionality. The main benefit of having a composite pattern is that as our application grows we can easily create a complex entity from the existing one.
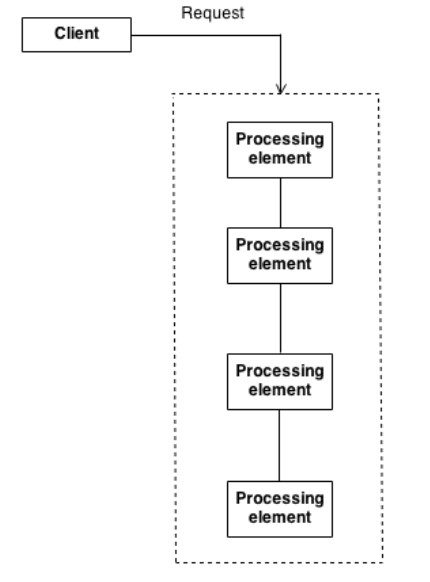
⛓️Chain of Responsibility
This is a common pattern in Node.js. If you have used Node.js middleware then you might have already been using it. The idea of this pattern is that a payload should not care about which function it will get processed by rather it will go through a chain of functions and appropriate function will process it.
Let’s take a look at a simple example.
// Apple request processor
function AppleProcess(req) {
 if (req.payload === "apple") {
   console.log("Processing Apple");
 }
}

// Orange request processor
function OrangeProcess(req) {
 if (req.payload === "orange") {
   console.log("Processing Orange");
 }
}

// Mango request processor
function MangoProcess(req) {
 if (req.payload === "mango") {
   console.log("Processing Mango");
 }
}
const chain = [AppleProcess, OrangeProcess, MangoProcess];
Above we have 3 process functions declared. We then put them in a `chain` array.
Next, we will create a `processRequest` function and pass this chain with a sample request.
function processRequest(chain, request) {
 let lastResult = null;
 let i = 0;
 chain.forEach(func => {
   func(request);
 });
}

let sampleMangoRequest = {
 payload: "mango"
};
processRequest(chain, sampleMangoRequest);
As we can see this is very similar to `Node.js` middleware pattern. When we are dealing with asynchronous data (i.e. express.js middleware) this pattern comes in handy.
🕵️Observer
One of the very popular patterns in ES6/ES7 is an observer pattern. In this pattern, an object (known as the subject) maintains a list of other objects (observers) depending on it, automatically notifying them of any changes of the state. Reactive frameworks like React.js, Vue.js are based on this pattern. We will implement a simple example of an observer.
Imagine we have an application where we have to update multiple elements in the DOM when an event occurs (i.e. user input, mouse clicks). Let’s say in our application we would like to change the state of `A`, `B` and `C` when the user starts inputting in the field. So we can have an `Observable` class and have `A`, `B` and `C` subscribe to it. So `A`, `B`, `C` will be listening for any changes and updated their states accordingly. Let’s say after user types in the first 3 characters in the input field we don’t want to change `C`. We want to stop listening to that event for `C`, in that case, we should also have an unsubscribe function in our `Observable` class. That way we can Let’s write our `Observable` class first.
class Observable {
 constructor() {
   this.observers = [];
 }
 subscribe(f) {
   this.observers.push(f);
 }
 unsubscribe(f) {
   this.observers = this.observers.filter(subscriber => subscriber !== f);
 }
 notify(data) {
   this.observers.forEach(observer => observer(data));
 }
}
Now we can create a couple DOM references
// some DOM references
const input = document.querySelector(".input");
const a = document.querySelector(".a");
const b = document.querySelector(".b");
const c = document.querySelector(".c");
With these DOM references, we can create a couple of observers
const updateA = text => a.textContent = text;
const updateB = text => b.textContent = text;
const updateC = text => c.textContent = text;
Then instantiate a new observable instance and subscribe to these observers
const headingsObserver = new Observable();

// subscribe to some observers
headingsObserver.subscribe(updateA);
headingsObserver.subscribe(updateB);
headingsObserver.subscribe(updateC);

// notify all observers about new data on event
input.addEventListener("keyup", e => {
 headingsObserver.notify(e.target.value);
});
This is a simplified version of an observer pattern. The concept of reactive programming is based on this pattern. Libraries like React.js, RxJs follows an observer pattern.
💡Want to learn more about Reactive Programming? Check this article out
👉How I reversed engineered RxJs and learned reactive programing
⚽Mediator
Our applications are made up of many classes. As our application becomes larger we add more of these classes and communication between these classes may become complex. This makes the code harder to read, test and maintain. With mediator pattern classes communicate through a mediator object. This way classes don’t depend on each other directly which lowers the coupling.
Let’s say we are building a chat room application (i.e. slack). Participants can join the chatroom by registering to the room. Participants can send messages to each other. The chatroom object in this application will work as a mediator. Each participant is represented by a participant object. The participant only sends the message and the Chatroom handles routing.
Let’s take a look at the code
class Participant {
  constructor(name) {
    this.name = name;
    this.chatroom = null;
  }

  send(message, to) {
    this.chatroom.send(message, this, to);
  }

  receive(message, from) {
    log.add(from.name + " to " + this.name + ": " + message);
  }
}

let Chatroom = function() {
  let participants = {};

  return {
    register: function(participant) {
      participants[participant.name] = participant;
      participant.chatroom = this;
    },

    send: function(message, from, to) {
      if (to) {                      // single message
        to.receive(message, from);
      } else {                       // broadcast message
        for (let key in participants) {
          if (participants[key] !== from) {
            participants[key].receive(message, from);
          }
        }
      }
    }
  };
};

// log helper
log = (function() {
    let log = '';

    return {
        add: msg => { log += msg + '\n'; },
        show: () => { alert(log); log = ''; }
    }
})();

function run() {
  let yoko = new Participant('Yoko'),
      john = new Participant('John'),
      paul = new Participant('Paul'),
      ringo = new Participant('Ringo'),
      chatroom = new Chatroom(),

  chatroom.register(yoko);
  chatroom.register(john);
  chatroom.register(paul);
  chatroom.register(ringo);

  yoko.send('All you need is love.');
  yoko.send('I love you John.');
  john.send('Hey, no need to broadcast', yoko);
  paul.send('Ha, I heard that!');
  ringo.send('Paul, what do you think?', paul);

  log.show();
}

run();
Conclusion
We have looked at some of the commonly used design patterns in JavaScript and their simple implementations. If you would like to take a step further, dig deeper into this topic and learn some of the other design patterns, the following books might help in your journey.
https://addyosmani.com/resources/essentialjsdesignpatterns/book/