As a web developer who had just started his career in web development, I was assigned a task of uploading images to a cloud storage, and for me, finishing the task was a challenge only because, before this, all the applications I developed or programmed were designed to store images either in the file-system of the application or stored as blob (Binary Object) in the database. Storing images on cloud storage was something that I hadn’t done before so I had to do a little research about what the cloud storage options are and which ones are available or suit the application I was developing.
After researching and consulting the client, I found a cloud storage option which was perfectly suiting the application and the client was okay with it too. The cloud storage option I found was Imgur. I found Imgur very comfortable and easy to work with and therefore in this article, we’ll use Imgur to store images for our application that we’re going to develop in this article.
What’s Imgur and why do you have to use one?
Imgur is a cloud storage provider specifically for storing images and videos.
So let’s get started,
Before diving into creating an application to utilize cloud storage, it’s important to understand the benefits of uploading and saving images in the cloud,
- First and foremost, images from cloud load much faster than that of images loading from a database or a file-system inside the application.
- Cloud storage can come at little or no cost for small to medium-sized organizations.
- It organizes and handles the data efficiently which means we don’t require resources to handle and organize data separately.
In this article, we’re going to develop a simple Angular application which is used to add and display photos. This application will use Imgur to store images that are added to this application.

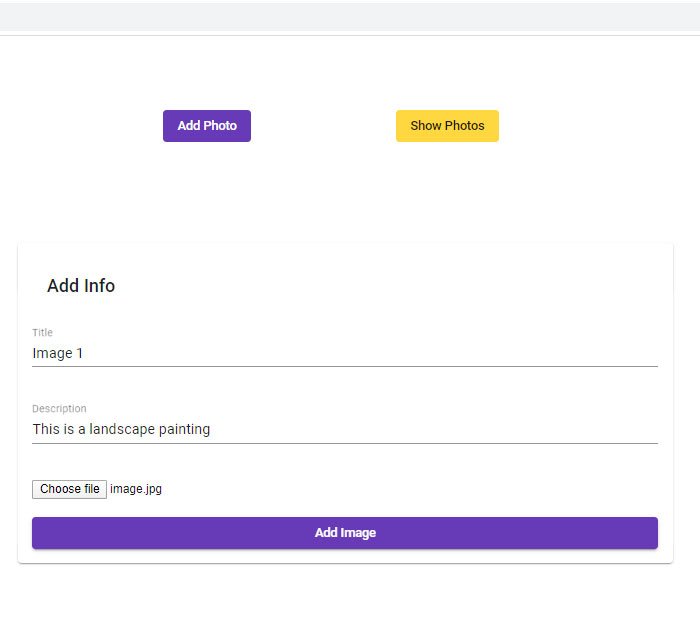
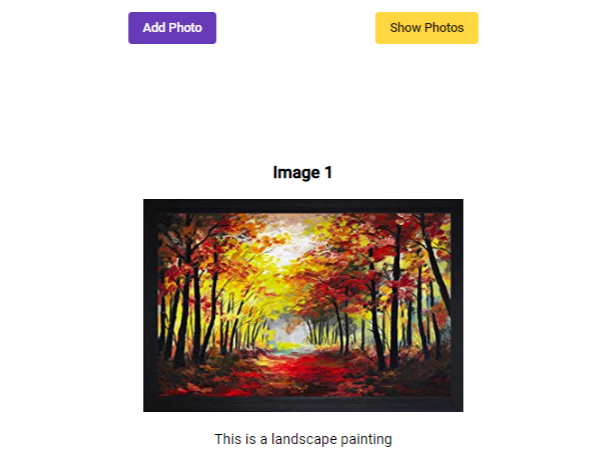
This is how the application is going to look after completion:

Requirements for the application:
- Angular (I’m using Angular 8 for this application)
- Node (Version 10 or higher)
- A text editor (I’m using Visual Studio Code for this application)
Next, type in the following commands in your command terminal/shell:
ng new imgurApp
ng add @angular/material
The first command creates a new angular application. Don’t forget to add angular-routing to your application, which will be prompted after running the first command.
The second command adds angular-material to our application. You’ll be prompted to choose a theme for your application, I’ve chosen deep purple-amber for this application feel free to use any theme.
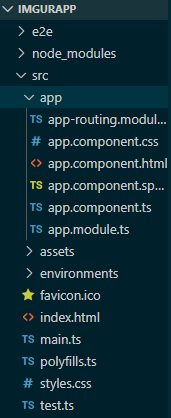
After running the two commands, your folder directory should look something like this :

Next, we need to add components to our application, so run the following commands to create two components:
ng g c add-photo
ng g c view-photos
We need to add some HTML and CSS to our application but before that, since we’ve added @angular-material to our application, we need to import angular-material to our app.module.ts file.
The easy way to doing that is to import material modules directly into app.module.ts but, the problem with this is when we keep adding material components to our application the lines inside app.module.ts increase drastically. So for avoiding this problem, we’ll create a new module where we import all the material components we need for the application and then this module is imported directly inside app.module.ts
So inside your command terminal/shell add the following code to add a new module to our application:
ng g m material
Next, go to material/material.module.ts and make changes so that it looks like this:
import { NgModule } from '@angular/core';
import { CommonModule } from '@angular/common';

@NgModule({
     declarations: [ ],
     imports: [
        CommonModule
      ],
    exports:[
     ]
 })
export class MaterialModule{}
All the material components which will be added should be imported in material.module.ts and added inside both the imports and exports array.
Note:- Don’t forget to import MaterialModule inside app.module.ts.
Next inside app-routing.module.ts, replace the routes variable with the following code:
const routes: Routes = [
  {path:'add-photo',component:AddPhotoComponent},
  {path:'photos',component: ViewPhotosComponent}
];
Note: Don’t forget to import AddPhotoComponent and ViewPhotosComponent.
Now that we’ve completed setting up our application, let’s move on to adding some HTML and CSS,
Replace the code inside app.component.html with the following code:
<div class="main-grid">
  <div class="nav-grid">
      <a mat-flat-button color="primary" routerLink="/add-photo">Add Photo</a>
      <a mat-flat-button color="accent"  routerLink="/photos">Show Photos</a>

  </div>

  <div class="content-grid">
    <router-outlet></router-outlet>
  </div>
</div>
Next to add some CSS inside app.component.css add the following code:
.main-grid{
    width:100%;
    height:100vh;
    display: grid;
    grid-template-areas:
    "navigation navigation"
    "main-content main-content"
    ;
    justify-content: space-evenly;
    grid-template-rows: 200px 1fr;
    row-gap: 30px;
}

.nav-grid{
    grid-area:navigation;
    width:100%;
    height:100%;
    display:flex;
    flex-direction: row;
    justify-content: space-evenly;
    align-items: center;
}

.content-grid{
    width:100%;
    height:100%;
    grid-area: main-content;
}
By adding the above Html and CSS code we’ve created two buttons that act navigation links to both our routes.
Next inside add-photo/add-photo.component.html add the following code:
<div class="add-photo-container">
    <mat-card class="add-photo-card">
     <mat-card-header>
         <mat-card-title>Add Info</mat-card-title>
     </mat-card-header>
     <mat-form-field>
         <input matInput [(ngModel)]="imageTitle" placeholder="Title">
       </mat-form-field>

       <mat-form-field>
         <input matInput [(ngModel)]="imageDescription" placeholder="Description">
       </mat-form-field>
         <input #imageInput type="file" (change)="imageInputChange(imageInput)" accept="image/*">
         <button mat-raised-button color="primary" (click)="addImage()">Add Image</button>

       </mat-card>
 </div>
Note: Don’t forget to import MatInputModule, MatFormFieldModule and MatCardModule inside material.module.ts. Also, import FormsModule inside app.module.ts.
Next inside add-photo.component.css add the following code:
.add-photo-card{
    display: flex;
    width:100%;
    height:100%;
    justify-content: space-around;
    flex-direction: column;
}

.add-photo-card > *{
    margin-top:20px;
}
Let’s breakdown the code we’ve added,
We’ve created a basic form that takes in title, description and a file as input. Don’t run your application yet, we need some typescript to add-photo component so that all the bindings which we have specified inside add-photo.component.html work properly.
Next, go to add-photo.component.ts and replace the code inside AddPhotoComponent class so that it looks like this:
export class AddPhotoComponent implements OnInit {

  private imageTitle:string;
  private imageDescription:string;
  private imageFile: File;
  constructor() { }

  ngOnInit() {
  }

  imageInputChange(imageInput:any){
    this.imageFile = imageInput.files[0];
  }

  addImage(){

  }

}
Now comes the interesting part where we add Imgur to our application,
We need to first create an account in Imgur, so go to http://imgur.com and create an account.
The next step is to register an application inside Imgur so that we send the images to Imgur using this application. To register an application, go to https://api.imgur.com/oauth2/addclient? and follow these steps:
- Add an application name
- Select Authorization type as Oauth2 authorization without a callback URL
- Add your email address
After submitting the form, you will receive a client-ID and a client secret.
Now that we’ve registered our application, we need to find a way to send images to Imgur API so that it stores our images.
There are two ways in which one can upload and store images in Imgur:
- Storing Anonymously
- Storing image to a specific user account
We’re going to cover both the methods. Let’s start with the first method,
Storing anonymously
As the name of method suggests, we will store images anonymously which means Imgur Api will just send an anonymous link to us when we save the image. This anonymous image will not show up in any user’s account.
Let’s implement this method in our application,
In your command terminal/shell run the following command:
ng g s image
This command will create a new service in our application and this service will be used to send HTTP requests to Imgur API.
Next, inside image.service.ts add code so that it looks like this:
import { Injectable } from '@angular/core';
import {HttpClient, HttpHeaders} from '@angular/common/http';


interface ImageInfo{
  title:string;
  description:string;
  link:string;
}

@Injectable({
  providedIn: 'root'
})

export class ImageService {
  private images:object[] = [];
  private url: string = 'https://api.imgur.com/3/image';
  private clientId: string = 'YOUR_CLIENT_ID';
  imageLink:any;


  constructor(private http:HttpClient) { }

  async uploadImage(imageFile:File, infoObject:{}){
    let formData = new FormData();
    formData.append('image', imageFile, imageFile.name);

    let header = new HttpHeaders({
      "authorization": 'Client-ID '+this.clientId
    });

    const imageData = await this.http.post(this.url, formData, {headers:header}).toPromise();
    this.imageLink = imageData['data'].link;

    let newImageObject:ImageInfo = {
      title:infoObject["title"],
      description:infoObject["description"],
      link:this.imageLink
    };

    this.images.unshift(newImageObject);

  }

  getImages(){
    return this.images;
  }
}
Let’s breakdown the code,
We’ve created an Interface which provides us a blueprint of what properties our image object will contain.
Next, we’ve created a private variable that contains the Imgur API URL to which we’re going to send HTTP requests. We’ve also added another private variable which contains our client-id for security purposes I cannot display my client-id so please add the client-id you received after registering the application.
We’ve added an async method named uploadImage. This function takes in two parameters, one is the imageFile which will contain the image we receive from our application and infoObject which contains the title and description of the image.
Then, inside the function, we’ve created formData in which we’ve appended our imageFile as a property.
Next, we send a post request to the Imgur API URL with a header that contains our client-id. One of the properties of the data we receive from Imgur API is the link which will be our image link. This link is stored in the variable imageLink.
Then, we create a new object with properties matching our interface and push it inside the images array.
There’s also a getImages method which returns the images array.
Now that we’ve completed our image service, go to add-photo.component.ts and inside the addImage() method add the following code:
addImage(){
    let infoObject = {
      title: this.imageTitle,
      description:this.imageDescription
    }
    this.imageService.uploadImage(this.imageFile,infoObject);
    this.imageTitle = "";
    this.imageDescription = "";
}
Let’s breakdown the code,
We’ve created a new object named infoObject which will consist the title and description of the image. Then, we’ve called a function inside the imageService which parameters as infoObject and the image file itself.
Note: Don’t forget to import ImageService inside add-photo.component.ts and add the following private variable inside the constructor:
constructor(private imageService:ImageService) { }
Now that we’ve completed uploading images anonymously to Imgur api, we’ll try to display the images uploaded. For doing that,
Inside view-photos.component.ts add code to make it look like this:
import { ImageService } from './../image.service';
import { Component, OnInit } from '@angular/core';

@Component({
  selector: 'app-view-photos',
  templateUrl: './view-photos.component.html',
  styleUrls: ['./view-photos.component.css']
})

export class ViewPhotosComponent implements OnInit {
  images:object[] = [];
  constructor(private imageService:ImageService) { }

  ngOnInit() {
    this.getAllImages();
  }

  getAllImages(){
    this.images = this.imageService.getImages();
  }

}
Next add the following codes inside view-photos.component.html and view-photos.component.css respectively:
<div class="photo-container" *ngFor="let image of images">
    <div class="photo-title">
        <h3>{{image.title}}</h3>
    </div>
    <div class="photo">
        <img [src]="image.link">
    </div>
    <div class="photo-description">
        <p>{{image.description}}</p>
    </div>
</div>
.photo-container{
    width:100%;
    display: flex;
    flex-direction: column;
    justify-content: center;
    align-items: center;
    margin-bottom:20px;

}


.photo img{
    width:100%;
    height:100%;
}
So there you go, we’ve finished uploading images anonymously in Imgur.
Next, let’s move on to uploading and storing images to a specific user account,
Storing image to a specific user account
This method is little tricky because unlike the previous method we can’t use client-id in our headers to store images in a specific account, we need access token to do that and this access token will be sent inside header of the request.
To get the access token, inside your browser, type the following url with your client-id:
https://api.imgur.com/oauth2/authorize?client_id=YOUR_CLIENT_ID&response_type=token
After sending the above url with your client_id, you will be redirected to a page where you need to enter your username and password to allow your application to access the account.
After submitting your username and password, you will receive a url in the browser with an access token like this:

Note: The access_token received from Imgur will expire in a month so you need to send a new request to the above url to generate a new access_token.
Make the following changes inside image.service.ts:
Add a new variable inside image.service.ts:
private accessToken:string = "YOUR_ACCESS_TOKEN";
Inside the uploadImage function, change the header so that it looks like this:
let header = new HttpHeaders({
      "authorization": 'Bearer '+this.accessToken
});
Now when you add image to your application it will directly show in your account in Imgur.
Before concluding this article, I wanted to mention few important points:
- Never save or store your client_id or access_token inside your project file. This is dangerous, I did it just for demonstration purpose.
- This application does not store all the image information uploaded in the back-end since this application was regarding storing images in cloud.
Conclusion
We’ve successfully accessed Imgur api from our application and stored our images inside Imgur via two methods.
Working demo: https://codesandbox.io/s/imgurapp-jp236?fontsize=14&hidenavigation=1&theme=dark


