In this article, I am going to show you one of the best ways to improve your Back-End skills without caring about Front-End. The great designed apps always make a positive impact on me, so I used to spend too much time on the design part of my applications. However, I like to work with the complexity of Back-End so I don’t have time to learn the inner workings of Front-End development. At the same time, I can’t start to build Back-End without finishing Front-End for some reason. As a solution, I started to build random apps by using CodePen snippets and it was really amazing with those UI/UX designs. Additionally, you’ll improve your creative thinking skills while trying to find app ideas by using CodePen designs.
A few days ago, I used a simple UI “search-box” design to create a Question-Answering Application. Even this kind of small designs can be turned into an application. By building this app you’ll learn a new Python package to implement a QA System on your own private data, become familiar with parser libraries of Python such as BeautifulSoup and integration of AJAX with Django. Let me give you a spoiler of the algorithm, we are going to crawl data for a particular question from the internet and pass them into the pre-trained Deep Learning model to find the exact answer.
Before we start you need a basic understanding of Django and Ubuntu to run some important commands. If you’re using other operating systems, you can download Anaconda to make your work easier.
Installation and Configuration
To get started, create and activate a virtual environment by following commands:
virtualenv env
. env/bin/activate
Once the environment activated, install Django, then create a new project named answerfinder and inside this project create an app named search:
pip install django
django-admin startproject answerfinder
cd answerfinder
django-admin startapp search
Don’t forget to configure your templates and static files inside settings.py
Ajax Request with Django
Create new a new HTML file named search.html and copy-paste everything inside following CodePen snippet.
Animated Search Box – Click to see the Pen
Now, let’s make small changes in the HTML file and add Ajax in the JavaScript file to get the input value. Initially, we need to define the method of the form and add id into search input to get data by id. Then, we are going to implement the ajax function inside the submitFn() function that handles the submission of the form.
search.html
<!DOCTYPE html>
<html lang="en">
<head>
    <meta charset="UTF-8">
    <meta name="viewport" content="width=device-width, initial-scale=1.0">
    <link rel="stylesheet" href="/static/css/main.css">
    <title>QA Application</title>
</head>
<body>
    <form method="POST" onsubmit="submitFn(this, event);">
        {% csrf_token %}
        <div class="search-wrapper">
            <div class="input-holder">
                <input type="text" id="question" class="search-input" placeholder="Ask me anything.." />
                <button class="search-icon" onclick="searchToggle(this, event);"><span></span></button>
            </div>
            <span class="close" onclick="searchToggle(this, event);"></span>
            <div class="result-container">
            </div>
        </div>
    </form>
    <script src="https://cdnjs.cloudflare.com/ajax/libs/jquery/2.2.4/jquery.min.js"></script>
    <script src="/static/js/main.js"></script>
</body>
</html>
main.js
function searchToggle(obj, evt){
    var container = $(obj).closest('.search-wrapper');

    if(!container.hasClass('active')){
            container.addClass('active');
            evt.preventDefault();
    }
    else if(container.hasClass('active') && $(obj).closest('.input-holder').length == 0){
            container.removeClass('active');
            // clear input
            container.find('.search-input').val('');
            // clear and hide result container when we press close
            container.find('.result-container').fadeOut(100, function(){$(this).empty();});
    }
}

function submitFn(obj, evt){

    $.ajax({
            type:'POST',
            url:'/',
            data:{
              question:$('#question').val(), // get value inside the search input
              csrfmiddlewaretoken:$('input[name=csrfmiddlewaretoken]').val(),
            },
            success:function(json){
            console.log(json)
            $(obj).find('.result-container').html('<span>Answer: ' + json.answer + '</span>');
            $(obj).find('.result-container').fadeIn(100);


            },
            error : function(xhr,errmsg,err) {
            console.log(xhr.status + ": " + xhr.responseText); // provide a bit more info about the error to the console
            console.log($('#total').text())
        }
    });

    evt.preventDefault();
}
As you see, I removed the body of the submitFn() function and implemented ajax to get the input value. Since we are making POST request it is important to include csrf token to make it secure. Once the request succeeds, we’ll get a response as a JSON to display it in the template.
Next, we should create a view that checks if a given input or question is taken, and return a response as JSON.
views.py
from django.http import JsonResponse

def search_view(request):
    if request.POST:
        question = request.POST.get('question')
        data = {
        'question': question
        }
        return JsonResponse(data)
    return render(request, 'search.html')
urls.py
from django.contrib import admin
from django.urls import path
from search.views import search_view

urlpatterns = [
    path('admin/', admin.site.urls),
    path('', search_view, name="search"),
]
Now, if you submit the form, the question will show up in the console of your browser with 200 status code which means the request was successful.
Question-Answering System
I found an article in Medium that explains the Question-Answering system with Python. It’s an easy-to-use python package to implement a QA System on your own private data. You can go and check for more explanation from the link below.
How to create your own Question-Answering system easily with python
The main reason for using this package is to display the exact answer to the user, even you can create a chatbot by using this deep learning model. Let’s first install the package then we’ll look closer to the program.
pip install cdqa pandas
Once installation completed, create a new python file just for testing and download the pre-trained models and data manually by using the code block below:
import pandas as pd
from ast import literal_eval

from cdqa.utils.filters import filter_paragraphs
from cdqa.utils.download import download_model, download_bnpp_data
from cdqa.pipeline.cdqa_sklearn import QAPipeline

# Download data and models
download_bnpp_data(dir='./data/bnpp_newsroom_v1.1/')
download_model(model='bert-squad_1.1', dir='./models')

# Loading data and filtering / preprocessing the documents
df = pd.read_csv('data/bnpp_newsroom_v1.1/bnpp_newsroom-v1.1.csv', converters={'paragraphs': literal_eval})
df = filter_paragraphs(df)

# Loading QAPipeline with CPU version of BERT Reader pretrained on SQuAD 1.1
cdqa_pipeline = QAPipeline(reader='models/bert_qa.joblib')

# Fitting the retriever to the list of documents in the dataframe
cdqa_pipeline.fit_retriever(df)

# Sending a question to the pipeline and getting prediction
query = 'Since when does the Excellence Program of BNP Paribas exist?'
prediction = cdqa_pipeline.predict(query)

print('query: {}\n'.format(query))
print('answer: {}\n'.format(prediction[0]))
print('title: {}\n'.format(prediction[1]))
print('paragraph: {}\n'.format(prediction[2]))
the output should like this:

It prints the exact answer and paragraph that includes the answer.
We are going to crawl the content of a few webpages later in this post to use them as data.
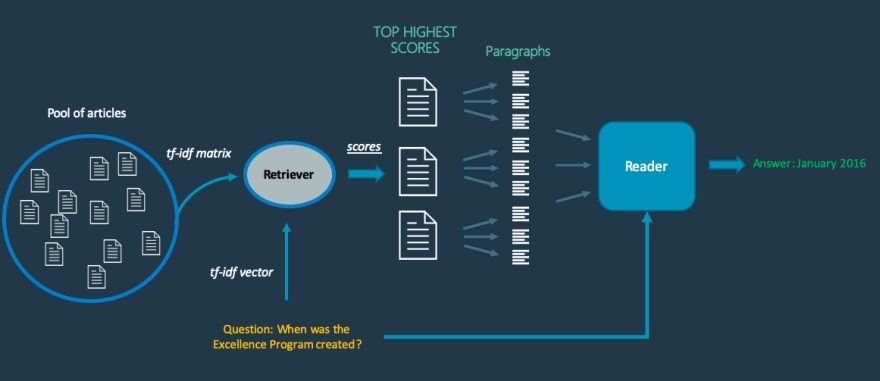
Basically, when a question sent to the system, the Retriever will select a list of documents from the crawled data that are the most likely to contain the answer. It computes the cosine similarity between the question and each document in the crawled data.
After selecting the most probable documents, the system divides each document into paragraphs and send them with the question to the Reader, which is basically a pre-trained Deep Learning model. The model used was the Pytorch version of the well known NLP model BERT.
Then, the Reader outputs the most probable answer it can find in each paragraph. After the Reader, there is a final layer in the system that compares the answers by using an internal score function and outputs the most likely one according to the scores which will the answer of our question.
Here is the schema of the system mechanism.
You have to include pre-trained models in your Django project and to achieve that you can run download functions directly from views or just simply copy-paste the models directory into your project.
Crawling Data with Beautiful Soup
We are going to use Beautiful Soup to crawl the content of the first 3 webpages from Google’s search results to get some information about the question because the answer probably locates in one of them. Basically, we need to perform a google search to get these links, and instead of putting so much effort for such a trivial task, google package has one dependency on Beautiful Soup library that can find links of all the google search result directly.
Install the beautiful soup and google package by following commands:
pip install beautifulsoup4
pip install google
Try to run the following code snippet in a different file to see the result:
from googlesearch import search

for url in search("Coffee", tld="com", num=10, stop=5, pause=2):
	print(url)
Once we get the links it’s time to create a new function that will crawl the content of these webpages. The data frame must be (CSV) in a specific structure so it can be sent to the cdQA pipeline. At this point, we can use the pdf_converter function of the cdQA library, to create an input data frame from a directory of PDF files. Therefore, I am going to save all crawled data in PDF files for each webpage. Hopefully, we’ll have 3 pdf files in total (can be 1 or 2 as well). Additionally, we need to name these pdf files, so by using enumerate() function, these files will name by their index numbers.
If I summarize the algorithm it will get the question form the input, search it on google, crawl the first 3 results, create 3 pdf files from the crawled data and finally find the answer by using a question answering system.
views.py
import os, io
import errno
import urllib
import urllib.request
from time import sleep
from urllib.request import urlopen, Request
from django.shortcuts import render
from django.http import JsonResponse
from bs4 import BeautifulSoup
from googlesearch import search
import pandas as pd
from cdqa.utils.filters import filter_paragraphs
from cdqa.utils.download import download_model, download_bnpp_data
from cdqa.pipeline.cdqa_sklearn import QAPipeline
from cdqa.utils.converters import pdf_converter


def search_view(request):
    if request.POST:
        question = request.POST.get('question')
        # uncomment the line below to download models
        # download_model(model='bert-squad_1.1', dir='./models')
        for idx, url in enumerate(search(question, tld="com", num=10, stop=3, pause=2)):
            crawl_result(url, idx)
        # change path to pdfs folder
        df = pdf_converter(directory_path='/path/to/pdfs/')
        cdqa_pipeline = QAPipeline(reader='models/bert_qa.joblib')
        cdqa_pipeline.fit_retriever(df)
        prediction = cdqa_pipeline.predict(question)
        data = {
        'answer': prediction[0]
        }
        return JsonResponse(data)
    return render(request, 'search.html')


def crawl_result(url, idx):
    try:
        req = Request(url, headers={'User-Agent': 'Mozilla/5.0'})
        html = urlopen(req).read()
        bs = BeautifulSoup(html, 'html.parser')
        # change path to pdfs folder
        filename = "/path/to/pdfs/" + str(idx) + ".pdf"
        if not os.path.exists(os.path.dirname(filename)):
            try:
                os.makedirs(os.path.dirname(filename))
            except OSError as exc: # Guard against race condition
                if exc.errno != errno.EEXIST:
                    raise
        with open(filename, 'w') as f:
            for line in bs.find_all('p')[:5]:
                f.write(line.text + '\n')
    except (urllib.error.HTTPError, AttributeError) as e:
        pass
Note that you must change filename path to your pdfs folder otherwise cdQA can’t create an input data frame. Remember that you have to download pre-trained models, simply uncomment the download function inside search_view(). Once models downloaded you can remove this line.
Final Result
Finally, you can run the project and type any question in the search box. It’ll take about 20 seconds to display the answer.

The question was “What is programming?” and the answer was “designing and building an executable computer program to accomplish a specific computing result”. Sometimes the crawlers can’t find enough information so the answer will empty. Additionally, don’t forget to remove pdf files for new questions, if you wish you can add a new function to handle this task.
I know some of you going to tell me that Flask is better for this kind of applications but I prefer Django anyway.
You can find this project in GitHub link below:


