In a perfect scenario, there should be synergy among
- the User Experience,
- the Developer Experience,
- and the Editor Experience of your website.
Managing a static HTML website can be easier when you have a headless Content Management System, such as Agility CMS, to help define the site content architecture. Agility CMS helps improve the Editor Experience by presenting a more user-friendly content architecture that makes for breezier workflows, and more importantly less of a dependency on developers.

How can you make that happen? Well, you can achieve just this when you build a site using Gatsby and integrate it with Agility CMS. Gatsby helps redefine the User Experience and Developer Experience, while Agility CMS contributes to a positive Editor Experience, ensuring an easily manageable and endlessly scalable, website management experience.
So, what is Gatsby, and what can you do with it? Let’s find out.
What is Gatsby and what does it offer?
Gatsby or GatsbyJS is a static website generator or more accurately a JAMstack framework that presents a fluid site development experience that’s more progressive than traditional static site development and management. It even offers some upgrades over dynamic content management. With the help of its Javascript-APIs-Markup, GatsbyJS helps simplify content sourcing from external systems, as all content is updated during the website build process.
Website builders these days rely on Gatsby for multiple reasons:
Better User Experience
Sites built by GatsbyJS grant faster site accessibility to visitors, perform better, and tick off on all SEO strong-points.
Better Hosting Experience
Even though your site performs better than dynamic sites, it is still just a static HTML site; so, website owners do not need high-end hosting services, and still get to experience reliable and fluid website hosting.
Better Development Experience
GatsbyJS elevates the Developer Experience by providing a React Javascript environment which makes it easy to maintain the site codebase. Developers can create and modify codes, add/remove plugins, and API integrations in the blink of an eye!
Better Editor Experience?
Gatsby already provides a lightweight coding environment for developers with the help of its React ecosystem, which in turn makes for a satisfying User Experience. But, it can further catalyze the Editor Experience if you integrate your Gatsby site with Agility CMS.
Agility CMS makes the content management process work like a charm for site managers, allowing them to create and modify content without a hitch.
“Now, what makes Agility CMS particularly a good fit for GatsbyJS sites is that Agility CMS not only provides native support for GatsbyJS via our gatsby-source-agilitycms github but with our built-in Page Management, the plugin can automatically generate your pages based off your page tree in Agility CMS. Combine this with our Page Template/Page Module architecture, and this means editors can create their own pages, add/order/remove functionality and content on each page, all without requiring assistance from a developer.” James Vidler, VP Product of Agility CMS explained.
Using Agility CMS for a better Editor Experience
Static websites have gained popularity for not relying on dynamic data sources or any type of server-side processing for displaying content. However, static websites are a hassle for content editors who have to regularly interact with the website codebase to update said content. That is where Agility CMS steps in, by providing a headless content management system for static websites.
Think of Agility CMS as a central hub for your site content which allows you to externalize management of your backend content database with the help of a RESTful API. Also, there is a treasure trove of tools available in the form of UI components and Page Templates within Agility CMS’ built-in Page Management functions. Thus, in plain terms, Gatsby can help you build high-performing, lighting-fast websites, and an Agility CMS can help you source content for it and also generate your website pages as per requirement.
Why the Editor Experience is better in Agility CMS vs other CMSs?
In short, Agility CMS allows developers to Develop Components, not Websites. When building a website with Gatsby and Agility CMS, it is important to take advantage of Agility CMS native Page Management. Start by taking a look at Agility CMS starter site, rather than starting from a blank site. It shows you how you should structure your gatsby site, and serves an example based on our recommended best-practices. Developers can save time and money by allowing editors to manage all aspects of pages. Editors should be able to control what pages are on their website, and what is on each page.
Offloading this responsibility to editors means developers can spend less time responding to content needs and more time on improving UX. You’ll maintain a toolbox of UI components (i.e. Modules and Page Templates) that editors will use to compose their pages.
So, let’s see how we can set up Agility CMS’ headless content architecture to seamlessly play into the Gatsby site-development framework.
Building Your Website with Gatsby and Agility CMS

For most website developers creating a site that offers an enriching User Experience gets easier with the React JS framework. Gatsby helps fast-track that process and grants greater development flexibility as cited above. Using Gatsby or GatsbyJS to build your website is fairly easy. All you need to do is carry out the following steps:
- Sign up for Free Agility CMS Blog Template
- Create the Gatsby Development Environment
- Integrate with Agility CMS
- Integrate your Gatsby site with Agility CMS
- Test your site with a local HTML server
1. Starting off with the Free Agility CMS Blog Template
The resourcefulness of Agility CMS in site content manipulation is unrivaled. If you are looking to create a website with blog content or if you are simply a new user then you will be glad to know that the Agility CMS Blog Template has everything you need to get started, The template will help you acquire a first-hand experience of the best practices, evaluation methods, and new user onboarding processes. Of course, you can edit the modules and content types that are already set up within the template to curate the blogging experience that you wish to give your site visitors.
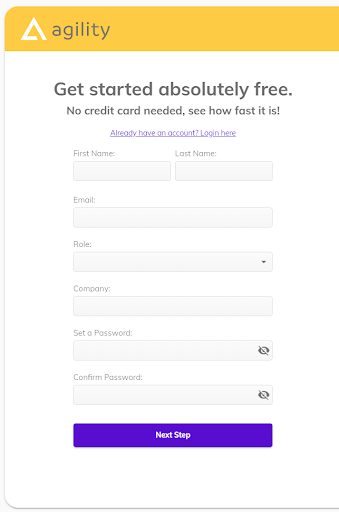
To get started, simply head over to https://account.agilitycms.com/sign-up and sign up for a free account.

After logging in, just select a free instance by clicking ‘Try Now!’.

Once you are in, start your project by entering the ‘Project Name’ and select the ‘Blog Template’ and click Submit
to complete signing-up.
The Blog Template instance provides website owners and builders with a collection of pre-initialized Page Templates, Pages, Modules, and Content.
In case you are absolutely new to this CMS environment, the following will come in handy:
Page Templates
One column template- a basic template with a single content zone that allows you to add modules
Pages
/home- is the root page of your site (‘/’)
- /posts- the primary listing page for your blog content
- /posts/*- the dynamic page path used to post new blog content
Modules
- Jumbotron – a banner UI component with minimal fields to get you started
- Rich Text Area – a WYSIWYG for flexible HTML
- Post Listing – List of your blog posts
- Post details – UI component that represents the details of individual blog posts. It is used on the /posts/* dynamic page
Content
- Global header – a content item that helps you render a header for your site with the help of a few fields
- Posts- Lists blog posts, showcasing the Title, Image, and Body for each post
If you are new to Agility CMS or website creation or CMS’ in general then you should familiarize yourself with the Blog instance before you head over to set up your website with Gatsby.
2. Creating the Gatsby Development Environment
Install and use the Gatsby CLI
npm install -g gatsby-cli
This command should help you install the Gatsby CLI globally on your system.
Create the site
gatsby new gatsby-site
Create the site by typing in the above command into the CLI
Make the directories into site folders
cd gatsby-site
Create site folders out of the directories that make up your site
3. Integrating with Agility CMS
Once you have created a production build for your site, it is time to log into your Agility CMS account to fetch the API credentials. Gatsby needs to authenticate your API key in order to source data from your Agility CMS account.
API Key

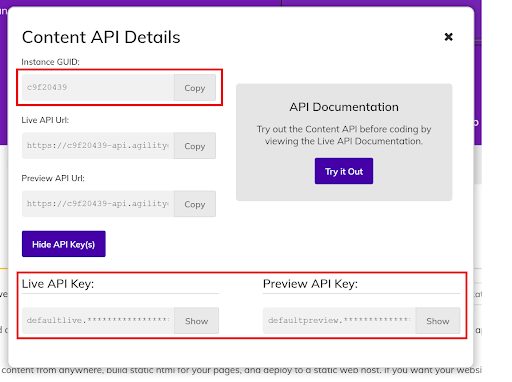
Once logged into your Agility CMS account, head over to the Getting Started page which should have the API Keys.
Simply click the API Keys button, and then click on the Show API Key(s) button to view the Live and Preview keys.

Click on Show for both these keys and copy them to somewhere local for later use. Do not forget to copy the GUID as well.
4. Integrating your Gatsby site with Agility CMS
Since the site is already set up with Gatsby, and your Agility CMS API keys have been retrieved as well, you can proceed to integrate the two.
Cloning the starter repo from Agility’s Github forum should be enough to get you started:
gatsby new agility-gatsby-starter
https://github.com/agility/agility-gatsby-starter
Then switch over to your code directory with:
cd agility-gatsby-starter
Authentication
To set up authentication you need to make a copy of ./.env.development.example
Let’s call it /.env.development. You can use the following code to do that:
cp .env.development.example .env.development
Now, you will need to add the development AGILITY_GUID and AGILITY_API_KEY variable values to .env.development
You can do that with the following commands:
# Your Instance Id
AGILITY_GUID=
# Your Preview API Key (recommended) – you can get this from the Getting Started Page in Agility CMS. It starts with default preview.
AGILITY_API_KEY=
# If using your Preview API Key, set this to true
AGILITY_API_ISPREVIEW=true
Then proceed to make a copy ./.env.production.example called /.env.production, with the following code:
cp .env.production.example .env.production
Now, add your development AGILITY_GUID and AGILITY_API_KEY variable values to .env.production as well with the following code:
# Your Instance Id
AGILITY_GUID=
# Your Live API Key (recommended) – you can get this from the Getting Started Page in Agility CMS. It starts with default live.
AGILITY_API_KEY=
# Since you won’t want to preview here, set this to false
AGILITY_API_ISPREVIEW=false
5. Testing your site with a local HTML server
Start the development server
gatsby develop
Execute a hot-reloading development environment with Gatsby. It is accessible by default at-
http://localhost:8000
Creating a production build
gatsby build
Ask Gatsby to create a production build for the site. The static HTML components and per-route Javascript code bundles are generated by executing this command.
Serving the production build locally
gatsby serve
Gatsby will now start a local HTML server for testing the site. It is essential that developers specifically build the site using the ‘gatsby build’ command, before using this command.
What happens when you let Agility CMS manages your Gatsby site content
You can bid goodbye to your site content editing woes once your Gatsby site is integrated with Agility CMS. Agility’s easy-to-use interface will grant enough flexibility and autonomy to the website editing tasks, that it invalidates any dependency on developers to create and update new site content.
As a result, now your website Editor Experience is at par with the User and Developer Experience.
So, what are you waiting for? Sign up with Agility CMS, to elevate your site content editing and management!


