
Do you find Redux confusing? Do you want to master the redux fundamentals and start using it effectively with your favorite frontend framework? If so, you come to the right place. In this article we will go over every bits and pieces of redux so you can really understand what’s going on behind the scene.
In this tutorial we will discuss,
- Redux core concepts (store, reducer, action) 🎯
- React/Redux application structure ⚙️
- Writing clean code with redux hooks 🧱
- Best practices for clean code in redux ⚛️
Why do we need redux?
Let’s say we are building a complex UI like the picture below.
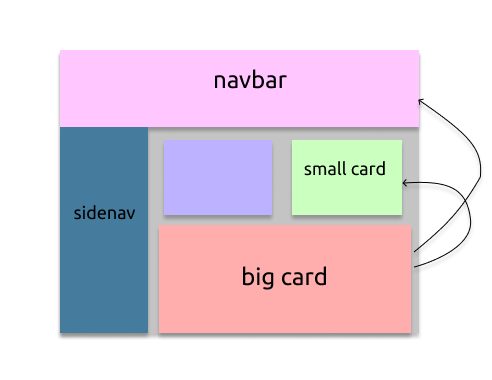
We want to sync different parts of our application. If a user interacts with the big card component the application has to update the small card and navbar components.
Managing states and syncing all the components requires writing a lot of code. That’s why we use state management libraries such as redux. Redux can be used with frameworks like React, Vue, Angular as well as vanilla javascript.
Redux Core Concepts:
In redux architecture we have three basic components.
- Store
- Reducers
- Actions
Store: The store is where we save our current application state. All the frontend UI components have access to the store. Think of the store as a database for the frontend components.
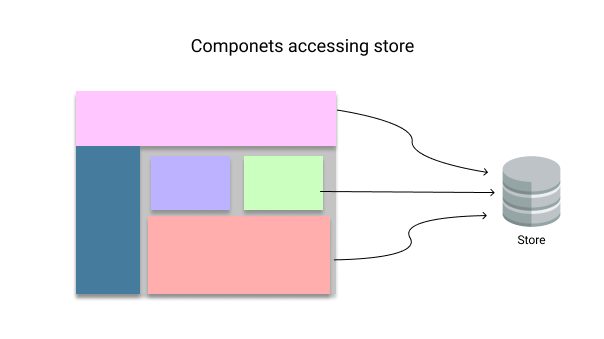
We can put any type of objects in our store. For instance let’s say we are building a TaskList application. In this case our application state will contain the user information and tasks associated with that user. So our store might look something like this
{
 tasks: [
   {
     id: 123,
     desc: "Make an css grid",
     complete: false
   }
 ],
 userName: "jon doe"
}
Now let’s say some user interaction happens and a component in our application needs to update this store. We do not directly mutate this store. Redux is built on functional programming principles. Mutating the store directly can cause side effects. That’s why we have pure functions that take in the current store as a parameter and return an updated store. These functions are called reducers.
[ Learn more about functional programing here ]
So our reducer look something like this
function reducer(state = [], action) {
  // Do some stuff
  // Create an updated state
  // return updated state
}
However, how does this reducer function know which part of the store needs to be updated? Well, reducer function also takes in another parameter called action. The `action` object contains information about what to update in the store. So our action objects can look something like this
const action = {
 type: "ADD_NEW_TASK",
 payload: {
   name: "some notification"
 }
};

const action2 = {
 type: "REMOVE_TASK",
 payload: {
   id: 2
 }
};
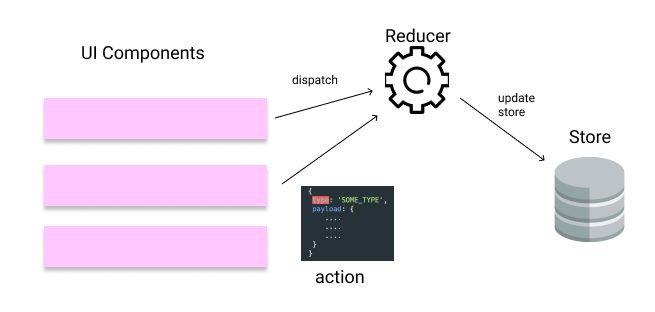
UI components dispatch (it’s a fancy way of saying calling a function with an action object as parameter) an action to reducer and reducer updates the store.
Let’s see this behavior in action. I created a new react app and created two new files called `reducer.js` and `store.js` in the root directory.
👉 Click here for complete code example
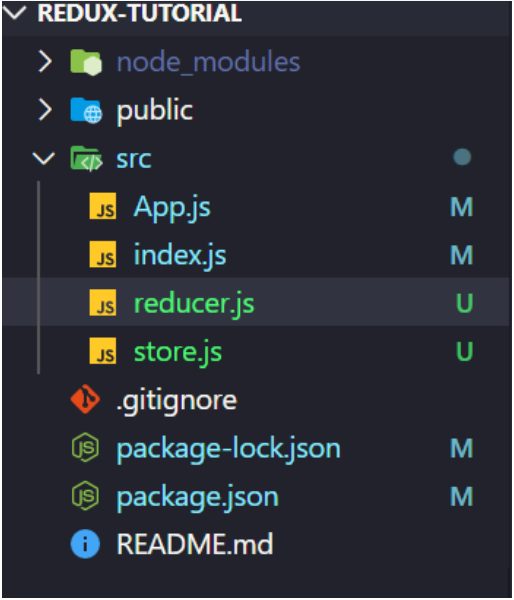
Let’s make a simple reducer function.
// reducer.js
function reducer(state = [], action) {
    switch(action.type) {
        case 'ADD_NEW_TASK':
            // TODO: @implement
            console.log('ADD_NEW_TASK was called', action.payload)
            break;
        case 'REMOVE_TASK':
            // TODO: @implement
            console.log('REMOVE_TASK was called', action.payload)
            break;
        default:
            return state;
    }
}
export default reducer;
We will take care of the implementation details later. Let’s write the `store.js` file.
// store.js
import { createStore } from "redux"; // import instance from reducer library
import reducer from "./reducer"; // import the reducer function we created
const store = createStore(reducer); // create a new store with our reducer function

export default store; // export store
We can now go to the index.js file and dispatch actions.
// index.js
import store from "./store"; // import the store we created

// dispatch actions
store.dispatch({
  type: 'ADD_NEW_TASK',
  payload: {
    name: "some notification"
  }
});

store.dispatch({
  type: 'REMOVE_TASK',
  payload: {
    id: 1
  }
});
We imported the store and called dispatch method with an action object. Now if we look at the console log we can see that our reducer code is being executed.
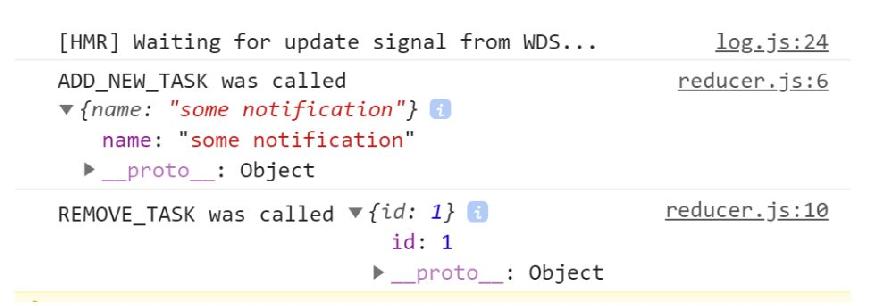
We first dispatched an action with `type` property equals ADD_NEW_TASK. So the reducer executed the code block inside the first case statement. After that we dispatched an object with `type` equals REMOVE_TASK and the reducer executed the code inside the second case statement. Using case statements is the widely used pattern for reducer function.
Now that we have this in place let’s implement some code so that the reducer function will update the store.
let idPrevItem = -1;

function reducer(state = [], action) {
    switch(action.type) {
        case 'ADD_NEW_TASK':
            return [
                ...state,
                {
                    id: ++idPrevItem,
                    desc: action.payload.desc
                }
            ]
        case 'REMOVE_TASK':
            return state.filter(n => n.id !== action.payload.id);
        default:
            return state;
    }
}

export default reducer;
Notice that we use spread operator and return a new array every time we add a new item. We follow the immutability principle here. If we decide to mutate the state itself then it will be hard to backtrack and debug our code when our code base gets more complicated.
Now let’s go back to our index.js file and add the following code
// index.js
store.subscribe(() => {
  console.log("---Listening -->>", store.getState());
});

// dispatch actions
...
This codeblock will initiate an event listener. We will be able to console log all the changes happening to store. In the components on our application we have event listeners like this that updates the component UI when a particular change is detected.
In some cases we might want to stop this event listener to prevent memory leaks. We can do so by creating an unsubscribe call show below.
// Subscribe to the store to listen to all changes in store state

const unsubscribe = store.subscribe(() => {
  console.log("---Listening -->>", store.getState());
});


// dispatch actions
store.dispatch({
  type: 'ADD_NEW_TASK',
  payload: {
    name: "some notification"
  }
});

unsubscribe();

store.dispatch({
  type: 'ADD_NEW_TASK',
  payload: {
    name: "some notification"
  }
});
In the example above the listener will stop and will not log the second dispatched action.
👉 Find the complete code up to this point here
That’s all there is to basic redux. Redux is a very small, simple but powerful library. Next let’s look at how we can use redux in our react application.
Adding Redux to React Project
I added two new components in our `App` component. A `TaskForm` component to create new tasks and a `TaskList` component to show tasks lists.
// App.js
import TaskList from './TaskList';
import Taskform from './Taskform';

function App() {
  return (
    <div className="App">
      <Taskform />
      <TaskList />
    </div>
  );
}
// TaskForm.js
import React from 'react';

function Taskform () {
    const [desc, setDesc] = React.useState('');

    const handleChange = event => setDesc(event.target.value)

    const handleSubmit = event => {
        event.preventDefault();
        console.log('-->>', desc)
    }

    return (
        <>
            <input placeholder="Name" onChange={handleChange} value={desc}/>
            <button onClick={handleSubmit}>Create</button>
        </>
    )
}

export default Taskform;
// TaskList.js
import React from 'react';

function TaskList () {
    return <div>Task List here</div>
}

export default TaskList;
We can make redux interact with these components with listeners as demonstrated earlier. However, there is a better way. There is a library called `react-redux` that makes the process even easier.
Let’s install it 🧙♂️
npm i react-redux --save
Now we have to make the following changes in our index.js file.
// index.js
import React from 'react';
import ReactDOM from 'react-dom';
import App from './App';
import store from "./store"; // import the store we created
import { Provider } from "react-redux"; // import the provider component from library

ReactDOM.render(
  <React.StrictMode>
    {/* Wrap the App component with provider component
        and pass our store as a property */
    }
    <Provider store={store}>
      <App />
    </Provider>
  </React.StrictMode>,
  document.getElementById('root')
);
We imported the provider component and wrapped our `App` component with it. We are also providing the store object as a property in the Provider. By doing this every component under provider will be able to access the store.
Now we want to dispatch actions from our TaskForm component. Previously, we used to do it with redux higher order components. However, now there is a react hook for it which makes it a piece of cake to implement. Here’s the code below,
import React from 'react';
import React from 'react';
import { useDispatch } from "react-redux";

function Taskform () {
    const [desc, setDesc] = React.useState('');
    const dispatch = useDispatch();

    const handleChange = event => setDesc(event.target.value)

    const handleSubmit = event => {
        event.preventDefault();
        dispatch({
            type: "ADD_NEW_TASK",
            payload: {
                desc
            }
        });
        setDesc('')
    }

    return (
        <>
            <input placeholder="Name" onChange={handleChange} value={desc}/>
            <button onClick={handleSubmit}>Create</button>
        </>
    )
}

export default Taskform;
All we did is bring in the `useDispatch` hook and execute it on button click with our payload. That’s it.
Now, in the `TaskList` component let’s take a look how to access the store.
import React from 'react';
import { useSelector } from "react-redux";

function TaskList () {
    const state = useSelector(state => state);
    return (
        state.map(item => (
            <>
                <li>{item.desc}</li>
            </>
        ))
    )
}

export default TaskList;
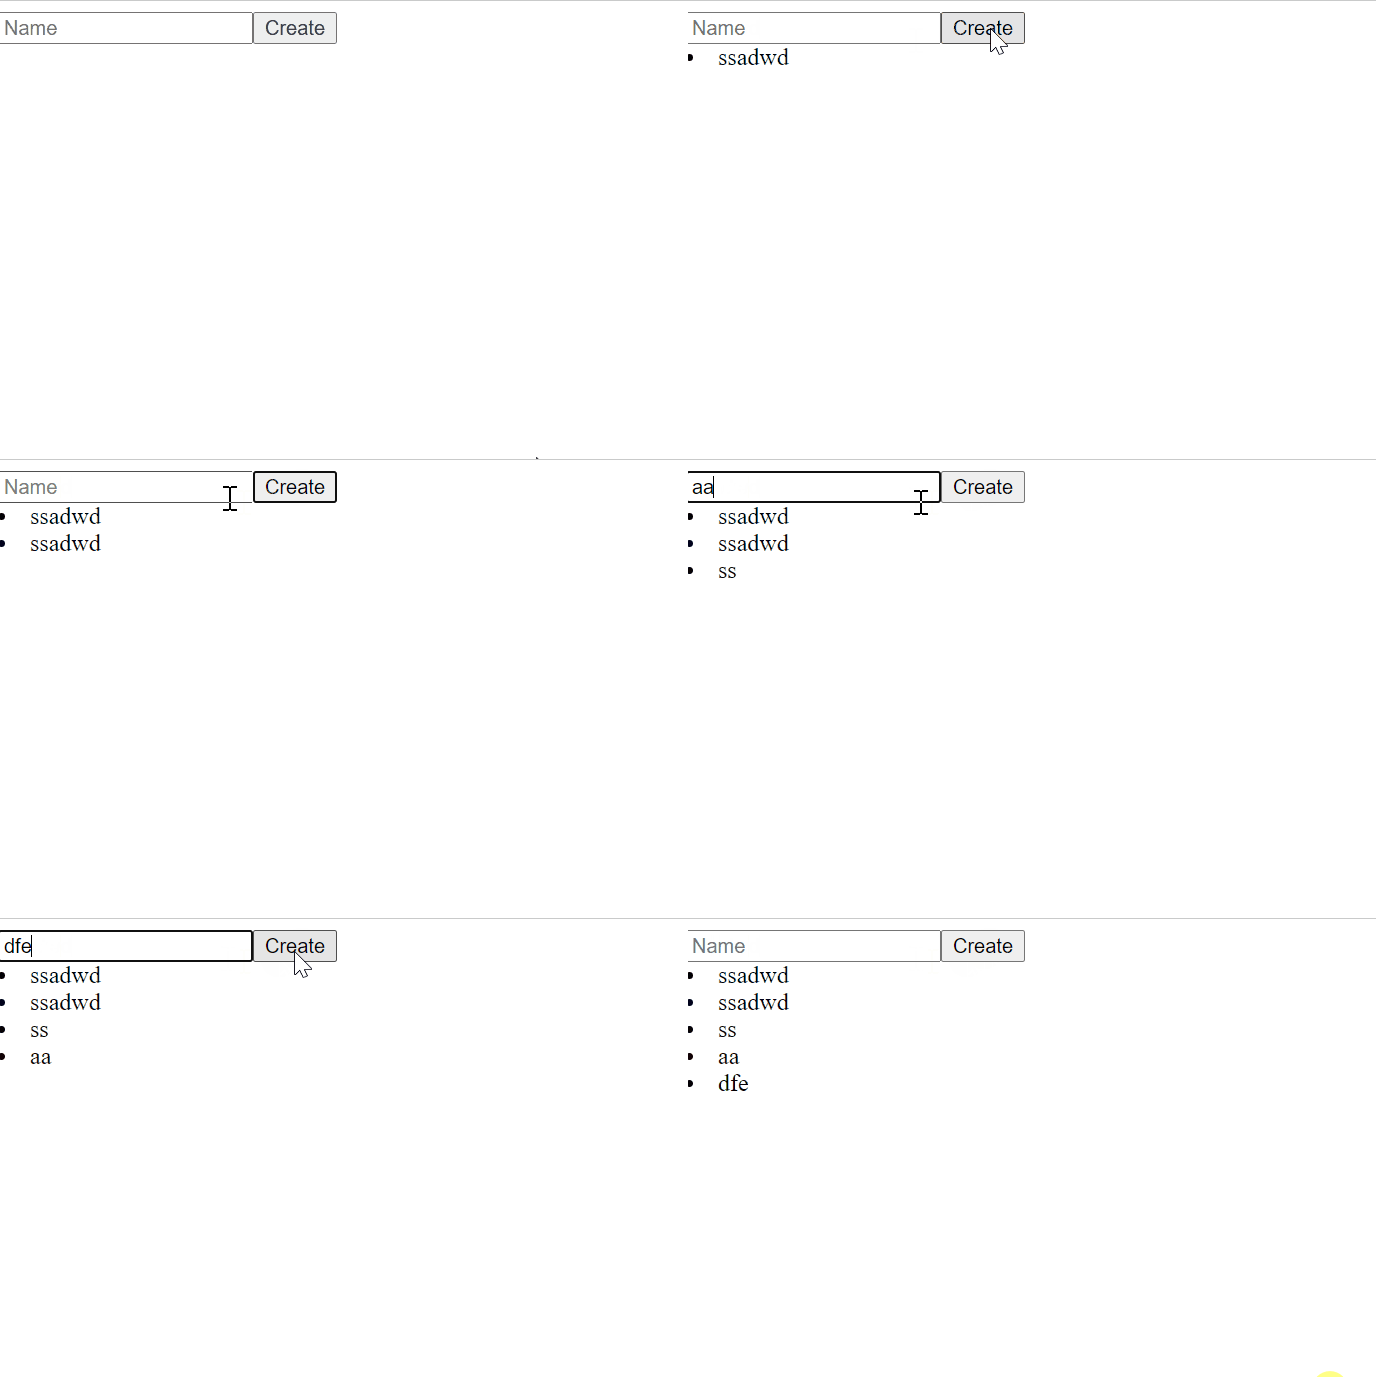
We used the use selector hook to access the store and got the updated store. Now we are able to add new tasks and see the components update.
Additionally we can implement deleting a task functionality in the `TaskList`.
import React from 'react';
import { useDispatch, useSelector } from "react-redux";

function TaskList () {
    const state = useSelector(state => state);
    const dispatch = useDispatch()
    const removeItem = id => {
        dispatch({
            type: 'REMOVE_TASK',
            payload: {
                id
            }
        })
    }
    return (
        state.map(item => (
            <>
                <li>{item.desc}</li>
                <button onClick={() => removeItem(item.id)}>🗑️</button>
            </>
        ))
    )
}

export default TaskList;
We used the `useDispatch` hook again in this component and dispatched the `REMOVE_TASK` action. That’s all there is to it.
Get the code up to this point here
Next, we will look at how we can refactor this code and apply some best practices.
Redux best practices
Keeping the action types separate: It is a best practice to separate action types and consolidate them into a separate file This way we have to change them into one place if we have to. Let’s do that now.
We create a new file called `actionTypes.js` in our root directory. Then we write the following code.
export const ADD_NEW_TASK = 'ADD_NEW_TASK';
export const REMOVE_TASK = 'REMOVE_TASK';
Now let’s use this export in our reducers and dispatch.
// reducer.js

import * as actionType from './actionTypes'

let idPrevItem = -1;

function reducer(state = [], action) {
    switch(action.type) {
        case actionType.ADD_NEW_TASK:
            return [
                ...state,
                {
                    id: ++idPrevItem,
                    desc: action.payload.desc
                }
            ]
        case actionType.REMOVE_TASK:
            return state.filter(n => n.id !== action.payload.id);
        default:
            return state;
    }
}

export default reducer;
// TaskList.js

import React from 'react';
import { useDispatch, useSelector } from "react-redux";
import * as actionType from './actionTypes';

function TaskList () {
    const state = useSelector(state => state);
    const dispatch = useDispatch()
    const removeItem = id => {
        dispatch({
            type: actionType.REMOVE_TASK,
            payload: {
                id
            }
        })
    }
    return (
        state.map(item => (
            <>
                <li>{item.desc}</li>
                <button onClick={() => removeItem(item.id)}>🗑️</button>
            </>
        ))
    )
}

export default TaskList;
Refactoring all dispatch actions: Another best practice is to keep all the dispatch actions into one location. Let’s see how it is done.
Let’s create a new file `actions.js` in `/src` directory.
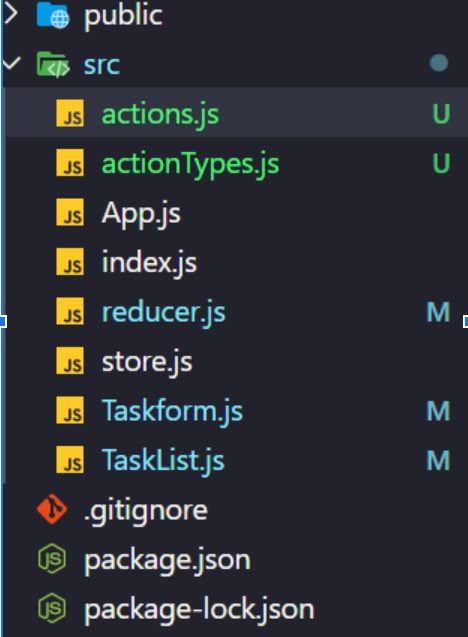
Now let’s create our actions inside actions.js file.
// actions.js
import * as actionType from './actionTypes';
export const addNewTask = desc => ({
    type: actionType.ADD_NEW_TASK,
    payload: {
        desc
    }
})

export const removeTask = id => ({
    type: actionType.REMOVE_TASK,
    payload: {
        id
    }
})
As you can notice this is just returning the dispatch payload. Now we can use these functions instead of defining the object when dispatching from our components. We’ll update our components like below
// TaskForm.js
...
import {addNewTask} from './actions'

function Taskform () {
    ...
    const handleSubmit = event => {
        event.preventDefault();
        dispatch(addNewTask(desc)); // dispatch calls the new action function
        setDesc('')
    }

    return (
       // everything same as before
       ...
    )
}
// TaskList.js
...
import {removeTask} from './actions'

function TaskList () {
    ...
    const removeItem = id => {
        dispatch(removeTask(id)) // Using new action function
    }
    return (
        ....
    )
}
💾 You can find the code up to this point in the following link.
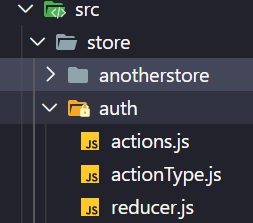
Structuring multiple stores:
Let’s see how we can structure our redux code for better readability and separation of concerns. It is always a good idea to separate the UI layer from the store.
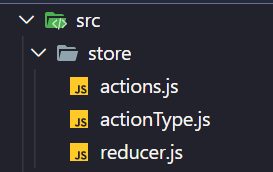
As our application grows we can have multiple folders inside the store. We usually write our business logic inside redux. Therefore, each folder becomes a separate domain model.
I hope this article has helped you better understand redux. For content like this please subscribe to our newsletter 🙂 That’s all for today.


