As a developer working on your own or with people, you must have used version control for your projects. It helps you keep track of the progress and changes in your applications and you can also return to previous versions.
When you build projects on your own, it’s very easy to maintain compared to when you have many contributors. The maintenance becomes hard in terms of the style guide, applying tests, and many other rules you may want your application to follow.
Moreover, there are also repetitive tasks you would be doing (linting and testing your applications) even when working on them on your own. This can be tiring, and sometimes you might just forget.
Git Hooks helps to trigger commands (could be something repetitive you want to be automated) and ghooks makes working with Git Hooks easier as well as syncing with other contributors to your application.
Have you ever tried intercepting a merge operation? Or a commit operation (for yourself or others)? Or a push operation? Or ensuring something happens automatically when you’re trying to git?
When these operations occur, your application and git records are likely transformed into a new state.
Git hooks provide a means to intercept these operations or automate some after-action. These interceptions do not necessarily stop the operation but ensure that some standards (as you have specified) are followed or some things are done afterward.
What are Git hooks
Git hooks are scripts that are executed when a git operation is triggered. Some of them are before an operation, while others, after. Here’s an illustration:
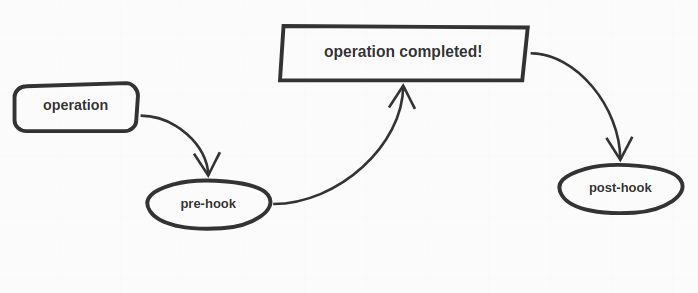
Git hooks are found in the hooks directory under .git. When a particular operation is run, git checks the related hook in this directory to know the script to execute.
If you have a project where you use git, you can check the `.git` directory. You’ll find something similar to this:
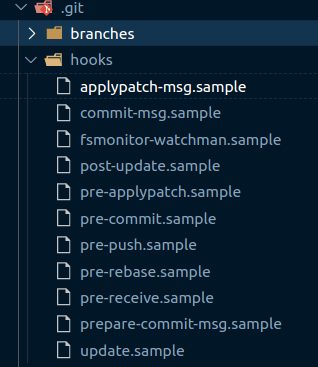
When you open each hook, you’ll find codes similar to bash scripts. However, any executable script (like Python or Node.js) should work.
If you find the .sample extension on the files like above, know that it exists so that git does not run them. They are just sample scripts populated by git on initialization.
Let’s try one of them. Remove the .sample extension from pre-commit, clear the file and add the following Node.js script (Node.js must be installed):
#!/usr/bin/env node
console.log('hello')
#!/usr/bin/env node is referred to as a shebang which shows the path to the interpreter that would execute the script.
To test this, make any change, and try to commit the change, you should see “hello” logged to the console (by Node.js). We’ll talk more on pre-commit`later, but for now, just understand that this hook is run before a commit is made.
Types of Git Hooks
1. Client-side Hooks
For the client-side, the hooks are executed on a local repository. For example, a pre-commit hook is run before a commit operation completes.
2. Server-side Hooks
These types of hooks are run on the server of the remote repository. For example, a post-receive hook is run after a push operation.
If any of git pre-hooks (executed before an operation) is executed and returns a 0 exit code, the operation being run passes, else, the operation is aborted. The process is described in this image:
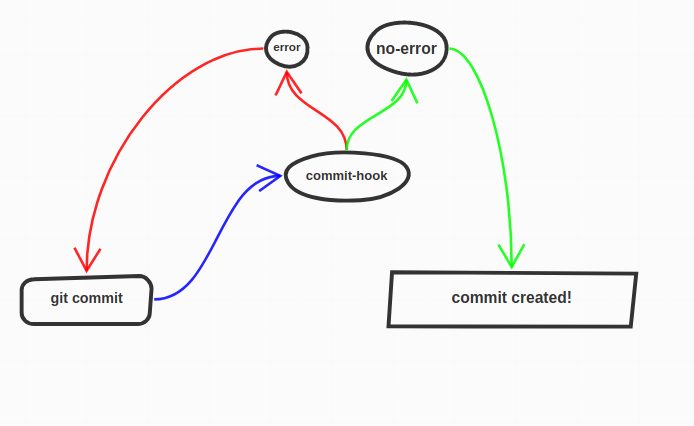
Note that, there can exist more than one hook for a type of operation. For instance, the hooks related to commit operations are commit-msg, pre-commit, and more. Therefore, you’d need to understand which is which.
For the rest of this article, we’ll focus on client-side hooks to get a clearer picture of how they work and how to use them.
Examples of Git Hooks
There are numerous types of hooks. We’ll look at a few of them.
- pre-commit: this hook is executed before the commit editor is opened (or a commit object created). That is when you execute
git commit, this hook is run before the editor opens. Similarly, when you executegit commit -m "commit message", the hook is run before-m commit messageis applied. - post-commit: is executed after the commit editor closes and the commit object is created.
- pre-push: is executed before a push operation completes, that is, before objects have been transferred to the remote repository.
- pre-receive: is executed before the remote repository receives a push operation.
You can find the different types of hooks in this documentation.
Use cases of Git hooks
- Ensure that code follows linting configurations before committing.
- Test your code before committing.
- Test your code after merging.
There’s more! These are just a few and I consider them popular. You can think of other things like sending mail notifications of the last commit, and more.
Later in this article, we’ll learn exactly how to implement these mentioned use cases.
Scope of Client-side hooks
These hooks are scoped to a local git repository. This means that when you push changes (after configuring .git/hooks) to the remote repository and you (or anyone else) clones the repository, the initial pre-populated scripts are present.
This becomes difficult to ensure policies across many local repositories of a project. ghooks solves this problem by configuring package.json so that on installing the package, the hooks folder for your project is populated and you can trigger some commands that will apply to all repositories of a project.
We’ll learn more of ghooks achieves this in the next section.
Customizing Git hooks
ghooks makes customizing git hooks seamlessly easier for developers. It configures the git hooks under the hooks directory. With that, we can provide commands that will run at specific operations.
With a little configuration, you can begin executing commands based on a git operation. Let’s see how with a few examples.
Setting up ghooks
Firstly, install the library:
npm install ghooks --save-dev
After installation, ghooks will configure the hooks in the hooks directory of git so that you can easily run your commands specified commands at specific action points of git operations.
Secondly, Add ghooks to package.json
Add ghooks to the config property in package.json like so:
{
  "config": {
    "ghooks": {
      // githook: command
    }
  }
}
That’s all there is to use ghooks. Let’s get started using it.
Setting up ghooks for mentioned the use cases
1. Ensure compliance with linting configurations before committing
For this example, we’d assume we have eslint configured for our application like so:
{
  "script": {
    "lint": "eslint ."
  },
}
With this hook, you can run the eslint command when a commit operation is about to be executed. That action would be configured like so:
{
  "script": {
    "lint": "eslint ."
  },
  "config": {
    "ghooks": {
      "pre-commit": "npm run lint"
    }
  }
}
With the above setup, git will trigger npm lint when you’re about to commit staged changes. This way, you can immediately get an error for code that doesn’t comply with your eslint configurations.
2 .Execute tests before committing
Normally after setting up test (say mocha), you’d have to run npm run test. Without git hooks, you may forget to run tests before committing. Tjat would be bad for your application.
Similar to the above configuration for linting, we would have:
{
  "script": {
    "test": "mocha ."
  },
  "config": {
    "ghooks": {
      "pre-commit": "npm run test"
    }
  }
}
3. Test your code after merging
Just like our test script above, we can have:
{
  "script": {
    "test": "mocha ."
  },
  "config": {
    "ghooks": {
      "post-merge": "npm run test"
    }
  }
}
This would return the test script after a merge operation is carried. This would help you focus on the parts of your application that needs attention before you start adding new features.
Wrap up
The use cases mentioned may look simple. These are very common cases. Different hooks can be used for different purposes. The customizability depends on how creative the developer can be. Check out this list of hooks to see when git triggers them so you can run your commands.
Git hooks make life easier for developers. It creates an automated flow of development that can save developers of errors and ensure standards in an application.
If I, as a contributor were to make changes to your application, these customized hooks will ensure that all requirements are followed.
By using githooks, you can create applications where people can contribute without breaking your application. Ghooks even makes it very easy.
I hope this getting started guide, gets you started using git hooks and ghooks.


