In this article, I am going to show you how to add multiple images to a Django model without any plugins. It’s better to keep the project simple and avoid any extra plugins which can cause unexpected errors during production or disable some of the functionalities. By using a small trick in Django admin you will able to upload multiple images to a particular model.
Now, I assume that you already activated your virtual environment so, let’s create a new Django project named “mysite” and a new app named “posts”.
django-admin startproject mysite
django-admin startapp posts
Since we use images in our project, we have to configure settings.py in order to serve static and media files and display templates. Update the TEMPLATES configuration:
settings.py
TEMPLATES = [
    {
        'BACKEND': 'django.template.backends.django.DjangoTemplates',
        'DIRS': [os.path.join(BASE_DIR, 'templates')],
        'APP_DIRS': True,
        'OPTIONS': {
            'context_processors': [
                'django.template.context_processors.debug',
                'django.template.context_processors.request',
                'django.contrib.auth.context_processors.auth',
                'django.contrib.messages.context_processors.messages',
            ],
        },
    },
]
Now, we should add static and media files configurations at the end of this file:
settings.py
STATIC_URL = '/static/'
STATICFILES_DIRS = [
    os.path.join(BASE_DIR, 'static'),
]
STATIC_ROOT = os.path.join(BASE_DIR, 'static_root')


MEDIA_URL = '/media/'
MEDIA_ROOT = os.path.join(BASE_DIR, 'media')
Great! It’s time to add our models into models.py and there will be two models in our case. The first model is “Post” which includes three fields just to show basic information about the post on the home page.
models.py
from django.db import models

class Post(models.Model):
    title = models.CharField(max_length=250)
    description = models.TextField()
    image = models.FileField(blank=True)

    def __str__(self):
        return self.title
As you see from the code snippet above we have a title, description, and image fields in the Post model. You can change FileField to ImageField it’s up to you since this tutorial covers multiple files and images, FileField is probably the right choice for now.
In Django, you can’t store multiple images in one field, so we are going to add a new model named “PostImage” to store all images and at this time we will use the ForeignKey field to create a relationship between these two models. Update your models.py by adding “PostImage” model:
models.py
from django.db import models

class Post(models.Model):
    title = models.CharField(max_length=250)
    description = models.TextField()
    image = models.FileField(blank=True)

    def __str__(self):
        return self.title

class PostImage(models.Model):
    post = models.ForeignKey(Post, default=None, on_delete=models.CASCADE)
    images = models.FileField(upload_to = 'images/')

    def __str__(self):
        return self.post.title
Once you updated models, it’s time to migrate our models and create a new superuser in order to access Django admin.
python manage.py makemigrations posts
python manage.py migrate
python manage.py createsuperuser
Great! Now, the main part is starting, open your admin.py to make configurations. We will create a single Django admin from two different models. The default Django administration comes with a concept of inlines, so if you have a one-to-many relationship you can edit the parent and its children on the same page or we can say admin interface has the ability to edit models on the same page as a parent model. However, you are limited in a way that you can’t have inlines inside inlines and nested one-to-many relations, so to avoid that we are using StackedInline class to edit “PostImage” model inside “Post” model.
admin.py
from django.contrib import admin

from .models import Post, PostImage

class PostImageAdmin(admin.StackedInline):
    model = PostImage

@admin.register(Post)
class PostAdmin(admin.ModelAdmin):
    inlines = [PostImageAdmin]

    class Meta:
       model = Post

@admin.register(PostImage)
class PostImageAdmin(admin.ModelAdmin):
    pass
Configure your admin.py as shown the above and you can go and check your admin now by clicking add new post. It should look like the image below:
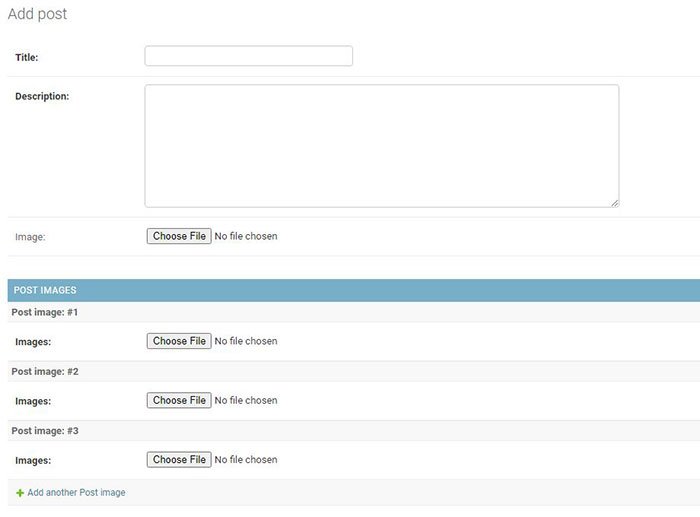
As you see you can add how many images you want into a Post model and all these images will belong to a specific Post model with the help of ForeignKey.
Now, navigate to your views.py to create views in order to render templates so we can see the created posts. In detail_view we are filtering “PostImage” objects by post foreign key, so related images will be populated inside detail of post. Simply add the following views, it’s not complicated just basic level views to populate images and posts :
views.py
from django.shortcuts import render, get_object_or_404

from .models import Post, PostImage

def blog_view(request):
    posts = Post.objects.all()
    return render(request, 'blog.html', {'posts':posts})

def detail_view(request, id):
    post = get_object_or_404(Post, id=id)
    photos = PostImage.objects.filter(post=post)
    return render(request, 'detail.html', {
        'post':post,
        'photos':photos
    })
Next, open urls.py to configure URLs and also add media URL configuration to serve images:
urls.py
from django.contrib import admin
from django.urls import path
from django.conf import settings
from django.conf.urls.static import static

from posts import views

urlpatterns = [
    path('admin/', admin.site.urls),
    path('', views.blog_view, name='blog'),
    path('<int:id>/', views.detail_view, name='detail')
] + static(settings.MEDIA_URL, document_root=settings.MEDIA_ROOT)
Finally, create a new folder named “templates” in your project, and then we will add three HTML files just to show posts and details in the browser.
base.html
<!DOCTYPE html>
<html lang="en">
<head>
    <meta charset="UTF-8">
    <meta name="viewport" content="width=device-width, initial-scale=1.0">
    <meta http-equiv="X-UA-Compatible" content="ie=edge">
    <link rel="stylesheet" href="https://stackpath.bootstrapcdn.com/bootstrap/4.4.1/css/bootstrap.min.css" integrity="sha384-Vkoo8x4CGsO3+Hhxv8T/Q5PaXtkKtu6ug5TOeNV6gBiFeWPGFN9MuhOf23Q9Ifjh" crossorigin="anonymous">
    <title>Multi-Image Tutorial</title>
</head>
<body>
    <div class="container py-4">
        {% block content %}
        {% endblock %}
    </div>
        <script src="https://code.jquery.com/jquery-3.4.1.slim.min.js" integrity="sha384-J6qa4849blE2+poT4WnyKhv5vZF5SrPo0iEjwBvKU7imGFAV0wwj1yYfoRSJoZ+n" crossorigin="anonymous"></script>
        <script src="https://cdn.jsdelivr.net/npm/popper.js@1.16.0/dist/umd/popper.min.js" integrity="sha384-Q6E9RHvbIyZFJoft+2mJbHaEWldlvI9IOYy5n3zV9zzTtmI3UksdQRVvoxMfooAo" crossorigin="anonymous"></script>
        <script src="https://stackpath.bootstrapcdn.com/bootstrap/4.4.1/js/bootstrap.min.js" integrity="sha384-wfSDF2E50Y2D1uUdj0O3uMBJnjuUD4Ih7YwaYd1iqfktj0Uod8GCExl3Og8ifwB6" crossorigin="anonymous"></script>
</body>
</html>
We are using Bootstrap just to give a simple design to our project.
blog.html
{% extends 'base.html' %}

{% block content %}
<div class="row row-cols-1 row-cols-md-2">
    {% for post in posts %}
    <div class="col mb-4">
      <div class="card">
        <div class="view overlay">
          <img class="card-img-top" src="{{post.image.url}}" alt="">
          <a href="#!">
            <div class="mask rgba-white-slight"></div>
          </a>
        </div>
        <div class="card-body">
          <h4 class="card-title">{{post.title}}</h4>
          <p class="card-text">{{post.description}}</p>
          <a href="{% url 'detail' post.id %}" class="btn btn-primary btn-md">Read more</a>
        </div>
      </div>
    </div>
    {% endfor %}
  </div>
{% endblock %}
detail.html
{% extends 'base.html' %}

{% block content %}
<!--Carousel Wrapper-->
<div id="carousel-example-1z" class="carousel slide carousel-fade" data-ride="carousel">
    <!--Indicators-->
    <ol class="carousel-indicators">
    {% for p in photos %}
      <li data-target="#carousel-example-1z" data-slide-to="{{ forloop.counter0 }}" class="{% if forloop.counter0 == 0 %} active {% endif %}"></li>
    {% endfor %}
    </ol>
    <!--/.Indicators-->
    <!--Slides-->
    <div class="carousel-inner" role="listbox">
      {% for p in photos %}
      <div class="carousel-item {% if forloop.counter0 == 0 %} active {% endif %}">
        <img class="d-block w-100" src="{{p.images.url}}"
          alt="First slide">
      </div>
      {% endfor %}
      <!--/First slide-->
    <!--/.Slides-->
    <!--Controls-->
    <a class="carousel-control-prev" href="#carousel-example-1z" role="button" data-slide="prev">
      <span class="carousel-control-prev-icon" aria-hidden="true"></span>
      <span class="sr-only">Previous</span>
    </a>
    <a class="carousel-control-next" href="#carousel-example-1z" role="button" data-slide="next">
      <span class="carousel-control-next-icon" aria-hidden="true"></span>
      <span class="sr-only">Next</span>
    </a>
    <!--/.Controls-->
  </div>

  {% endblock %}
In detail.html I added a carousel to show related images for a specific post. You can see the indicators of the carousel (<ol>) surrounded with for loops and I used for loop counter to detect active carousel item. The same logic applied to carousel items to detect active images.
Great! Now, you can create a new post and check it on the home page. Once you click the details you will able to see related images in a carousel.
I hope it helps you to organize your multiple images and also it keeps the project simple. Maybe there are a lot of plugins on the internet that can handle multiple images but as I said before these plugins can cause errors or disable some of the functionalities of the project. Simple is more!
You can find source code in the following link:
https://github.com/raszidzie/Multiple-Images-Django-Tutorial/






Just what i needed. Thaaaaaaaaaaaaaank you sooooo much!
It’s an amazing tutorial. I’ve got a question though. How can I handle all this within one view. So to have title and then multiple files on one view. I cannot work this out. Could you advice, please?
Is it possible to add dropzone js to an admin page? Drag and drop multiple image upload?
Hello. What code can I use in my views.py to receive multiple images from template and save each image at once?
Really appreciate you on this content, just a perfect one for me. Great job!
Managing large photo files across devices used to feel like such a headache. When working with Django models, I sometimes need quick access to my camera images on my phone. I came across a guide that simplified transferring digital camera to iphone. It’s way faster and has saved me tons of time, especially with bulk image uploads. Anyone who needs a smoother photo transfer process should check it out—it really simplifies things.