Writing API tests for web applications has proven to be the foundation for reliable and usable applications that work with API services. End to end API tests, especially, define a specification for applications thereby giving developers the confidence that their application meets the laid down requirements.
There are various ways that tests give that assurance. Most of these tests depend on the time they are executed. This could be before pushing to a repository, before merging to master branch, or when your app is deployed.
Most hosting services do not give the option to test your apps when deployed. So it’s left for you to apply tests before deployment. Thankfully, Heroku does. They do this with an add-on called Loadmill.
Loadmill comes with a lot of features than running tests on deployment. As we continue in this article, we’ll learn how to use Loadmill to automatically run API tests when our apps are deployed.
Why Should You Run API Tests on Deployment?
Testing locally (before pushing to a repository, before committing or any other similar method) is a good practice but it comes with limitations.
One of the most common limitations is “It works on my machine”. Your machine may be in the best state to support your application’s requirements, hence the tests are successful, but you may not be able to confidently say the same for other users of your application.
Another limitation is, your repository may contain new changes (maybe merged pull requests, minor online fixes, and so on) that your local repository may not be aware of. So, the tests are successful on your machine, but on deployment, the result is a bad experience for your users.
Since the deployment of any application is the last checkpoint before the app goes live, it would be the best practice to execute some tests at that point. Combining this method with local tests, GitHub integrations, and so on makes your application reliable.
What Is Loadmill?
Loadmill is a Heroku addon used for specifying and executing API tests on web applications. It also has more features like:
- One-click continuous testing: which runs tests automatically when your app is deployed and notifies you of any errors.
- GitHub integration: allows you to connect to the repository of your application and run tests for different branches. With this, you do not need another tool for your GitHub actions.
- Load testing: another area where Loadmill shines. With this feature, you can run numerous API test scenarios like you’re imitating multiple users on your application and measure response time.
- Track application performance: Loadmill compares the previous performance of your application with the current one to detect and prevent regression.
- and much more.
Another feature of Loadmill is that it can generate API tests automatically. It does this by scanning your application and analyzing user flows to create API tests.
Getting Started With Loadmill
Using loadmill in your application is easy and free. You can install it on your Heroku Dashboard or the terminal. For this article, we’ll be using the terminal.
Head over to your application’s directory in your terminal and do the following:
Install the Addon for Your App
heroku addons:create loadmill
The command above would setup the addon for your application on Heroku. Once successful, every test script provided to the addon would be executed on the next deployment.
The test results will be sent to your email address.
Loadmill Dashboard
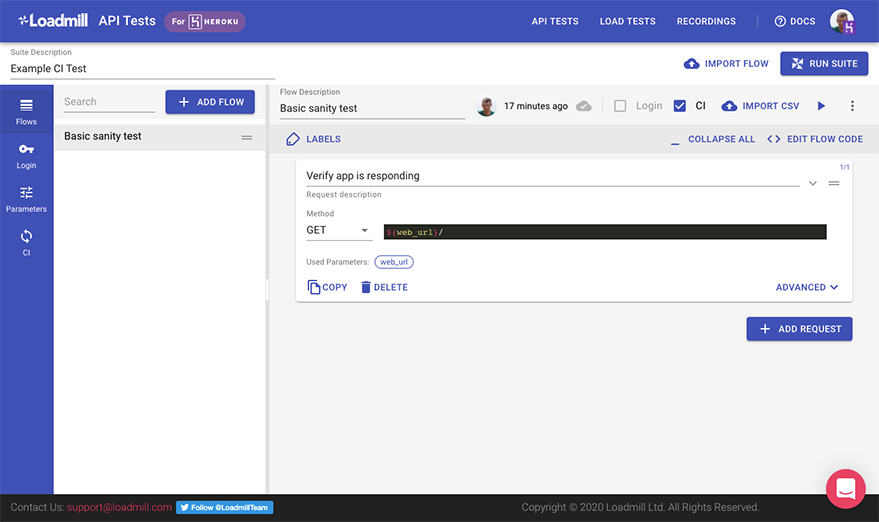
Loadmill DashboardLoadmill provides a dashboard that lets you easily add, modify, or delete tests. To access it, you can use this CLI command (in your application’s directory):
heroku addons:open loadmill
or, go to your Heroku Dashboard, select the application you installed loadmill on, and select loadmill from the Addons menu.
The diagram above shows a test case automatically added when loadmill is installed. You’d also noticed the CI label above checked. That action tells loadmill to run the tests automatically. For further tests you would create, you have to check the CI label, or run the tests when you choose.
Manage Your Test Reports
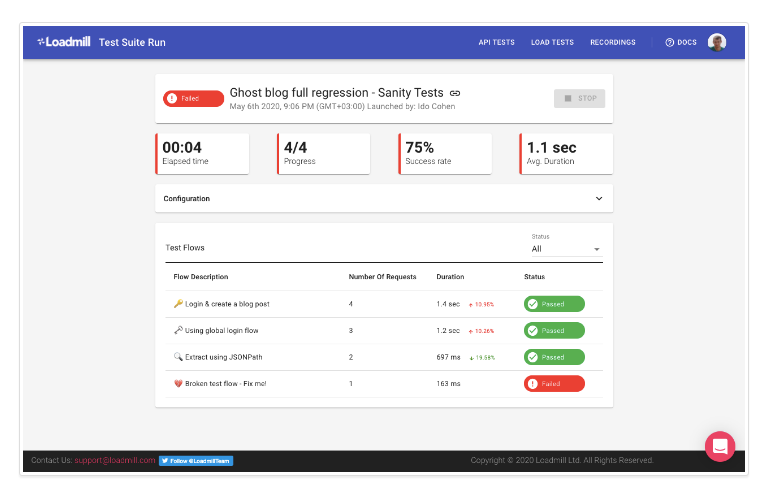
API Test ReportsJust like most testing services provide you with details of your tests (which one failed, which one passed), Loadmill provides a visual representation for that too. This helps you focus on rectifying the failing part of your system before deploying it again.
Adding a Test
To add a test, click on “Add Tests” followed by “New Test Suite”. This would open a dialog similar to this:
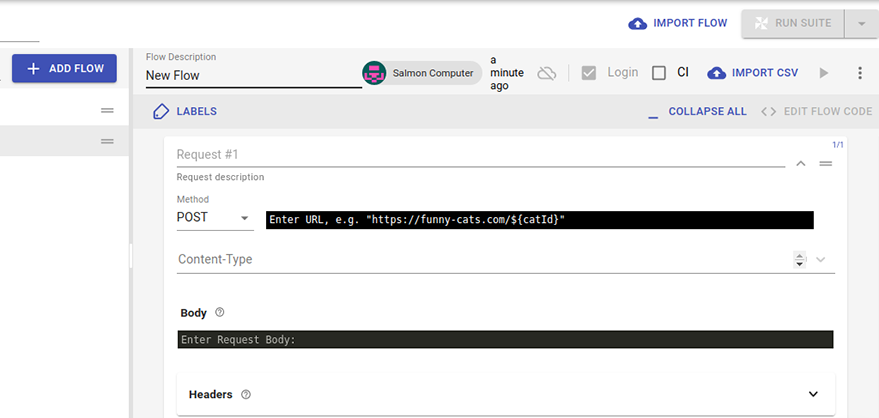
Adding a Test view on the dashboardHere, you can add multiple flows and multiple requests.
Let’s start with a GET request. We’ll be using JSON for these examples.
In the flow, select the GET method. Then enter https://jsonplaceholder.typicode.com/posts for the URL.
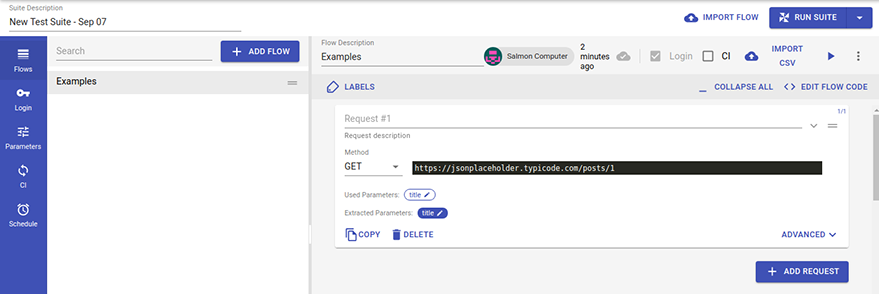
Process of adding a testWith the Add Request button, you can add more requests. For our example, we will use only one.
When you click Advanced, you’ll discover more options too. Here’s a screenshot of that:
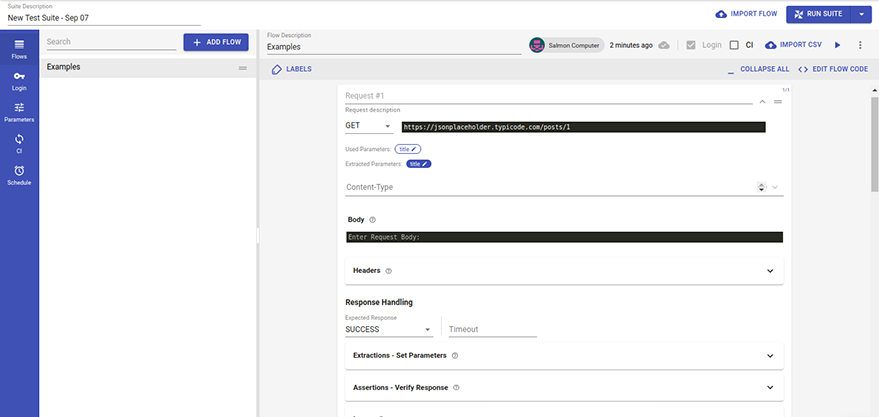
Advance options for adding testsAnother awesome feature of Loadmill is that you can place assertions on the response coming in.
Firstly, you would need to give a parameter name to the response coming in the “Extractions – Set Parameters” section, they you can add your assertions in “Assertions – Verify Response” section. Here’s a screenshot of that set up:
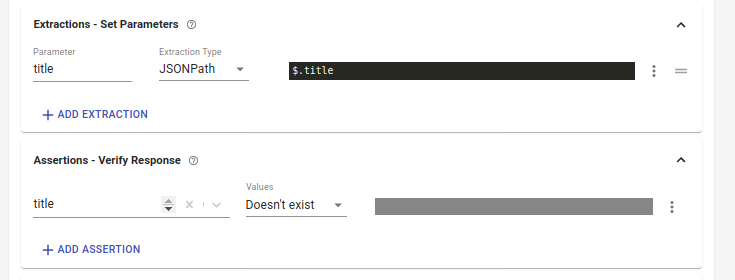
Creating assertions on for values gotten from APIAs seen above, we’ve extracted the title (using $.title) and named it title. Then we place an assertion such that the title parameter does not exist. Of course it does in the response, but I used that so that we can see the test fail. Here’s a screenshot of the report after clicking the play button:
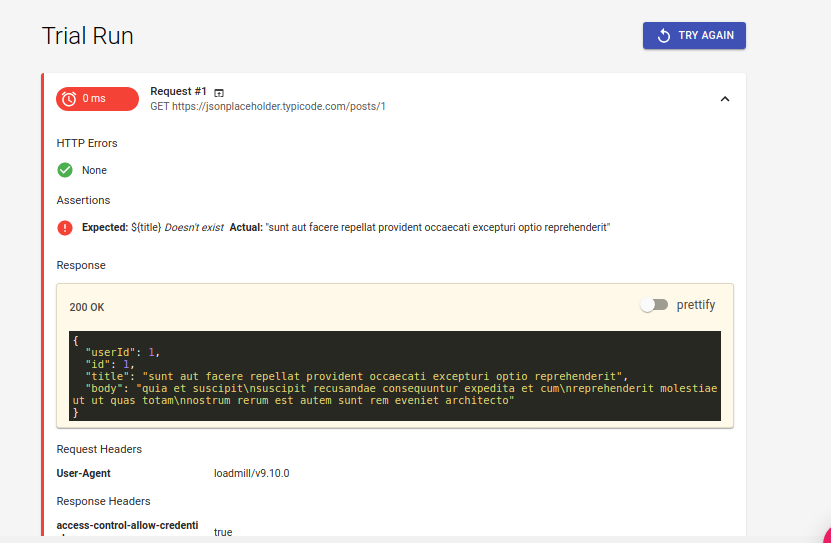
Test Report of API Test createdFor a POST request, the same rules and features apply. The difference is that the POST request can send body parameters.
With these flows setup, Loadmill can trigger numerous requests (from different servers) to the endpoints provided and evaluate the response time. It also suggests dyno configurations that you can apply to your app.
Conclusion
In this article, we looked at the importance of tests after deployment and how Loadmill, an add-on of Heroku apps, helps us to achieve this.
Tests after deployment give an immediate evaluation of your application’s performance and how it meets your requirements.
Loadmill helps us achieve this. It gives a quick overview of the performance of your application (during Load Testing) and the reliability of your APIs when you deploy your apps. The reports help you as a developer to apply new techniques for better performance, thereby making your application more usable.


