In this series, we will be building a Github Jobs App using React, Node, GraphQL, and Apollo Client. We will cover it in two separate articles. In the first part, we will create a GraphQL server from scratch with Node and Express.js. For the second part, we will build the client-side app using React.js and then connect it to the GraphQL server to get our full-stack app. So, let’s start this article by setting up our GraphQL server to fetch the data from the Github API.
Prerequisites
This tutorial assumes that you have at least some experience with Node, Express, and React. Knowledge of GraphQL and Apollo Client would come handy but is not compulsory. This guide will teach you some GraphQL basics and how to build a server with GraphQL, Node, and Express. This first part would benefit to folks who want to dive into GraphQL and start building their first API or server with it. Before we get started, make sure that you have these tools installed in your machine:
Node.js
Yarn (if you are using it)
Without further ado, let’s introduce GraphQL.
What is GraphQL?
GraphQL is a query language for your API created and maintained by Facebook. It allows you to query only the data you need. GraphQL has one single endpoint for all kinds of requests, and it expects an HTTP method of type Post for all requests, even for getting data. GraphQL is a powerful and flexible tool that uses schemas and resolvers. Each GraphQL schema defined in the API should have a corresponding GraphQL resolver (the names have to match). In this way, GraphQL can manage the request sent by the user with one single endpoint. We will dive more into these GraphQL concepts later – for now, let’s set up a new project.
Setting up
To create a new Node.js app, you need to open the command-line interface (CLI) and execute the following command.
yarn init
Or if you are using npm
npm init
Once the project initialized, let’s now structure the files as follows:
├── src
|  ├── graphql
|  |  ├── resolvers.js
|  |  └── schema.js
|  |  ├── app.js
├── package.json
└── yarn.lock
This file structure is relatively easy to understand. The graphql folder contains the files related to GraphQL, such as the schemas and the resolvers, and the index.js file is the entry point of the server. With this in place, we can now open the project on the CLI and then run this command below to install Express.js, Axios, and GraphQL.
yarn add express express-graphql graphql axios
Or for npm
npm install express express-graphql graphql axios
Here’s what each of the installed packages does:
– express is a minimalist web framework for Node.js
– express-graphql is a middleware that connects GraphQL to Express.js
– graphql enables the use of GraphQL in this project
– axios allows you to send HTTP requests to the Github API
We will be using the express-graphql library to create the server. But feel free to use other methods as well if you want too. We also need to install the nodemon library as a development dependency to live-reload the server on changes.
yarn add -D nodemon
Or
npm install -D nodemon
With this step forward, we can now create the GraphQL schema for our project in the next section.
Create the GraphQL schemas
A GraphQL schema is an object that defines a set of types with the fields of your data. It’s similar to types annotation in the TypeScript ecosystem. It describes the expected value of a given variable or function.
- graphql/schema.js
const { buildSchema } = require('graphql')

module.exports = buildSchema(`
type Job {
id: ID!
title: String!
type: String!
company: String!
description: String!
url:String!
location: String!
created_at: String!
}

type Query {
jobs:[Job!]
job(id: ID!): Job!
}

schema {
 query: Query
}

`)
As you can see here, we define the shape of a job object with the Job type. Next, we use it as a returned value on the GraphQL queries. Here, we have two types of queries: one for fetching all jobs and another for retrieving a single data. Finally, we pass the Query object to the schema property to inform GraphQL to use it as a schema for the GraphQL server. By the way, the fields provided by the Github API is more verbose than that. I have picked the relevant fields for this tutorial. Feel free to change the fields, depending on your needs. Great! We now have a schema to work with. So, let’s create the resolvers to request data from the API.
Create the GraphQL resolvers
A GraphQl resolver is a group of functions that allows sending a GraphQL query. It’s where we put the logic to create, get, update, or delete data from a database or API.
- graphql/resolvers.js
const axios = require('axios')

const API_URL = 'https://jobs.github.com/positions'

module.exports = {
jobs: async () => {
try {
const allJobs = await axios.get(`${API_URL}.json`)
return allJobs.data.map((job) => ({
id: job.id,
title: job.title,
type: job.type,
company: job.company,
created_at: job.created_at,
}))
} catch (error) {
throw error
}
},
job: async (req, res) => {
try {
const singleJob = await axios.get(`${API_URL}/${req.id}.json`)
return {
id: singleJob.data.id,
title: singleJob.data.title,
type: singleJob.data.type,
company: singleJob.data.company,
description: singleJob.data.company,
url: singleJob.data.url,
location: singleJob.data.location,
created_at: singleJob.data.created_at,
}
} catch (error) {
throw error
}
},
}
Here, we start by importing Axios and then declare a new constant, which holds the URL of the Github API. Next, we use the jobs() function to get all data from the API. And as you can already notice, the data matched the type Job defined earlier. Next, we rely on the job function to retrieve a single item. It expects to receive the id of the job object to get back the data. With this step forward, we can now dive into the last part of this tutorial and create the server.
Create the GraphQL server
The server will connect GraphQL to Express and then uses the GraphQL schema and resolvers to interact with the Github API.
– app.js
const express = require('express')
const { graphqlHTTP } = require('express-graphql')
const graphqlSchema = require('./graphql/schema')
const graphqlResolvers = require('./graphql/resolvers')

const app = express()

app.use(  '/graphql',
graphqlHTTP({
schema: graphqlSchema,
rootValue: graphqlResolvers,
graphiql: true,
}))

app.listen(3000, () => console.log('Server is running on localhost:3000'))
The library express-graphql provides a handy method named graphqlHTTP that enables you to create an endpoint using the schemas and the resolvers. Now, if a request is sent to /graphql, the GraphQL server will handle it appropriately. We pass graphiql: true as well to the method graphqlHTTP to enable access to the GraphQL interface (GraphiQL) when the user visits the endpoint /graphql. Next, we listen to the port 3000 to start the server whenever it’s ready. With that, we now have our GraphQL server. However, we still need to add a script in the package.json file to start the server. So, let’s do that.
Start the GraphQL server
– package.json
{
"name": "node-graphql-api",
"version": "1.0.0",
"main": "index.js",
"license": "MIT",
"scripts": {
"start": "nodemon index.js"
},

"dependencies":
{
"axios": "0.20.0",
"express": "4.17.1",
"express-graphql": "0.11.0",
"graphql": "15.3.0"
},

"devDependencies": {
"nodemon": "^2.0.2"
}
}
This command will start the server when you execute on the CLI yarn start or npm start. And as you already know, nodemon will live-reload the app when needed.
Test the GraphQL Server
We now have everything we need to check if the GraphQL server works. So, let’s browse to the root of the project and then open it on the CLI.
yarn start
Or
npm start
Browse now to the endpoint /graphql and add this code block to GraphiQL. This query will retrieve all jobs from the Github API.
– GraphiQL
{
jobs {
id
title
type
company
created_at
}
}
You should get the data like this.
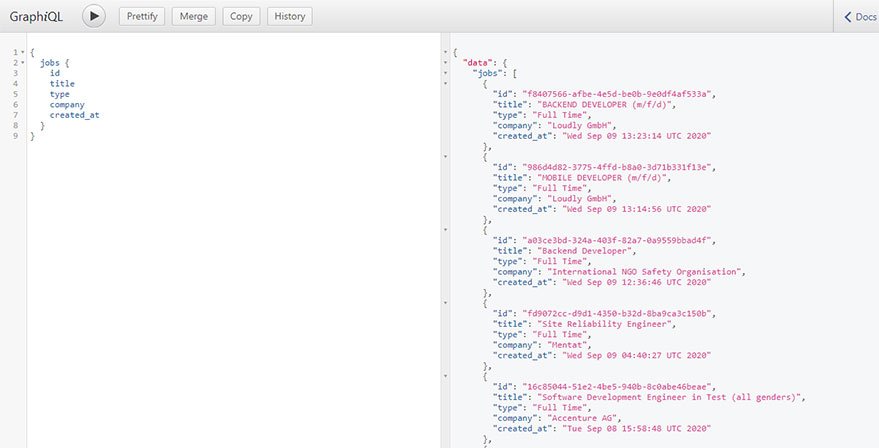
All Jobs PreviewYou can already appreciate the power and flexibility of GraphQL. It gives you only the data you need, nothing more, nothing less. Great! Let’s try to fetch a single object with this query.
query ($id: ID!) {
job(id: $id) {
id
title
type
company
description
url
location
created_at
}}
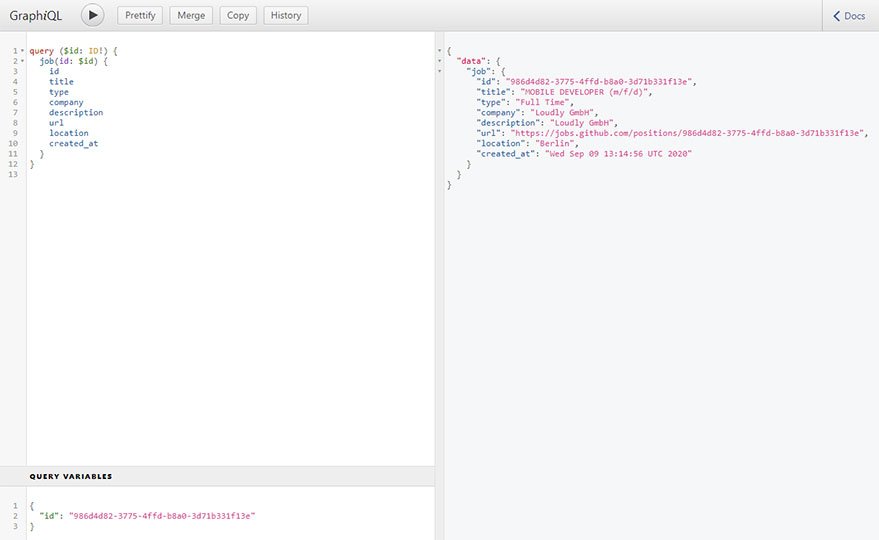
Single Job PreviewIt seems like everything is working correctly. We have now finished building the GraphQL server with Node.js, Express, and GraphQL.
Conclusion
Throughout this article, we have built our GraphQL server that allows fetching data from the Github API. In the second part of this series, we will be using React and Apollo Client to build the client-side app to interact with the server. Hopefully, you will be there.
You can find the finished project in this CodeSandbox. You can find other great content like this on my blog or follow me on Twitter to get notified. Thanks for reading, and see you soon for the second part.
Resources
Check out these resources to dive deeper into the content of this tutorial:


