In the first step, we are going to implement the Splash Screen using the latest version of React Native and plugins. Major steps in this tutorial are going to take place in Xcode as we need to configure the iOS part of the app for displaying the Splash Screen. The idea is to add the required splash screen icons and configure the native iOS app directory in the Xcode. We are going to make use of the react-native-splash-screen package in the React Native part as well as the iOS part to display the splash screen transition. Most of the work takes place in Xcode for configuring the splash screen and only some minor part is for the react-native side.
If we realize, there is already a default splash screen from react native project. But we are going to implement our own splash screen with our own logo icon for my site. For now, we have just put some text on the splash screen which is displayed in the emulator simulation below:
Generate Icon
Here download the logo from this link first we use this for build icon

Then go to makeappicon drop file then fill email wait for file coming to an inbox

Now we got icon set for Android and iOS in this one time

Icon and splash screen for iOS
In this step, we are going to configure the app in Xcode in order to integrate the splash screen. First, we need to open our project on Xcode as shown in the screenshot below:
use terminal in VsCode for open Xcode project by this command:
xed ios/kriss.xcodeproj
After opening Xcode, we need to add an app icon to Xcode project as directed in the screenshot below:
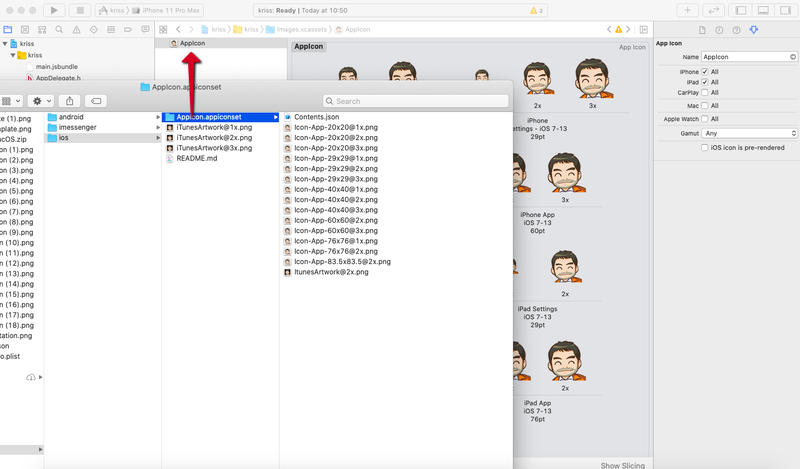
Next, we need to open the folder ./images.xcassest. Then, we need to choose AppIcon and replace the default icon with our new icon. Now, if we re-built our app, we will be able to see the new app icon as demonstrated in the screenshot below:

Update new splash screen
For the splash screen, we use the app icon that we downloaded earlier to generate an image set. We need to go to the Image Sets tab and drop the image. Lastly, we need to click generate to generate the image set as shown in the screenshot below:

Now, we have the new image set for splash screen.
Back to Xcode, we need to select + in this top and choose New Image Set. We can name it as SplashScreen:

Then, we need to drop new image set as directed in the screenshot below:
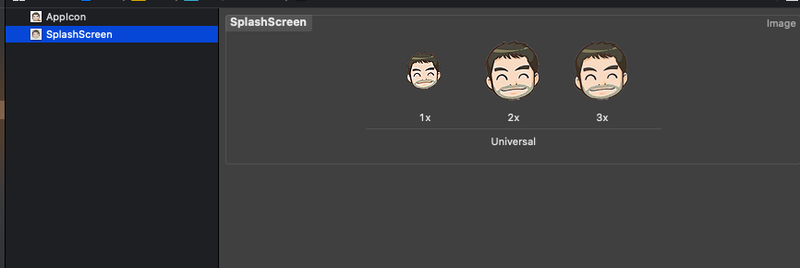
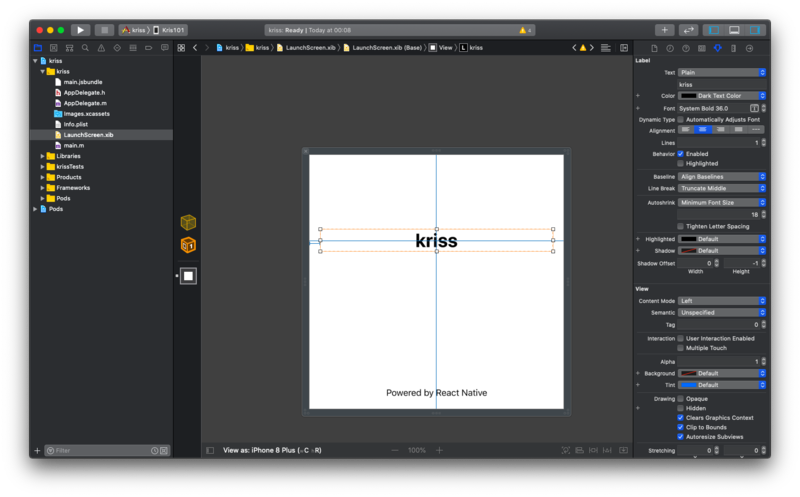
Next, we need to open LunchScreen.xib and replace old text as shown in the screenshot below:
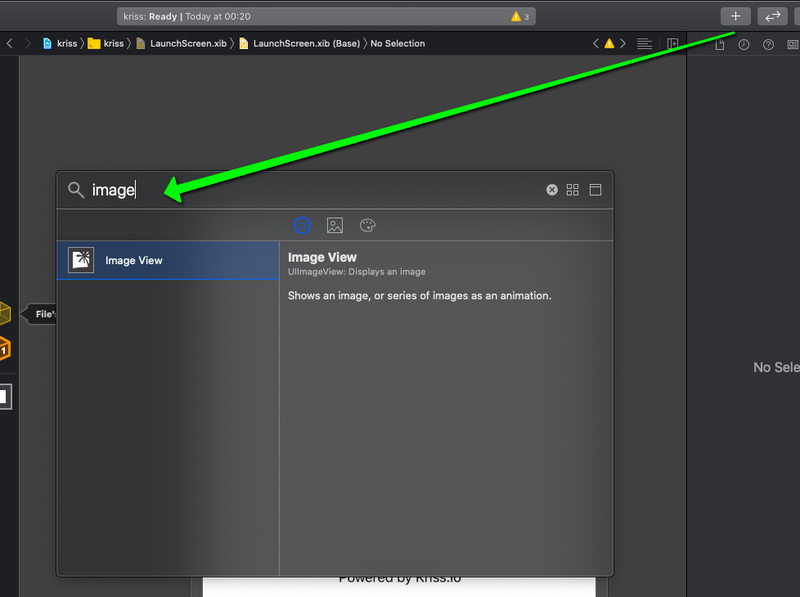
Then, we need to add new Image View as directed in the screenshot below:
Next, we need to choose the image set that we created before as shown in the highlighted section below:
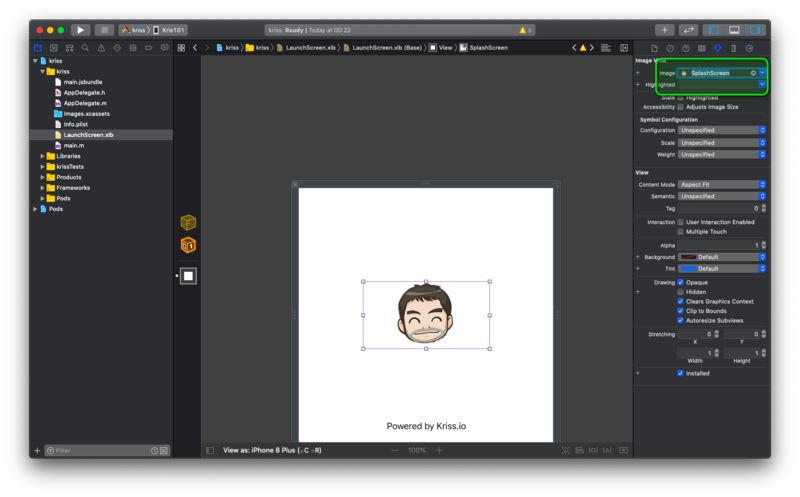
Lastly, we need to adjust the icon and splash screen size.
Autoresizing
We need to make the image responsive to the screen size. For that, we need to follow the image below:

Finally, we are done with setting a new splash screen. We can rebuild the app to see the new splash screen:

Icon and Splashscreen for Android
For the Android platform, we are going to use the same image set generated from makeappicon to create the App icon and Splash screen:

First, we need to replace old icons folder with new icons sets as directed in the screenshot below:

Now if we rebuild the app, we will see the new icon as depicted in the screenshots below:

For splash screen, we need to create the file named background_splash.xml in the location shown by the screenshot below:

Next, we need to copy the code from the code snippet below and paste it into the background_splash.xml file:
<?xml version="1.0" encoding="utf-8"?>
 <layer-list xmlns:android="http://schemas.android.com/apk/res/android">
  <item android:drawable="@color/white"/>
   <item
     android:width="200dp"
     android:height="200dp"
     android:drawable="@drawable/icon"
     android:gravity="center" />
</layer-list>
Next, we need to create the file named colors.xml in folder ./values. The full path to where the file should be created is shown in the image below:

Inside the file, we need to define the color values as shown in the code snippet below:
<?xml version="1.0" encoding="utf-8"?>
<resources>
  <color name="grey">#e8e8e8</color>
  <color name="white">#ffffff</color>
</resources>
Next, we need to open styles.xml inside the same folder where we created the colors.xml file. Then, we need to configure the status bar color by using the code from the code snippet below:
<resources>
<!-- Base application theme. -->
  <style name="AppTheme" parent="Theme.AppCompat.Light.NoActionBar">
<!-- Customize your theme here. -->
     <item name="android:statusBarColor">@color/grey</item>
   </style>
   <style name="SplashTheme" parent="Theme.AppCompat.Light.NoActionBar">
      <item name="android:windowBackground">@drawable/background_splash</item>
      <item name="android:statusBarColor">@color/white</item>
  </style>

</resources>
Now with colors and styles configured, we need to create a new file named launch_screen.xml inside the layout folder:

Inside the file, we need to add the code from the code snippet below:
<?xml version="1.0" encoding="utf-8"?>
<LinearLayout xmlns:android="http://schemas.android.com/apk/res/android"
    android:orientation="vertical"
    android:layout_width="match_parent"
    android:layout_height="match_parent"
    android:background="@color/white"
    android:gravity="center">
    <ImageView
        android:layout_width="200dp"
        android:layout_height="200dp"
        android:layout_marginTop="24dp"
        android:src="@mipmap/ic_launcher"
    />
</LinearLayout>
To activate the splash screen, we need to create a new activity file named SplashActivity.java. The file should be created in the located directed by the screenshot below:

Inside the activity file, we need to add the code from the following code snippet:
package com.kriss;

import android.content.Intent;
import android.os.Bundle;
import androidx.appcompat.app.AppCompatActivity;

public class SplashActivity extends AppCompatActivity {

    @Override

    protected void onCreate(Bundle savedInstanceState) {
    super.onCreate(savedInstanceState);=
    Intent intent = new Intent(this, MainActivity.class);
    startActivity(intent);
      finish();
    }

}
Next, we need to open AndroidManifest.xml file which is located as shown by the image below:

Here, we need to configure the SplashActivity.java file. For that, we need to add the new activity inside the application element as shown in the code snippet below:
<manifest xmlns:android="http://schemas.android.com/apk/res/android"

    package="com.kriss">
    <uses-permission android:name="android.permission.INTERNET" />
    <application
        android:name=".MainApplication"
        android:label="@string/app_name"
        android:icon="@mipmap/ic_launcher"
        android:roundIcon="@mipmap/ic_launcher_round"
        android:allowBackup="false"
        android:theme="@style/AppTheme">
            <activity
                android:name=".SplashActivity"
                android:theme="@style/SplashTheme"
                android:label="@string/app_name">
                <intent-filter>
                <action android:name="android.intent.action.MAIN" />
                <category android:name="android.intent.category.LAUNCHER" />
            </intent-filter>
            </activity>
        <activity android:name="com.facebook.react.devsupport.DevSettingsActivity" />

    </application>

</manifest>
Last thing in MainActivity.java we import SplashScreen package that got from command react-native link
package com.kriss;
import com.facebook.react.ReactActivity;
import android.os.Bundle;
import org.devio.rn.splashscreen.SplashScreen;

public class MainActivity extends ReactActivity {

    @Override

    protected void onCreate(Bundle savedInstanceState) {
    SplashScreen.show(this);
      super.onCreate(savedInstanceState);
    }
Now if we re-run the app, we will see the splash screen in the Android emulator or device:

Using React Native Splash Screen
Lastly, we need to close the splash screen as well. We need to do that from the React Native environment using the package called react-native-splash-screen. This package will help us hide the splash screen. Hence, we need to install the package first by running the following command in our project terminal:
yarn add react-native-splash-screen
For iOS, we need to run the following commands:
cd ios
pod install
react-native run-ios --device "Kris101"
Now, in the index.js file, we need to SplashScreen component from from ‘react-native-splash-screen’ package:
import SplashScreen from 'react-native-splash-screen';
Then, by using the useEffect hook or alternatively componentDidmount in the class component. we need to call the hide function to hide the Splash screen once the React Native app loads as shown in the code snippet below:
const Apps = () => {
    useEffect(() => {
        SplashScreen.hide();

    })
    return <App />
}
AppRegistry.registerComponent(appName, () => Apps);
Finally, we have successfully integrated a splash screen and app icon from both Android and iOS platforms.
Conclusion
This chapter was all about integrating the app icon and splash screen for both Android and iOS platforms. The tutorial mostly focuses on icon generation and native codes rather than React Native code. Integrating the app icon and splash screen makes the app look professional.
In the next chapter, we will implement the foundation of any React Native app which is React Navigation.
All the code is available on Github.


