In this chapter, we are going to implement the overall UI for the Home Screen in the Home.js file. Here, we are going to simply fetch data from the WordPress API and display the data on the Home screen as FlatList. We are also going to make use of the react-native-paper package using provides us with numerous useful components. Lastly, we will implement Pull to refresh and Infinite scroll as well.
Installing React Native paper
First, we need to install react-native-paper package by running the following command in our project folder:
yarn add react-native-paper
First, we need to install react-native-paper package by running the following command in our project folder:
import {
   Avatar,
   Button,
   Card,
   Title,
   Paragraph,
   List,
   Headline,
 } from 'react-native-paper';
First, we need to install react-native-paper package by running the following command in our project folder:
const Home = () => {
   return (
       <View>
           <Headline style={{ marginLeft: 23 }}>Lastest Post</Headline>
           <Card
               style={{
                   shadowOffset: { width: 5, height: 5 },
                   width: '90%',
                   borderRadius: 12,
                   alignSelf: 'center',
                   marginBottom: 10,
               }}>
               <Card.Content>
                   <Title>Blog post</Title>
                   <Card.Cover
                       style={{
                           width: '100%',
                           height: 190,
                           alignSelf: 'center',
                       }}
                       source={{
                           uri:
                               'https://images.unsplash.com/photo-15739212650045-8d99c48c879f?ixlib=rb-1.2.1&ixid=eyJhcHBfaWQiOjEyMDd9&auto=format&fit=crop&w=1050&q=80',
                       }}
                   />
                   <Paragraph>just a blog post</Paragraph>
               </Card.Content>
           </Card>
       </View>
   );

}

export default Home
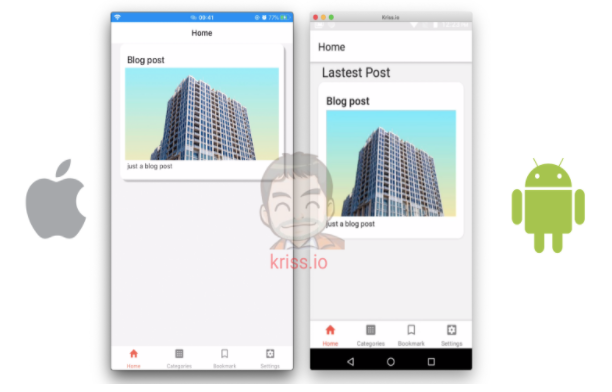
Here, we made use of the Card component as a parent component which wraps its sub-components. All the components have some styles integrated into them in order to make them look good.
Hence, we will get the following result on the emulator screen:
Fetch data from WordPress API
Next, we are going to fetch the posts from the WordPress API using the fetch() method. After fetching, we are going to parse the response into JSON format and configure it to the state called posts.
First, we need to import the modules to handle state from the react package as shown in the code snippet below:
import React, { useState, useEffect, useContext } from 'react';
Now in the Home.js file, we are going to create two state properties using the useState module. The two states are posts to which stores the posts result from server and setPosts method that enables us to set the posts state as shown in the code snippet below:
const Home = () => {
       const [posts, setPosts] = useState([]);
The coding implementation is in the function called fetchLastestPost() whose overall configuration is provided in the code snippet:
Const fetchLastestPost = async () => {
   const response = await fetch(
       `https://kriss.io/wp-json/wp/v2/posts?per_page=5`,
   );
   const posts = await response.json();
   setPosts(posts);
}
Here, we made an asynchronous call to the WordPress API from the function.
Next, we need to call the function in useEffect module alternatively we can also use componentDidmount in order to call fetchLastestPost.
The coding implementation is shown in the code snippet below:
useEffect(() => {
     fetchLastestPost()
 }, [])
The JSON data from the response will have a lot of properties.
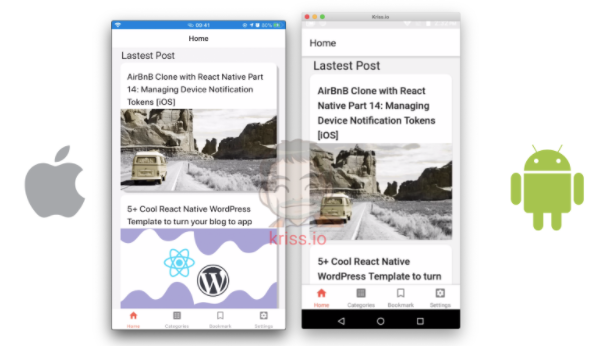
Next, we are going to wrap the Card component with the FlatList component and feed the API data into the FlatList. Then, the Card component template will be returned by the FlatList. But first, we need to import the FlatList component as shown in the code snippet below:
import { View, FlatList } from 'react-native'
Now, we are going to use the posts state data into the FlatList as shown in the code snippet below:
<FlatList
     data={posts}
     renderItem={({ item }) => (
         <Card
             style={{
                 shadowOffset: { width: 5, height: 5 },
                 width: '90%',
                 borderRadius: 12,
                 alignSelf: 'center',
                 marginBottom: 10,
             }}>
             <Card.Content>
                 <Title>{item.title.rendered}</Title>
             </Card.Content>
             <Card.Cover
                 source={{ uri: item.jetpack_featured_media_url }}
             />
         </Card>
     )}
     keyExtractor={(item, index) => index.toString()}
 />
Now, we are going to use the posts state data into the FlatList as shown in the code snippet below:
Display Html content with react-native-render-html
Now, we need to display the excerpt of the overall post on the list. For that, we are going to make use of components from the react-native-render-html package. And, we need to display the published date of the article as well. For that, we are going to make use of the moment package which provides the moment.js configurations.
In order to use these packages, we need to install them first. For that, we need to use the command from the following code snippet:
yarn add react-native-render-html moment react-native-webview
Now, we need to import both the packages in the Home.js file as shown in the code snippet below:
import HTMLRender from 'react-native-render-html'
import moment from 'moment'
Now, we are going to use the HTMLRender component and moment component in our Card template as shown in the code snippet below:
<Card
     style={{
         shadowOffset: { width: 5, height: 5 },
         width: '90%',
         borderRadius: 12,
         alignSelf: 'center',
         marginBottom: 10,
     }}>
     <Card.Content>
         <Title>{item.title.rendered}</Title>
         <Paragraph>Published on {moment(item.date).fromNow()}</Paragraph>
     </Card.Content>
     <Card.Cover
         source={{ uri: item.jetpack_featured_media_url }}
     />
     <Card.Content>
         <Card.Content>
             <HTMLRender html={item.excerpt.rendered} />
         </Card.Content>
     </Card.Content>
 </Card>
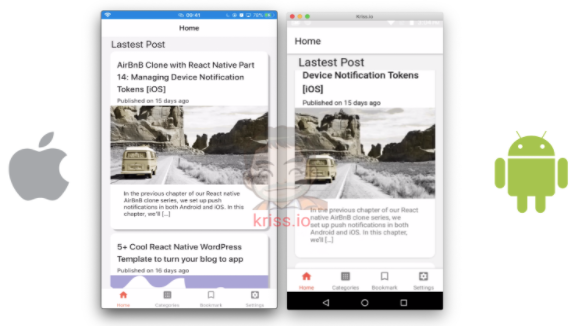
Here, we have used the HTMLRender component in order to display the excerpt data using HTML format. Then, using the moment method, we can customize the way in which the timestamp is being displayed.
Hence, we will get the following result in the emulator screens on the next page:
Adding pull to refresh and Infinite scroll
Here, we are going to implement pull to refresh which will refresh and make API call again to refresh the posts in the Home screen list. Also, we are going to add the Infinite scroll to the bottom of the Home screen. The infinite scroll will trigger the request to the server which will load more articles into the list.
Implementing Pull to Refresh
First, we are going to implement pull to refresh. For that, we need to define a state variable called isFetching which will handle the hiding and showing of refresh loader. The isFetching state and setIsFetching state function are defined using the useState module as shown in the code snippet below:
const [isFetching, setIsFetching] = useState(false);
Here, the isFetching state is initially set to false.
Next, we are going to use useEffect as listener on isFetching in case of state changes as shown in the code snippet below:
useEffect(() => {
       if (isFetching) {
           fetchLastestPost();
       }
   }, [isFetching]);
Next, we need to create a function called onRefresh() which will trigger when we pull the pull to refresh trigger. Here, the isFetching state is set to true using setIsFetching state method as shown in the code snippet below:
function onRefresh() {
       setIsFetching(true);
   }
Now, we need to add the onRefresh function to the onRefresh event of the FlatList as shown in the code snippet below:
<FlatList
		 data={posts}
            onRefresh={() => onRefresh()}
            refreshing={isFetching}
And, in the fetchLastestPost function, we also need to change the state of isFetching to false to hide the scroll loader at the end as shown in the code snippet below:
fetchLastestPost = async () => {
     const response = await fetch(
         `https://kriss.io/wp-json/wp/v2/posts?per_page=5`,
     );
     const posts = await response.json();
     setPosts(posts);
     setIsFetching(false)
 }
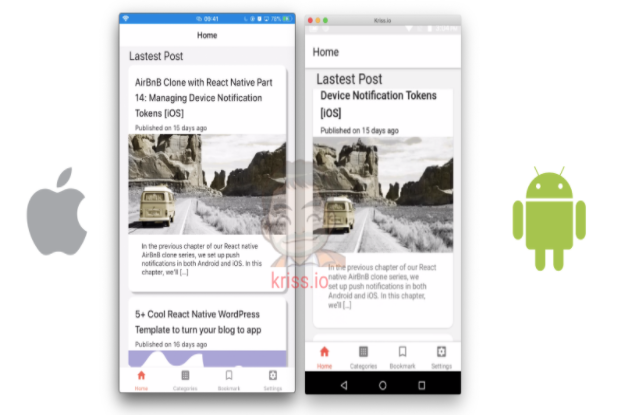
Hence, we will see the activity indicator when we make a gesture the pull the post downward to refresh the posts:
Implementing Infinite Scroll
Now, we are going to add the infinite scroll to the bottom of the Home screen. The idea is to load more articles when we scroll to the bottom. For that, we need to define a state variable called page which will handle which data we are fetching from the WordPress API. The setPage state method is used to set the page state variable. Initially, the page state is set to 1 as shown in the code snippet below:
const [page, setPage] = useState(1);
Now, the implementation of the handleLoadMore function is provided in the code snippet below:
function handleLoadMore() {
       setPage(page => page + 1);
   }
Here, we have incremented the page value by 1 using setPage state method.
Now, we use the useEffect module to listen for page change. If the page state variable value increases, we call the fetchLastestPost method as shown in the code snippet below:
useEffect(() => {
     if (page > 1) {
         fetchLastestPost();
     }
 }, [page]);
Now, we need to make some configuration in the fetching of API as well which will be based on the page number as shown in the code snippet below:
const fetchLastestPost = async () => {
     const response = await fetch(
         `https://kriss.io/wp-json/wp/v2/posts?per_page=5&page=${page}`,
     );
     const post = await response.json();
     if (page == 1) {
         setPosts(post);
     } else {
         setPosts([...posts, ...post]);
     }
     setIsFetching(false);
 }
Here, we have
- added page to the query in order to fetch next page.
- Then after fetching, we have concatenated it to the post state variable using setPosts state method.
Now, in order to add the Infinite scroll, we need to make use of the ActivityIndicator component from the react-native package.
Then, we need to implement a new function called renderFooter() which will return the template for ActivityIndicator wrapped by View component with styles or nothing based on the isFetching state as shown in the code snippet below:
function renderFooter() {
   if (isFetching) return null;
   return (
       <View
           style={{
               paddingVertical: 20,
               borderTopWidth: 1,
               borderColor: '#CED0CE',
           }}>
           <ActivityIndicator animating size="large" />
       </View>
   );
}
Hence, we are going to call handleLoadMore and call it in the onEndReached event of the FlatList. We are also configuring some additional props to the FlatList such as onEndReachedThreshold which controls the trigger of function based on how far we are from the bottom of the list. The overall implementation is provided in the code snippet below:
<FlatList
    data={posts}
         onRefresh={() => onRefresh()}
      	refreshing={isFetching}
      	     onEndReached={() => handleLoadMore()}
         onEndReachedThreshold={0.1}
         	ListFooterComponent={() => renderFooter()}
Hence, if we re-run the app, we can call a new post when we scroll to the bottom of the Home screen as shown in the emulator simulation below:
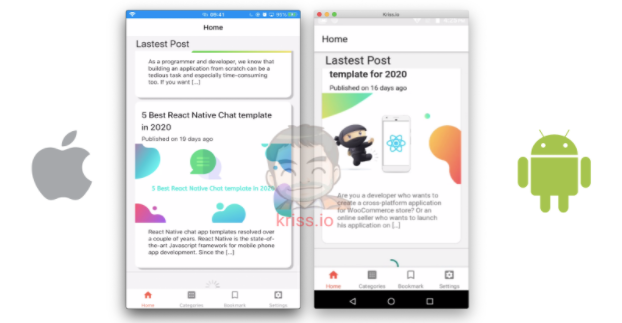
Finally, we have successfully completed the implementation of the Home screen list.
Conclusion
In this chapter, we learned how to implement the overall UI of the Home screen tab using the react-native-paper package. We also learned how to fetch the data from the WordPress server using the fetch method. Then, we set up the react-native-render-html and moment package in order to render the HTML tags and also format the timestamp using the moment package. Furthermore, we learned how to configure the pull to refresh function in both android and iOS. Lastly, we learned how to set up the infinite loader to trigger load more function which loads additional articles into the list.
All code in this chapter is available on GitHub.


