Here, we are going to implement the list view of bookmarked posts in the Bookmark screen and also work on implementing the Categories screen. For the post list in the Bookmark screen, we are going to use the post id that we saved to AsyncStorage from the SinglePost screen in the previous tutorial to fetch the articles on the bookmark screen. After that, we are going to implement the Categories screen. This screen will contain the list of categories related to the article posts. And on clicking on these categories, we will navigate to the posts which are based on that respective category. The implementation is simple. We are going to fetch the categories data and display it with the FlatList component. And by using the TouchableOpacity component, we will navigate to the new list screen which will display the list of article posts based on that category.
Let’s get started!
Bookmark List Screen
Now, we need to create a screen to display the posts which have been bookmarked. So, we need to go to the Bookmark.js file as import the required components and packages as shown in the code snippet below:
import React, { useEffect, useState, useContext } from 'react';
import { FlatList, View, Image } from 'react-native';
import FlatlistItem from '../components/FlatlistItem';
import { Headline, Text } from 'react-native-paper';
import ContentPlaceholder from '../components/ContentPlaceholder';
import AsyncStorage from '@react-native-community/async-storage';
Then, we need to define the initial states called bookmarkpost and isloading state to handle the post and preloader as shown in the code snippet below:
   const Bookmark = ({ navigation }) => {
   const [bookmarkpost, setbookmarkpost] = useState([]);
   const [isloading, setisloading] = useState(true);
Next, we need to create a function for fetching the bookmarked post. The coding implementation for this is provided in the code snippet below:
const fetchBookMark = async () => {
       await AsyncStorage.getItem('bookmark').then(async (token) => {
           res = JSON.parse(token);
           setisloading(true);
           if (res) {
               console.log('arr', res)
               const result = res.map(post_id => {
                   return 'include[]=' + post_id;
               });
               let query_string = result.join('&');
               const response = await fetch(
                   `https://kriss.io/wp-json/wp/v2/posts?${query_string}`,
               );
               const post = await response.json();
               setbookmarkpost(post);
               console.log(post)
               setisloading(false);
           } else {
               setbookmarkpost([]);
               setisloading(false);
           }
       });
   };
The coding implementation in the above code snippet is explained below:
- First, we get bookmarked data from Asyncstorage.
- Next, we convert the string data to the array form.
- Then, we loop through the strings and create a query string for fetching the post.
- Then, we concatenate the query string to the main URL.
Now, we have successfully completed the implementation of the Bookmark List screen.
Using Focus Hook
In order to update data every time a user navigates to the Bookmark screen, we are going to use the Focus hook from react-navigation to detect screen focus events. First, we need to import the hook function as shown in the code snippet below:
import { useIsFocused } from '@react-navigation/native';
Then, we need to create a new constant as shown in the code snippet below:
const isFocused = useIsFocused();
And, also use useEffect hook to observe isFocused event as shown in the code snippet below:
useEffect(() => {
       fetchBookMark();
   }, [isFocused]);
Lastly, we need to make the conditional rendering to display the screen with data or without the data as shown in the code snippet below:
if (isloading) {
       return (
           <View style={{ marginTop: 30, padding: 12 }}>
               <ContentPlaceholder />
           </View>
       );
   } else if (bookmarkpost.length == 0) {
       return (
          <View style={{ textAlign: 'center', alignItems: 'center', alignSelf: 'center' }}>
               <Image source={require('../assets/image/nobookmark.png')} />
           </View>
       );
   } else {
       return (
           <View>
               <Headline style={{ marginLeft: 30 }}>Bookmark Post</Headline>
               <FlatList
                   data={bookmarkpost}
                   renderItem={({ index, item }) => (
                       <React.Fragment>
                           <FlatlistItem item={item} navigation={navigation} />
                       </React.Fragment>
                   )}
                   keyExtractor={(item, index) => index.toString()}
               />
           </View>
       );
   }
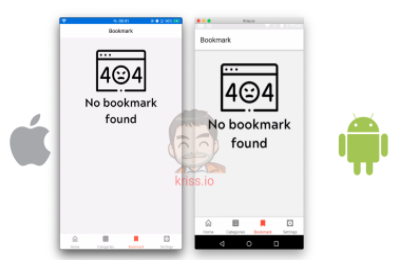
Hence, the Bookmark screen without any bookmarked posts is shown in the emulator screenshots below:
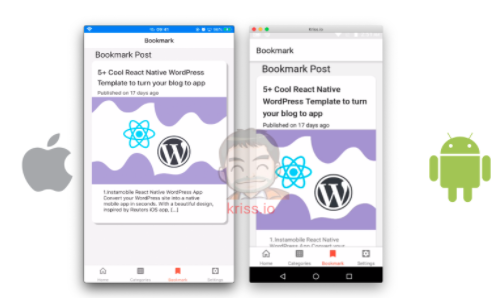
While the Bookmark screen with bookmarked posts is shown in the emulator screenshots below:
Hence, we have successfully implemented the bookmark feature along with Bookmark List screen.
Implementing Categories Screen
First, we need to import the necessary component in the Category.js screen as shown in the code snippet below:
import React, { useState, useEffect, useContext } from 'react';
import { FlatList, ScrollView, View, TouchableOpacity } from 'react-native';
import ContentPlaceholder from '../components/ContentPlaceholder';
import { Card, Title } from 'react-native-paper'
Next, we need to create a functional component that receives a navigation option as a parameter. We also need to define some state variables to handle the preloaders and categories data as shown in the code snippet below:
   const Categories = ({ navigation }) => {
   const [isloading, setisloading] = useState(true);
   const [categories, setCategories] = useState([]);
Now, we need to create a function that fetches data from WordPress Api. First, we need to set the loading state to true to show the content placeholders until the data has been fetched. After the data is fetched successfully, we will display the fetched data and hide the loading placeholders. For that, we need to use the code from the following code snippet:
const fetchCategorie = async () => {
       setisloading(true);
       const response = await fetch(`https://kriss.io/wp-json/wp/v2/categories`);
       const categories = await response.json();
       setCategories(categories);
       setisloading(false);
   };
For the initial load, we need to call the function inside the useEffect hook as shown in the code snippet below:
useEffect(() => {
       fetchCategorie();
   }, []);
Next, we start implementing the UI part. The UI implementation is the same in which we will set the conditional rendering to show either preloaders or a categories data in FlatList as shown in the code snippet below:
if (isloading) {
       return (
           <View style={{ marginTop: 30, padding: 12 }}>
               <ContentPlaceholder />
           </View>
       );
   } else {
       return (
            <FlatList
                   data={categories}
                   renderItem={({ item }) => (
                       <TouchableOpacity
                           onPress={() =>
                               navigation.navigate('CategorieList', {
                                   categorie_id: item.id,
                                   categorie_name: item.name,
                               })
                           }>
                           <Card>
                               <Card.Content>
                                   <Title>{item.name}</Title>
                               </Card.Content>
                           </Card>
                       </TouchableOpacity>
                   )}
                   keyExtractor={(item, index) => index.toString()}
               />
         );
   }
}
export default Categories
Hence, we will get the following result on our emulator screen:
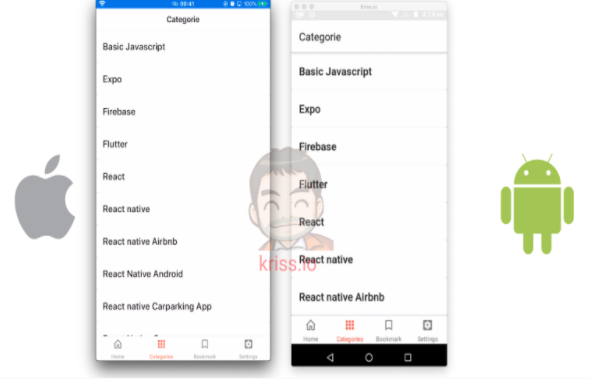
Display Categories list
Now, we need to create a screen that will show the list of posts based on a particular category. This screen will be the same as the Home screen. Only the post will be based on the category we choose. Here, we are going to add pull to refresh and infinite scroll as well.
First, we need to create a new component screen name CategorieList.js in the components folders. Then, we need to make the following imports to the file:
import React, { useEffect, useState, useContext } from 'react';
import { FlatList, View, ActivityIndicator } from 'react-native';
import ContentPlaceholder from '../components/ContentPlaceholder';
import FlatlistItem from '../components/FlatlistItem';
Next, we need to define the state variables for posts, page, fetching and loading states as shown in the code snippet below:
const CategorieList = ({ navigation, route }) => {
   const [posts, setPosts] = useState([]);
   const [isloading, setIsLoading] = useState(true);
   const [isFetching, setIsFetching] = useState(false);
   const [page, setPage] = useState(1);
The posts state is for handling the fetched post, isloading state to handle the display of preloaders, and the page state to handle the fetched page from the server.
Now, we need to make use of useEffect hook to observe events for pull to refresh and infinite scroll as shown in the code snippet below:
useEffect(() => {
       fetchLastestPost();
   }, []);
   useEffect(() => {
       if (isFetching) {
           fetchLastestPost();
       }
   }, [isFetching]);
   useEffect(() => {
       if (page > 1) {
           fetchLastestPost();
       }
   }, [page]);
Now, in order to fetch the data from WordPress API, we are going to implement an asynchronous function and use the category id and page queries in the URL as shown in the code snippet below:
const fetchLastestPost = async () => {
       let categorie_id = route.params.categorie_id;
       const response = await fetch(
           `https://kriss.io/wp-json/wp/v2/posts?categories=${categorie_id}&per_page=5&page=${page}`,
       );
       const post = await response.json();
       if (page == 1) {
           setPosts(post);
       } else {
           setPosts([...posts, ...post]);
       }
       setIsLoading(false);
       setIsFetching(false);
   };
Then, we need to create two functions to handle pull to refresh and infinite scroll as shown in the code snippet below:
function onRefresh() {
       setIsFetching(true);
   }
   function handleLoadMore() {
       setPage(page => page + 1);
   }
   function renderFooter() {
       if (isFetching) return null;
       return (
           <View
               style={{
                   paddingVertical: 20,
                   borderTopWidth: 1,
                   borderColor: '#CED0CE',
               }}>
               <ActivityIndicator animating size="large" />
           </View>
       );
   }
We need the preloader content placeholder to the render method as well. We are going to use isloading state to handle the showing and hiding of preloaders as shown in the code snippet below:
if (isloading) {
       return (
           <View style={{ marginTop: 30, padding: 12 }}>
               <ContentPlaceholder />
           </View>
       );
   } else {
       return (
           <View>
               <FlatList
                   data={posts}
                   onRefresh={() => onRefresh()}
                   refreshing={isFetching}
                   onEndReached={() => handleLoadMore()}
                   onEndReachedThreshold={0.1}
                   ListFooterComponent={() => renderFooter()}
                   renderItem={({ index, item }) => (
                         <FlatlistItem item={item} navigation={navigation} />
                      )}
                   keyExtractor={(item, index) => index.toString()}
               />
           </View>
       );
   }
};

export default CategorieList;
Hence, we will get the following result on the emulator screen:
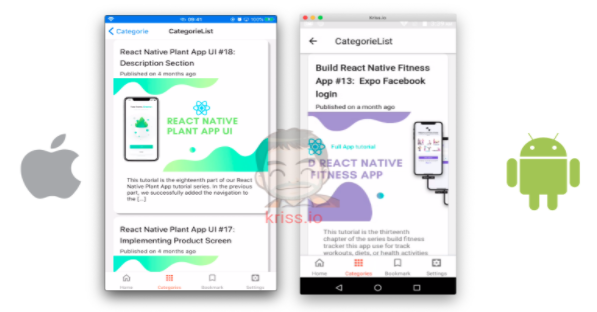
Finally, we have completed the implementation of Categories Screen in our project.
Conclusion
In this chapter, we made use of the AsyncStorage and fetch method to successfully fetch the bookmarked post to be displayed on the Bookmark screen. Then, we went on to implement the overall UI of the Categories screen as well as the Categories List screen. We learned how to fetch the categories of different posts from the WordPress API. Then, we implemented the navigation to the Category List screen where we learned how to fetch the articles post based on the category id and display them as a list. Then, by clicking on the article posts we navigated to the SinglePost screen.
In the next chapter, we will learn how to use Formik, Yup, and Firebase to create a simple form.
All code available on Github.


