Introduction
Validation is important for any website. Validation makes sure that user input is valid or not. If the input is not valid then throw a validation message. In fact, if you observe the latest Asp.Net technologies, you could find out that the validation feature was given extreme importance with fine updates.
Asp.net MVC provides a set of validations that is easy to use. It is the best way to deal with errors. We all knew about the validation through data annotation. Now we will see with the help of fluent validation.
What is Fluent Validation?
Fluent validation is a validation library for .NET. This will be separated from the business logic. So, it has an advantage over data annotation validation. This library is available in the NuGet package so it is easy to add to the application.
Example:
Let’s take a simple example.
Step 1: – Add Fluent Validation Package
To use the fluent validators, we first need to download it from the NuGet packages. Just write the “FluentValidation” and download version 8.6.1 since “FluentValidation.Mvc5” is deprecated.

Step 2: – Create a view model
Now let’s take a view model class to apply fluent validation. We have named it Client View Model, you can give it to yours. There are three properties in the view model class as described below in the snippet.
using System;
using System.Collections.Generic;
using System.Linq;
using System.Web;

namespace FluentValidatorMVC.Model
{
    public class ClientViewModel
    {
        public string ValidateUserName { get; set; }
        public string ValidateEmailAddress { get; set; }
        public string ValidatePassword { get; set; }
    }
}
There are three properties in ClientViewModel, “ValidateUserName”,” ValidateEmailAddress”, and” ValidatePassword”.
Step 3: – Create the validator class
Now we will create the validator class for our view model class to perform the validation on it. Inherits this class to the “AbstractValidator”. It is the base class for object validators.
using FluentValidation;
using FluentValidatorMVC.Model;
using System;
using System.Collections.Generic;
using System.Linq;
using System.Web;

namespace FluentValidatorMVC.Models
{
    public class ValidatorModel : AbstractValidator<ClientViewModel>
    {
        public ValidatorModel()
        {
            RuleFor(x => x.ValidateUserName).NotEmpty().WithMessage("Required Field");
            RuleFor(x => x.ValidateEmailAddress).EmailAddress().WithMessage("Please enter valid email address").NotEmpty().WithMessage("Required
Field");
            RuleFor(x => x.ValidatePassword).NotEmpty().WithMessage("Required Field").Length(4,8);
        }
    }
}
Here RuleFor defines the specific rule for the specific property. We have passed the view model in the base class validator. We have used the validation for not empty text fields, for an email address, and for password length.
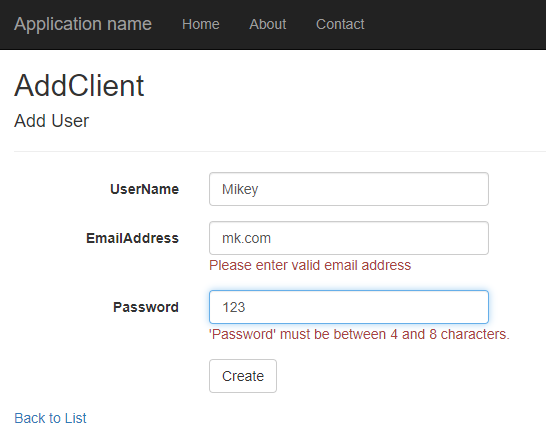
If any of these fields is null or empty then it will show a validation message using the “WithMessage” property.
Apart from this, there are other validation properties like Must (for age validation), Equal (for password field), and InclusiveBetween (for range validation).
Step 4: – Create the Factory class
We will create the Fluent validator factory which inherits from the validator factory base class. Validator factory base class is the factory for creating validators.
using FluentValidation;
using FluentValidatorMVC.Model;
using System;
using System.Collections.Generic;
using System.Linq;
using System.Web;

namespace FluentValidatorMVC.Models
{
    public class FluentValidatorFactory : ValidatorFactoryBase
    {
        private static Dictionary<Type, IValidator> validators = new Dictionary<Type, IValidator>();

        static FluentValidatorFactory()
        {
            validators.Add(typeof(IValidator<ClientViewModel>), new ValidatorModel());
        }

        public override IValidator CreateInstance(Type validatorType)
        {
            IValidator validator;
            if(validators.TryGetValue(validatorType, out validator))
            {
                return validator;
            }
            return validator;
        }
    }
}
As we can see here that, we have to inherit the factory base class and created two static methods. We have taken here the static dictionary variable and static constructor. The Dictionary variable represents the key-value pair. Here the key is the type and the value is IValidator. IValidator gets the validation rule from the validator class at run time on the view model class.
We have defined the static constructor because the validation rule will be applied or registered on the related view model one single time when the application run.
Step 5: – Execute validation factory
Now we need to execute the validation factory constructor when the application runs, so create the instance of it in the global. asax file as shown below.
using FluentValidation.Mvc;
using System;
using System.Collections.Generic;
using System.Linq;
using System.Web;
using System.Web.Mvc;
using System.Web.Optimization;
using System.Web.Routing;
using FluentValidatorMVC.Models;

namespace FluentValidatorMVC
{
    public class MvcApplication : System.Web.HttpApplication
    {
        protected void Application_Start()
        {
            AreaRegistration.RegisterAllAreas();
            FilterConfig.RegisterGlobalFilters(GlobalFilters.Filters);
            RouteConfig.RegisterRoutes(RouteTable.Routes);
            BundleConfig.RegisterBundles(BundleTable.Bundles);
            ValidatorConfiguration();
        }

        private void ValidatorConfiguration()
        {
            FluentValidationModelValidatorProvider.Configure(provider =>
            {
                provider.ValidatorFactory = new FluentValidatorFactory();
            });
        }
    }
}
As we can see here, we have created the validation configuration method and, in the method, we have defined the validator factory class.
Step 6: – Create the controller
First, create the controller and two action methods for view and insert the value in it.
using FluentValidatorMVC.Model;
using System;
using System.Collections.Generic;
using System.Linq;
using System.Web;
using System.Web.Mvc;

namespace FluentValidatorMVC.Controllers
{
    public class ValidatorController : Controller
    {
        // GET: Validator
        public ActionResult Index()
        {
            return View();
        }
        [HttpGet]
        public ActionResult AddClient()
        {
            return View();
        }
        [HttpPost]
        public ActionResult AddClient(ClientViewModel clientmodel)
        {
            if (ModelState.IsValid)
            {
                //your code
            }
            return View();
        }
    }
}
Step 7: – Create the view
Now create the view of this method and run the project. In the view, place below code.
@model FluentValidatorMVC.Model.ClientViewModel
@{
    ViewBag.Title = "AddClient";
}

<h2>AddClient</h2>

@using (Html.BeginForm())
{
    @Html.AntiForgeryToken()

    <div class="form-horizontal">
        <h4>Add User</h4>
        <hr />
        @Html.ValidationSummary(true, "", new { @class = "text-danger" })

        <div class="form-group">
            @Html.LabelFor(model => model.ValidateUserName, htmlAttributes: new { @class = "control-label col-md-2" })
            <div class="col-md-10">
                @Html.EditorFor(model => model.ValidateUserName, new { htmlAttributes = new { @class = "form-control" } })
                @Html.ValidationMessageFor(model => model.ValidateUserName, "", new { @class = "text-danger" })
            </div>
        </div>

        <div class="form-group">
            @Html.LabelFor(model => model.ValidateEmailAddress, htmlAttributes: new { @class = "control-label col-md-2" })
            <div class="col-md-10">
                @Html.EditorFor(model => model.ValidateEmailAddress, new { htmlAttributes = new { @class = "form-control" } })
                @Html.ValidationMessageFor(model => model.ValidateEmailAddress, "", new { @class = "text-danger" })
            </div>
        </div>

        <div class="form-group">
            @Html.LabelFor(model => model.ValidatePassword, htmlAttributes: new { @class = "control-label col-md-2" })
            <div class="col-md-10">
                @Html.EditorFor(model => model.ValidatePassword, new { htmlAttributes = new { @class = "form-control" } })
                @Html.ValidationMessageFor(model => model.ValidatePassword, "", new { @class = "text-danger" })
            </div>
        </div>

        <div class="form-group">
            <div class="col-md-offset-2 col-md-10">
                <input type="submit" value="Create" class="btn btn-default" />
            </div>
        </div>
    </div>
}

<div>
    @Html.ActionLink("Back to List", "Index")
</div>

@section Scripts {
    @Scripts.Render("~/bundles/jqueryval")
}
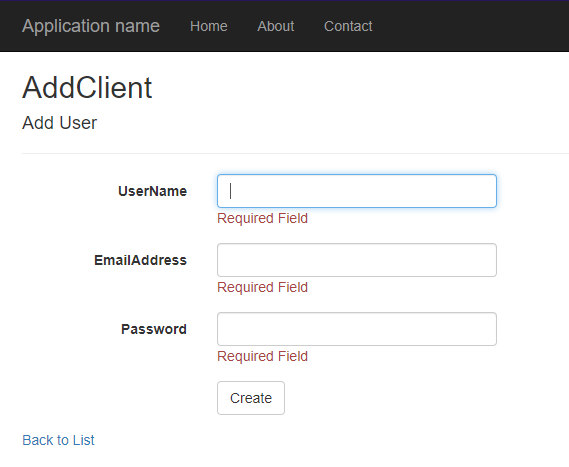
Output:
We can do this validation using the validator attribute as shown below.
using FluentValidation.Attributes;
using FluentValidatorMVC.Models;

namespace FluentValidatorMVC.Model
{
    [Validator(typeof(ValidatorModel))]
    public class ClientViewModel
    {
        public string ValidateUserName { get; set; }
        public string ValidateEmailAddress { get; set; }
        public string ValidatePassword { get; set; }
    }
}
So, using this validator attribute we can perform the validation. And do change in global. asax file. Just add one configure method in the application_start method.
using FluentValidation.Mvc;
using FluentValidatorMVC.Models;

namespace FluentValidatorMVC
{
    public class MvcApplication : System.Web.HttpApplication
    {
        protected void Application_Start()
        {
            AreaRegistration.RegisterAllAreas();
            FilterConfig.RegisterGlobalFilters(GlobalFilters.Filters);
            RouteConfig.RegisterRoutes(RouteTable.Routes);
            BundleConfig.RegisterBundles(BundleTable.Bundles);
            FluentValidationModelValidatorProvider.Configure();
        }
    }
}
Client-Side Validation: –
Note here that fluent validation also supports the client-side validation in MVC but there are only some rules that are supported. Which we have listed below.
- Not Null/Not Empty
- Regex validation
- Range validation
- Equal to
- Length
Conclusion
In this blog, we have seen how to download the fluent package and how to use this fluent validator in MVC. This is simple and easy to add new validation because it will reside in the specific validator class file. But in MVC, we can add the data annotation above the class or property to validate it.
Author Bio: Vinod Satapara – Technical Director, iFour Technolab Netherlands.
Technocrat and entrepreneur with years of experience building large-scale enterprise web, cloud, and mobile applications using the latest technologies like ASP.NET, CORE, .NET MVC, Angular, and Blockchain. Keen interest in addressing business problems using the latest technologies and have been associated with ASP.NET software development companies.


