This article is aimed at developers who are interested to integrate LDAP Authentication with Flask. In the following example, I will start with an overview of LDAP technology followed by the code that explains to integrate LDAP with Flask Web Application.
1. LDAP Authentication
We will begin the journey by understanding LDAP authentication. Directory services are a critical part of any identity infrastructure. A popular choice for many identity projects is LDAP. I’m not going to give a comprehensive guide to LDAP in this article. I will be giving an overview of the technology.
An authentication method is a process of confirming an identity.
In the case of an application, a user is given a username and a secret security token also known as a password and uses them to verify their identity on the application itself. There are several authentication methods and types, used for different types of applications such as API, intranet.
LDAP a short form for Lightweight Directory Access Protocol is an open standard described currently by RFC4511 . LDAP’s purpose is to implement a distributed information directory over the IP. This directory normally contains information related to users, groups, and even devices. It has a fixed schema describing each object’s attributes, however, this schema can be changed using LDIF( LDAP Data Interchange Format).
LDAP is usually based on the idea of a tree data structure ( Yes, you are right very similar to a family tree). Look at the below namespace for an example company.
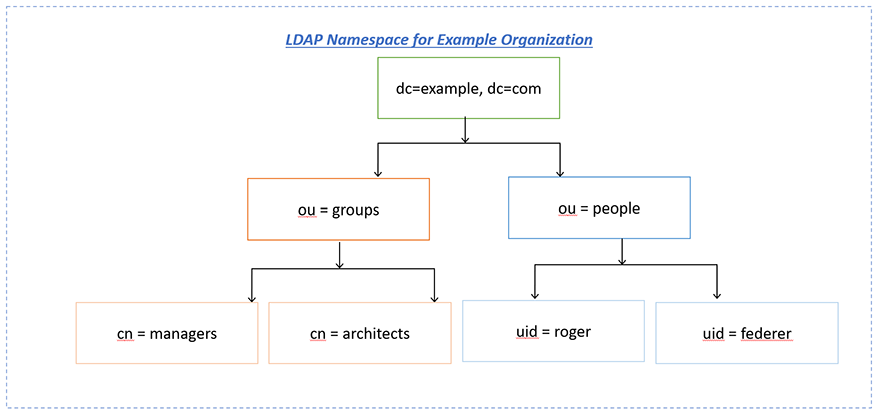
The very first level is called the root node which consists of one entry (dc=example, dc=com) where dc stands for domain component. The second level consists of two entries ( ou=groups and ou=people) where ou stands for an organizational unit. It is pretty much similar to the file system folder concept. The third level contains the leaf entries with the actual data. In our example, we have two entries for two groups and two people.
The DN (Distinguished Name) for an entry can be known by starting from the entry in question and traversing up the tree until you hit the root, for example, uid=roger,ou=people,dc=example,dc=com.
To summarize, the DC phrase is the domain component, and it identifies the domain where the user is (an LDAP directory can have trees of domains and subdomains). In our example, the domain is example.com. The phrase OU refers to the organizational unit where the user is, and CN is its common name.
Alright, now I wanted to touch base on the basics LDAP protocol.
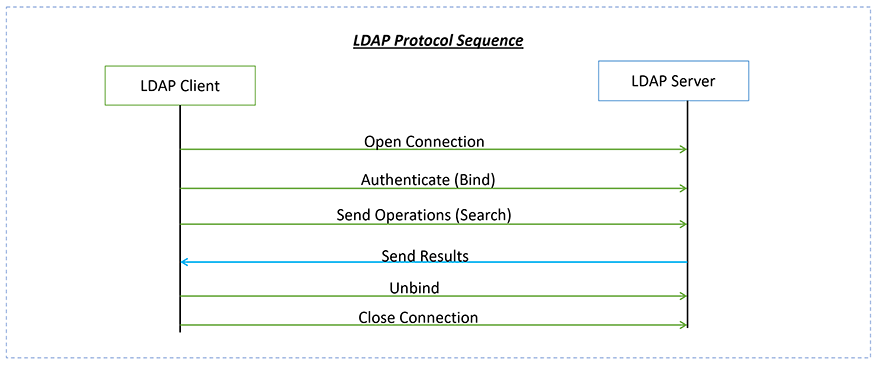
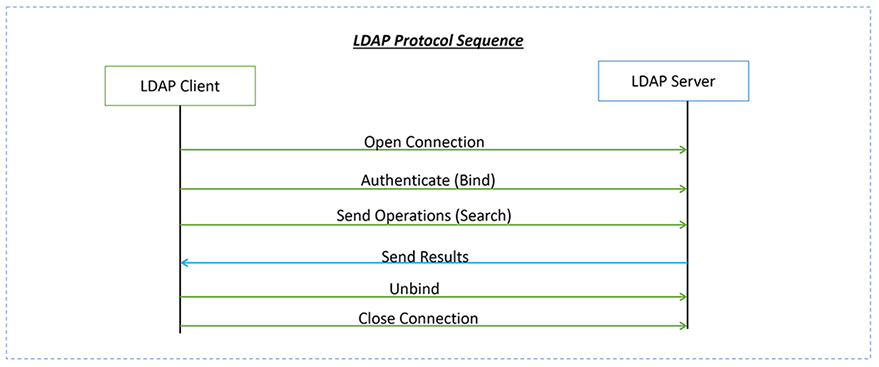
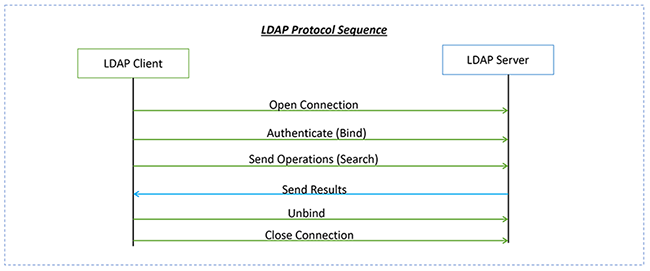
LDAP is a client-server message-oriented protocol not a simple text-based protocol like HTTP. The LDAP implementation has various operations, such as adding users, searching, deleting, modifying, and so on. The scope/interest of this article is only for Bind and Search operations.
Finally, the two most common LDAP services are Microsoft Active Directory (You have to pay for this) and OpenLDAP (As the name suggested it’s open-source).
2. Getting Ready With LDAP Server
In this section, I will walk you through the installation of the LDAP Server locally. If you already have an LDAP server that you can access, feel free to skip the LDAP setup instructions in this section.
To get the LDAP server locally installed you need to have access to Docker and I’m going to make a fair assumption that you have some knowledge of Docker. Docker can be installed from here.
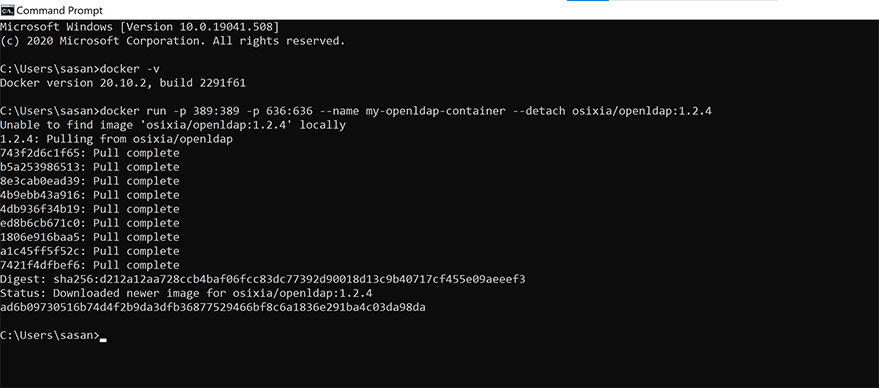
The reason we need Docker is that it is the easiest way to spin up a demo LDAP Server locally. Open up your terminal and run the below command and wait for the process to complete. Refer to the screenshot below.
$ docker run -p 389:389 -p 636:636 --name my-openldap-container --detach osixia/openldap:1.2.4
Now, let’s test the server by searching for an example user with the username and password as admin and admin, as follows.
docker exec my-openldap-container ldapsearch -x -H ldap://localhost -b dc=example,dc=org -D "cn=admin,dc=example,dc=org" -w admin
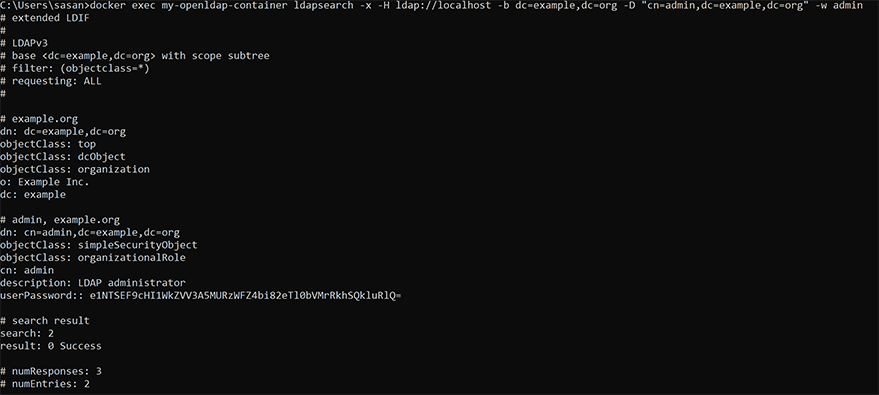
The successful execution of the preceding command indicates that the LDAP server is running and is ready for our use.
3. Python LDAP3
LDAP3 server is a modern and more pythonic way of accessing LDAP.
We need to install the python package that will help us talk to LDAP. We can do it using the python package installer.
pip install ldap3
In order to use LDAP with Python we need to import the Server and the Connection object, and any additional constant we will use in our LDAP.
from ldap3 import Server, Connection, ALL, SUBTREE
from ldap3.core.exceptions import LDAPException, LDAPBindError

# ldap server hostname and port
ldsp_server = f"ldap://localhost:389"

# dn
root_dn = "dc=example,dc=org"

# ldap user and password
ldap_user_name = 'admin'
ldap_password = 'admin'

# user
user = f'cn={ldap_user_name},root_dn'
As you might remember from the LDAP Protocol diagram the authentication operation is called Bind. A bind can be performed in 3 different ways:
- Anonymous Bind – A public access where the password is not required.
- Simple Password Bind – Provide username and credentials that the LDAP server uses to determine your authorization level.
- Simple Authentication and Security Layer (SASL) – Provide username and credentials that the LDAP server uses to determine your authorization level.
We will be making a simple password bind as below.
server = Server(ldsp_server, get_info=ALL)

connection = Connection(server,
                        user=user,
                        password=ldap_password,
                        auto_bind=True)

print(f" *** Response from the ldap bind is \n{connection}" )
In case your server is commercial and encrypted then you can make a connection to the server using the below code.
def global_ldap_authentication(user_name, user_pwd):
    """
      Function: global_ldap_authentication
       Purpose: Make a connection to encrypted LDAP server.
       :params: ** Mandatory Positional Parameters
                1. user_name - LDAP user Name
                2. user_pwd - LDAP User Password
       :return: None
    """

    ldap_user_name = user_name.strip()
    ldap_user_pwd = user_pwd.strip()
    tls_configuration = Tls(validate=ssl.CERT_REQUIRED, version=ssl.PROTOCOL_TLSv1_2)
    server = Server('ldap://<server_name_here>:389', use_ssl=True, tls=tls_configuration)
    conn = Connection(server, user=ldap_user_name, password=ldap_user_pwd, authentication=NTLM,
                      auto_referrals=False)
    if not conn.bind():
        print(f" *** Cannot bind to ldap server: {conn.last_error} ")
    else:
        print(f" *** Successful bind to ldap server")
    return
With LDAP3 we can perform CRUD operations as well like Create user/groups, Read users/groups, Update groups/users, and even Delete users or groups.
** Note: Admin user is very similar to the root user in Linux/Unix with all the privileges. Just for demonstration purposes only I have used admin users and I highly recommend not to use or share the admin password.
4. Integration With Flask Web Application
Flask is very simple to use, but it supports many extensions that are useful in professional web development. It’s my personal favorite among Python web frameworks because it balances ease of use with a rich feature set.
The flask package also includes the jinja2 template library that is quite powerful with a very rich set of features.
First thing first let us set up the app like below and then we will go into details.
~/Flask-Ldap
        |-- app.py
        |-- manage.py
        |-- settings.py
        |__ /forms             # Form
            |-- LoginForm.py   # LoginForm
        |__ /main
            |-- __init__.py
        |__ /views
            |-- global_ldap_authentication.py
        |__ /templates
            |__ /includes
                |-- _flashmsg.html
                |-- _formhelpers.html
            |__ error.html
            |__ login.html
            |__ success.html
        |__ /views
            |-- global_ldap_authentication.py
Time to discuss the components in detail before we go and run it to see LDAP validation. We will first discuss the design steps that are being implemented. The design is pretty simple and I will do my best to explain it in that way.
4a). Design Steps
- The user will initiate the flask web application through the URL which displays the login form and the button to log in.
- Upon clicking the button the App will do an LDAP validation.
- If the User and credentials match in the server the user will see a success message.
- If the user validation fails then we will display the error page.
4b). Components: Templates
I will be using a couple of templates simple enough for this demonstration purpose. Well, don’t get too harsh on me with the naming conventions, I have used the naming conventions that are more suitable for the explanation purpose. However, these are not the right naming conventions for real production use and I do know that, feel free to change it to your standards.
login.html
This is our home page which the user uses to enter his credentials for authentication. I have not put in a lot of fancy stuff into this just the login form to go along with the button that the user is expected to submit to authenticate.
In this template, we have used Jinja to render fields from the Flask form stored in the /forms directory. The username and password fields are rendered from the form. Another interesting note in this template is the use of CSRF (Cross Site Request Forgery).
We have protected our web app from the CSRF attack, so we need to use it in all our forms just to make sure we are not be attacked by anonymous request.
Apart from the above couple of points, there is not much to explain just boring bootstrap content integration with the Flask form.
<!doctype html>
<html lang="en">
<head>
    <!-- Required meta tags -->
    <meta charset="utf-8">
    <meta name="viewport" content="width=device-width, initial-scale=1, shrink-to-fit=no">

    <!-- Bootstrap CSS -->
    <link rel="stylesheet" href="https://maxcdn.bootstrapcdn.com/bootstrap/4.0.0/css/bootstrap.min.css"
          integrity="sha384-Gn5384xqQ1aoWXA+058RXPxPg6fy4IWvTNh0E263XmFcJlSAwiGgFAW/dAiS6JXm" crossorigin="anonymous">
    <title>Flask Example</title>
</head>


<br>
<body class="bg-gradient-white">
<div id="page-wrapper">
    <div class="container">
        {% include 'includes/_flashmsg.html' %}
        {% from "includes/_formhelpers.html" import render_field %}
        <div class="row justify-content-center">
            <div class="col-xl-10 col-xl-12 col-xl-9">
                <div class="card o-hidden border-0 shadow-lg my-5">
                    <div class="card-body p-0">
                        <div class="row">
                            <div class="col-lg-6">
                                <div class="p-4">
                                    <div class="text-center">
                                        <h1 class="h4 text-gray-900 mb-4">
                                            <button type="button" class="btn btn-danger btn-circle-sm"><i
                                                    class="fa fa-mask"></i></button>
                                            LDAP3 Authentication With Python FLask
                                        </h1>
                                    </div>

                                    <form method="POST" class="form-horizontal needs-validation"
                                          action="{{ url_for('index') }}">
                                        {{ form.csrf_token }}
                                        <div class="form-group row">
                                            <div class="col-sm-10">
                                                {{ render_field(form.user_name_pid, class_="form-control", value="") }}
                                            </div>
                                        </div>

                                        <div class="form-group row">
                                            <div class="col-sm-10">
                                                {{ render_field(form.user_pid_Password , class_="form-control",
                                                value="") }}
                                            </div>
                                        </div>

                                        <div class="form-group row">
                                            <div class="col-sm-4 col-form-label">
                                                <input type="submit" class="btn btn-primary" onclick="loading();">
                                            </div>
                                        </div>

                                    </form>
                                    <hr>
                                </div>
                            </div>
                        </div>
                    </div>
                </div>
            </div>
        </div>
    </div>
</div>

<script src="https://code.jquery.com/jquery-3.2.1.slim.min.js"
        integrity="sha384-KJ3o2DKtIkvYIK3UENzmM7KCkRr/rE9/Qpg6aAZGJwFDMVNA/GpGFF93hXpG5KkN"
        crossorigin="anonymous"></script>
<script src="https://cdnjs.cloudflare.com/ajax/libs/popper.js/1.12.9/umd/popper.min.js"
        integrity="sha384-ApNbgh9B+Y1QKtv3Rn7W3mgPxhU9K/ScQsAP7hUibX39j7fakFPskvXusvfa0b4Q"
        crossorigin="anonymous"></script>
<script src="https://maxcdn.bootstrapcdn.com/bootstrap/4.0.0/js/bootstrap.min.js"
        integrity="sha384-JZR6Spejh4U02d8jOt6vLEHfe/JQGiRRSQQxSfFWpi1MquVdAyjUar5+76PVCmYl"
        crossorigin="anonymous"></script>
</body>
</html>
Success.html
Upon the successful LDAP authentication, the user is directed to this template. It justs displays the success message.
<!doctype html>
<html lang="en">
<head>
    <!-- Required meta tags -->
    <meta charset="utf-8">
    <meta name="viewport" content="width=device-width, initial-scale=1, shrink-to-fit=no">

    <!-- Bootstrap CSS -->
    <link rel="stylesheet" href="https://maxcdn.bootstrapcdn.com/bootstrap/4.0.0/css/bootstrap.min.css"
          integrity="sha384-Gn5384xqQ1aoWXA+058RXPxPg6fy4IWvTNh0E263XmFcJlSAwiGgFAW/dAiS6JXm" crossorigin="anonymous">

    <title>Flask LDAP3 Authentication Example</title>

</head>

<body>
<br>
<div class="alert alert-success" role="alert">
    <h4 class="alert-heading">Authentication Success</h4>
    <p>Well! You have passed through the authentication.</p>
    <hr>
    <p class="mb-0">Authentication Success - {{ success_message }}</p>
</div>
<br>

<script src="https://code.jquery.com/jquery-3.2.1.slim.min.js"
        integrity="sha384-KJ3o2DKtIkvYIK3UENzmM7KCkRr/rE9/Qpg6aAZGJwFDMVNA/GpGFF93hXpG5KkN"
        crossorigin="anonymous"></script>
<script src="https://cdnjs.cloudflare.com/ajax/libs/popper.js/1.12.9/umd/popper.min.js"
        integrity="sha384-ApNbgh9B+Y1QKtv3Rn7W3mgPxhU9K/ScQsAP7hUibX39j7fakFPskvXusvfa0b4Q"
        crossorigin="anonymous"></script>
<script src="https://maxcdn.bootstrapcdn.com/bootstrap/4.0.0/js/bootstrap.min.js"
        integrity="sha384-JZR6Spejh4U02d8jOt6vLEHfe/JQGiRRSQQxSfFWpi1MquVdAyjUar5+76PVCmYl"
        crossorigin="anonymous"></script>
</body>
</html>
error.html
Upon the un-successful LDAP authentication, the user is directed to this error template. The error message as to why the LDAP Bind had failed will be displayed on this page. Again here we have used the Jinja2 variable to display the error message.
Upon the LDAP authentication failure, the error message is captured in the error_message variable which is then sent to this template.
<!doctype html>
<html lang="en">
<head>
    <!-- Required meta tags -->
    <meta charset="utf-8">
    <meta name="viewport" content="width=device-width, initial-scale=1, shrink-to-fit=no">

    <!-- Bootstrap CSS -->
    <link rel="stylesheet" href="https://maxcdn.bootstrapcdn.com/bootstrap/4.0.0/css/bootstrap.min.css"
          integrity="sha384-Gn5384xqQ1aoWXA+058RXPxPg6fy4IWvTNh0E263XmFcJlSAwiGgFAW/dAiS6JXm" crossorigin="anonymous">

    <title>Flask LDAP3 Authentication Example</title>


</head>

<body>

<br>
<div class="alert alert-danger" role="alert">
  <h4 class="alert-heading">Authentication Failed</h4>
  <p>Well! You couldn't pass through the authentication,</p>
  <hr>
  <p class="mb-0">Authentication failed due to {{ error_message }}</p>
</div>

<br>

<script src="https://code.jquery.com/jquery-3.2.1.slim.min.js"
        integrity="sha384-KJ3o2DKtIkvYIK3UENzmM7KCkRr/rE9/Qpg6aAZGJwFDMVNA/GpGFF93hXpG5KkN"
        crossorigin="anonymous"></script>
<script src="https://cdnjs.cloudflare.com/ajax/libs/popper.js/1.12.9/umd/popper.min.js"
        integrity="sha384-ApNbgh9B+Y1QKtv3Rn7W3mgPxhU9K/ScQsAP7hUibX39j7fakFPskvXusvfa0b4Q"
        crossorigin="anonymous"></script>
<script src="https://maxcdn.bootstrapcdn.com/bootstrap/4.0.0/js/bootstrap.min.js"
        integrity="sha384-JZR6Spejh4U02d8jOt6vLEHfe/JQGiRRSQQxSfFWpi1MquVdAyjUar5+76PVCmYl"
        crossorigin="anonymous"></script>
</body>
</html>
4c). Components: views
global_ldap_authentication.py
The LDAP3 function that was discussed in detail in the above section will go in here. I’m using the local LDAP server to authenticate so the below code reflects the function with no encryption.
from ldap3 import Server, Connection, ALL, SUBTREE
from ldap3.core.exceptions import LDAPException, LDAPBindError


def global_ldap_authentication(user_name, user_pwd):
    """
      Function: global_ldap_authentication
       Purpose: Make a connection to encrypted LDAP server.
       :params: ** Mandatory Positional Parameters
                1. user_name - LDAP user Name
                2. user_pwd - LDAP User Password
       :return: None
    """

    # fetch the username and password
    ldap_user_name = user_name.strip()
    ldap_user_pwd = user_pwd.strip()

    # ldap server hostname and port
    ldsp_server = f"ldap://localhost:389"

    # dn
    root_dn = "dc=example,dc=org"

    # user
    user = f'cn={ldap_user_name},{root_dn}'

    print(user)
    server = Server(ldsp_server, get_info=ALL)

    connection = Connection(server,
                            user=user,
                            password=ldap_user_pwd)
    if not connection.bind():
        print(f" *** Cannot bind to ldap server: {connection.last_error} ")
        l_success_msg = f' ** Failed Authentication: {connection.last_error}'
    else:
        print(f" *** Successful bind to ldap server")
        l_success_msg = 'Success'

    return l_success_msg
4d). Components: forms
LoginForm.py
The LoginForm is a simple flask form with a couple of fields i.e. Username and Password. The values in these fields are mandatory and cannot be empty.
from main import app
from flask_wtf import Form
from wtforms import StringField, PasswordField, validators


class LoginValidation(Form):
    user_name_pid = StringField('', [validators.Required()],
                                render_kw={'autofocus': True, 'placeholder': 'Enter User'})

    user_pid_Password = PasswordField('', [validators.Required()],
                                      render_kw={'autofocus': True, 'placeholder': 'Enter your login Password'})
4e). Components: manage.py
If you are experienced with Flask or Django, you might remember that we typically work with the manage.py file when we’d like to run project-wide tasks, such as launching the server or applying database migrations.
Below is my version of manage.py.
from flask_script import Server, Manager
import os
from main import app

manager = Manager(app)

manager.add_command("runserver", Server(
    use_debugger=True,
    use_reloader=True,
    host='localhost',
    port=5000
))

if __name__ == '__main__':
    manager.run()
4f). Components: main/__init.py__
This is the main configuration file that will be initiated by Flask. I have set the template and the root path here. Please change them as per your directory setup.
import os

from flask import Flask
from flask_bootstrap import Bootstrap
from flask_wtf.csrf import CSRFProtect

# import redis
# from flask_session import Session

# -- ---------------------------------------------------------------------------------
# -- Script Name : Ldap Authentication with FLask
# -- Author      : *******
# -- Date        : *******
# -- ---------------------------------------------------------------------------------
# -- Description : Authenticate users with Flask
# -- ---------------------------------------------------------------------------------
# -- Version History
# -- ===============
# --
# -- Who      		    version     Date      Description. 3
# -- ===       		    =======     ======    ======================
# -- XXXXXXXX             1.0       Jan 21    Initial Version.
# -- ---------------------------------------------------------------------------------


current_path = os.environ['PATH']
print(current_path)

# -- ---------------------------------------------------------------------------------
# -- Function    : Initiate the App C:\Users\p784138\AWS\Non-Prod\
# -- ---------------------------------------------------------------------------------
app = Flask(__name__,
            template_folder="C:\\Users\\sasan\\PycharmProjects\\Flask-Ldap\\templates",
            root_path="C:\\Users\\sasan\\PycharmProjects\\Flask-Ldap\\Flask-Ldap"
            )


bootstrap = Bootstrap(app)
app.config.from_object('settings')
app.secret_key = os.urandom(24)
app.config['MAX_CONTENT_LENGTH'] = 16 * 1024 * 1024

csrf = CSRFProtect(app)

print('Inside __init__py')

from main import app
4g). Components: app.py
The logic in the app.py is very simple. First, we import the form, LDAP authentication function. We then configure the route /login.
In this route, we capture the username and password entered in the front end form and send them to the global_ldap_authentication function for validation.
The final step in this route is to display one of the success or error templates based on the return message from the LDAP authentication function.
from flask import render_template, request, redirect, url_for, flash
from main import app
from views.global_ldap_authentication import *
from forms.LoginForm import *
from flask_cors import CORS, cross_origin
from flask.sessions import SecureCookieSessionInterface
from itsdangerous import URLSafeTimedSerializer

@app.route('/login', methods=['GET','POST'])
def index():

    # initiate the form..
    form = LoginValidation()

    if request.method in ('POST') :
        login_id = form.user_name_pid.data
        login_password = form.user_pid_Password.data

        # create a directory to hold the Logs
        login_msg = global_ldap_authentication(login_id, login_password)

        # validate the connection
        if login_msg == "Success":
            success_message = f"*** Authentication Success "
            return render_template('success.html', success_message=success_message)

        else:
            error_message = f"*** Authentication Failed - {login_msg}"
            return render_template("error.html", error_message=str(error_message))

    return render_template('login.html', form=form)


if __name__ == '__main__':
    app.run(debug=True)
5. Final Step – Executing The Code
It is time now to initiate the Flask App. Once the APP is initiated, it’s time to open the browser and hit the URL – “http://127.0.0.1:5000/login”.
I will show you two scenarios where the user enters :
- Correct Credentials.
- Wrong credentials.
5a.) LDAP Authentication with correct credentials.
The username is “admin” and the password is “admin”.
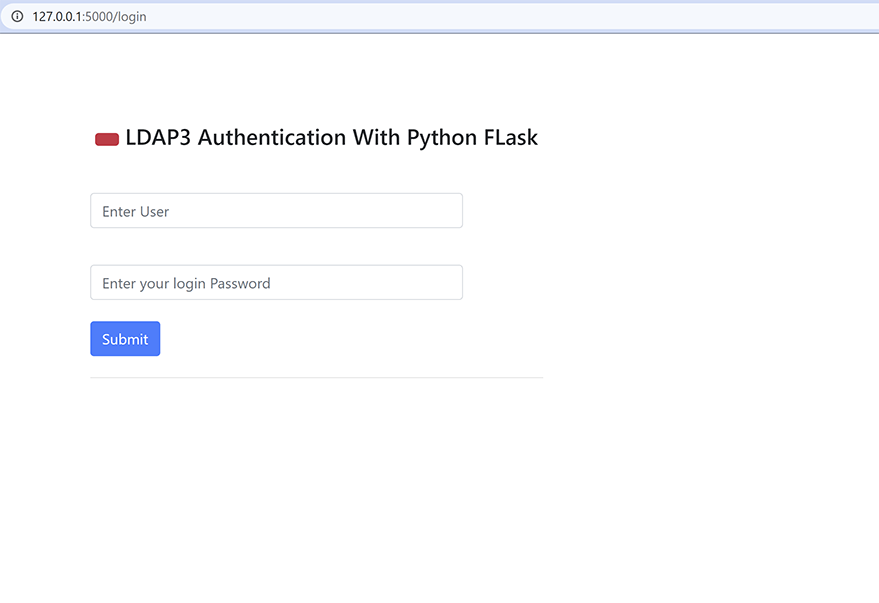

5b.) LDAP Authentication with In-correct credentials.
The username is “admin” and the password is “A wrong credential”.
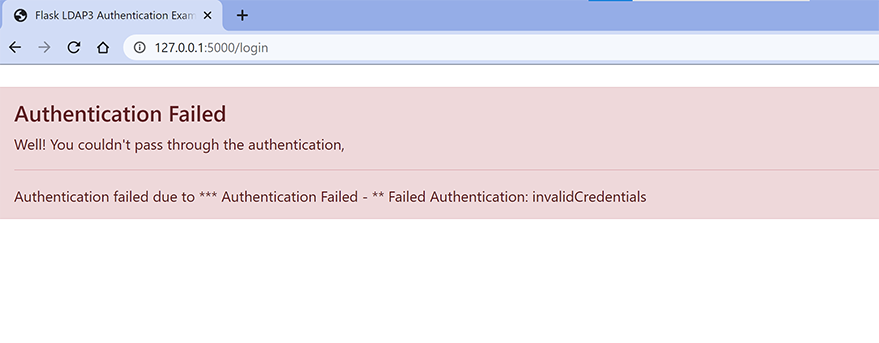
If you liked this article and if it helped you in any way, feel free to like it and subscribe to this website for more tutorials.
If you believe this article will be of big help to someone, feel free to share.



What’s stopping someone from typing in the next route, so say for example your app will launch with /upload you can just skip the login page, how can you prevent that?
The CSRF session token is missing.
Okay, so the base search doesnt look for samaccountname thats why it was failing to login. You dont have the entry for external ldap servers what context to use.
Something goes wrong with this tutorial. it seems you have forgotten something. Do you think you could share the code source with us, using GitHub for instance.
best regards
Hi I find the tutorial is good but there are some errors in the presented code.
so to make the life easiear for those who will give it a try here is the correction for the first login snippet
with the simple connection to LDAP Server, without the TLS:
wrong: -> # user
user = f’cn={ldap_user_name},root_dn’
right: -> user = f’cn={ldap_user_name},{root_dn}’
One needs to import a couple of more modules to make the ldap authentication with TLS work but it works as well, so the tutorial is good!
Here how the imports from the authentication partshould look to make things going with tls 😉 … :
#!/usr/bin/env python
import sys
sys.path.insert(0,’/usr/local/lib/python2.7/dist-packages’)
# … please notice the SIMPLE auth method was missing but is
# … needed should you not use NTLM as authentication method
# … and you will probably need to enlist the NTLM should you really use it
# … as auth method inside your OpenLDAP domain subtree…
#
from ldap3 import Server, Connection, ALL, SIMPLE, NTLM, SUBTREE
from ldap3.core.exceptions import LDAPException, LDAPBindError
# … for tls actions:
#
import ssl
from ldap3.core.tls import Tls
Hello,
I’m trying to follow this guide but I received this message:
jinja2.exceptions.UndefinedError: the template ‘includes/_formhelpers.html’ (imported on line 20 in ‘login.html’) does not export the requested name ‘render_field’
Please, what is _formhepers and formmsg content?
Best regards
getting below error by above flask project:
AttributeError: module ‘wtforms.validators’ has no attribute ‘Required’
please, suggest.
Could you please share complete source code,either git hub?
no settings.py is given and there are errors:/ isn’t there a github link?
A tutorial full of errors that the author never cared to fix
I’ve found a way to fix errors in order to make code functioning.
The fixes are:
– in login.html comment out ” {% include ‘includes/_flashmsg.html’ %}”
– create the directory ‘includes’ under ‘templates’ and there create a file named _formhelpers.html with this:
{% macro render_field(field) %}
{{ field.label }}
{{ field(**kwargs)|safe }}
{% if field.errors %}
{% for error in field.errors %}
{{ error }}
{% endfor %}
{% endif %}
{% endmacro %}
– in __init__.py comment out this lines
from flask_wtf.csrf import CSRFProtect
app.config.from_object(‘settings’)
csrf = CSRFProtect(app)
(so CSRFProtect it’snot used but the example function: if someone lnow a way resolve “Bad Request – The CSRF session token is missing.” is wellcome…)
– in LoginForm.py:
‘… import FlaskForm’ instead of ‘…import Form’
from ‘validators.Required’ to ‘validators.InputRequired’