Overview:
Blockchain technology has transformed the digital asset landscape and decentralized applications (DApps) by offering secure, trustless, and transparent platforms for transactions and data management. Ethereum, Binance Smart Chain, and other blockchain platforms have become dominant ecosystems in this domain. However, as these platforms expand and develop autonomously, the capability for various blockchains to interact and share information has emerged as a crucial factor for the growth and success of the blockchain ecosystem.
In this article, I will deeply into the importance of interoperability in the blockchain sphere and present use cases that support this perspective. Additionally, I will provide code examples using Node.js to demonstrate the practical implementation of interoperability between Ethereum, Binance Smart Chain, and other blockchain platforms.
Note: The article does not cover the fundamentals of these topics as it is not within its scope. It is recommended that readers have a basic understanding of blockchain programming and Node.js before proceeding to gain a full understanding of the concepts discussed.
Use cases
Here are some of the advantages and corresponding use cases that illustrate the importance of interoperability among various blockchain platforms:
Promoting Innovation and Cooperation:
Interoperability promotes the creation of new solutions by enabling developers to design applications capable of interacting with multiple blockchain platforms. This cross-platform communication allows developers to harness the distinct features and strengths of various blockchains, resulting in inventive solutions that address a wider range of requirements. Moreover, interoperability encourages collaboration between different blockchain projects, fostering the sharing of ideas and technology throughout the ecosystem.
Use case: Cross-chain lending platforms in DeFi can access liquidity from multiple blockchains, enhancing their ability to offer more competitive interest rates and loan conditions to users. This not only benefits users but also encourages collaboration among DeFi projects across different platforms.
Expanding the Value Proposition of Blockchain Networks:
Interoperability broadens the overall value offering of blockchain networks by facilitating seamless integration and communication between them. By interacting with multiple platforms, users can access a wider array of services and applications, thereby enhancing the utility of individual blockchain networks.
Use case: An artist can create and sell NFTs on various platforms, such as Ethereum, Binance Smart Chain, and Flow. Interoperability allows the artist to engage with a larger audience, utilize multiple marketplaces, and optimize their revenue. This, in turn, promotes the adoption and growth of NFT marketplaces on different platforms.
Improving User Experience:
Interoperability significantly enhances the user experience by minimizing friction and complexity in cross-chain transactions. Users can effortlessly exchange tokens and access services across diverse platforms without the need for intricate bridging mechanisms or third-party intermediaries.
Use case: A user wants to exchange tokens between Ethereum and Binance Smart Chain. Interoperability solutions, like cross-chain bridges, enable the user to transfer their assets swiftly and conveniently, without depending on centralized exchanges, which may have higher fees and custody risks.
Encouraging Enterprise Adoption of Blockchain:
For businesses to embrace blockchain technology, they must seamlessly incorporate it into their current systems and processes. Interoperability is vital in this aspect, as it allows companies to link their legacy systems with a variety of blockchain networks, facilitating efficient data exchange and communication across platforms.
Use case: A worldwide supply chain management system connects multiple blockchain platforms to monitor and validate goods as they transition from manufacturers to retailers. Interoperability allows the system to harness the advantages of various blockchain networks, ensuring secure, transparent, and effective tracking of goods throughout the supply chain.
Ethereum Overview
Ethereum’s structure and smart contracts
Ethereum is a decentralized platform that empowers developers to construct and deploy smart contracts, which are self-executing code that operates on the Ethereum Virtual Machine (EVM). These contracts can be employed to create DApps, tokenize assets, and automate intricate transactions. Ethereum’s native currency, Ether (ETH), is utilized to power these smart contracts and compensate for network transactions.
Ethereum’s JSON-RPC API
Ethereum offers a JSON-RPC API, enabling developers to engage with the blockchain programmatically. This API delivers methods for querying the blockchain’s state, managing accounts, deploying and interacting with smart contracts, and submitting transactions.
Development tools and libraries (e.g., web3.js)
A variety of development tools and libraries are available to streamline Ethereum development, including web3.js, ethers.js, and Truffle. Web3.js is the most popular JavaScript library for interacting with Ethereum nodes, providing an accessible interface for the JSON-RPC API.
Here are some code examples to help illustrate the concepts related to Ethereum’s structure and smart contracts:
- Deploying a Basic Smart Contract
To demonstrate the deployment of a smart contract, we’ll use a simple example: the Solidity code for an ERC-20 token contract.
pragma solidity ^0.8.0;

import "@openzeppelin/contracts/token/ERC20/ERC20.sol";
contract MyToken is ERC20 {
constructor(uint256 initialSupply) ERC20("MyToken", "MTK") {
_mint(msg.sender, initialSupply);
}
}
To deploy this contract, a tool like Truffle can be used, which eases the process of compiling and deploying smart contracts. After installing Truffle and configuring it for your project, create a new migration file in the migrations folder:
// migrations/2_deploy_mytoken.js
const MyToken = artifacts.require("MyToken");

module.exports = function (deployer) {
deployer.deploy(MyToken, "1000000000000000000000"); // Deploy with an initial supply of 1000 tokens
};
Run the following command to deploy the smart contract to your preferred Ethereum network:
truffle migrate --network <your_network>
- Interacting with a Smart Contract using web3.js
After deploying the smart contract, you can interact with it using the web3.js library in a Node.js environment. First, install web3.js:
npm install web3
Next, create a JavaScript file to interact with the deployed ERC-20 token contract:
const Web3 = require('web3');

const provider = 'https://mainnet.infura.io/v3/YOUR_INFURA_API_KEY';
const web3 = new Web3(new Web3.providers.HttpProvider(provider));
const erc20ABI = [...] // The ABI of the deployed ERC-20 token contract
const contractAddress = '0x...'; // The address of the deployed ERC-20 token contract
const myAddress = '0x...'; // Your Ethereum address
const erc20Contract = new web3.eth.Contract(erc20ABI, contractAddress);
async function getMyTokenBalance() {
const balance = await erc20Contract.methods.balanceOf(myAddress).call();
console.log(MyToken balance: ${web3.utils.fromWei(balance, 'ether')} tokens);
}
getMyTokenBalance();
This example demonstrates how to connect to an Ethereum network using web3.js and interact with a deployed ERC-20 token contract.
The provider variable specifies the endpoint for connecting to the Ethereum network. In this case, the endpoint is https://mainnet.infura.io/v3/YOUR_INFURA_API_KEY, where YOUR_INFURA_API_KEY is the API key for accessing the Infura service, which provides access to the Ethereum network. The web3 variable is created using the Web3 constructor function and takes the provider variable as an argument, which is used to establish a connection to the Ethereum network.
Next, the code defines the ABI (Application Binary Interface) and address of the ERC-20 token contract. The ABI is essentially a specification of the contract’s functions and data structures, while the address is the location of the contract on the blockchain.
After defining the contract details, the code specifies the Ethereum address for which it wants to retrieve the token balance.
Finally, the code defines an asynchronous function called “getMyTokenBalance” that retrieves the balance of the ERC-20 token for the specified Ethereum address using the contract’s “balanceOf” function. The balance is returned in the token’s smallest unit (wei), so the code uses the Web3 library’s “fromWei” function to convert it to a more human-readable format. The token balance is then printed to the console.
By deploying and interacting with smart contracts, developers can create DApps, tokenize assets, and automate complex transactions.
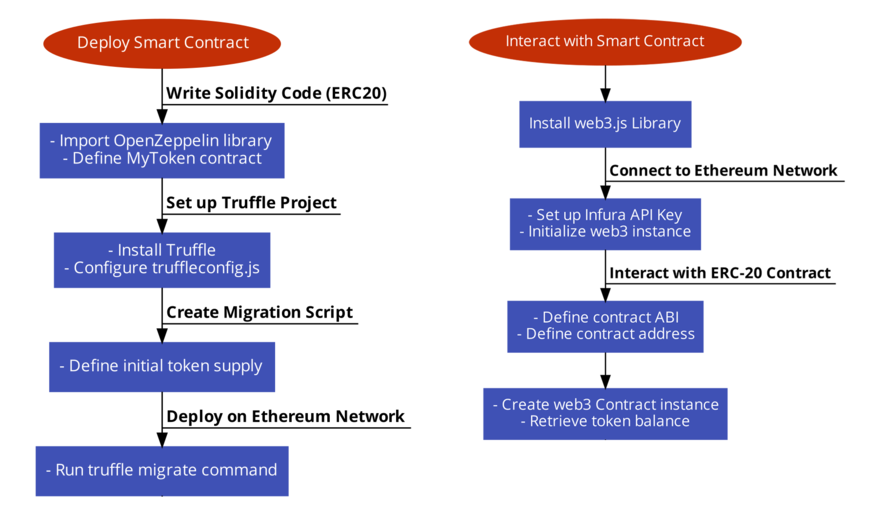
The following diagram illustrates the process of deploying and interacting with an ERC-20 token smart contract on the Ethereum network:
Binance Smart Chain Overview
Binance Smart Chain’s design and Ethereum compatibility
Binance Smart Chain (BSC) is a blockchain infrastructure established by Binance to facilitate smart contracts and provide rapid, cost-effective transactions. Running alongside Binance Chain, BSC enables the smooth exchange of tokens between the two chains. BSC’s design is compatible with Ethereum, as it employs the Ethereum Virtual Machine (EVM) and supports Ethereum’s Solidity programming language. This compatibility allows developers to effortlessly migrate existing Ethereum applications to BSC.
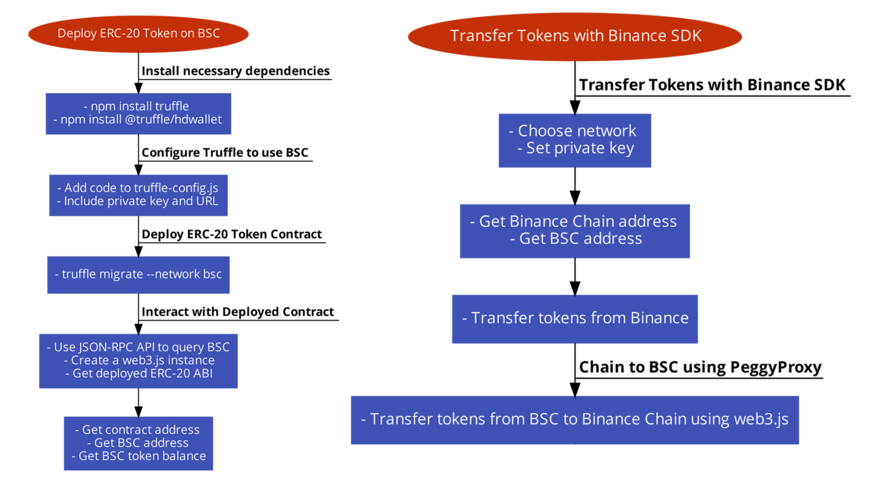
For instance, deploying an ERC-20 token contract on Binance Smart Chain with Truffle involves the following steps:
First, install the necessary dependencies:
npm install truffle
npm install @truffle/hdwallet-provider
Next, configure Truffle to use the Binance Smart Chain network by adding the following code to your truffle-config.js file:
const HDWalletProvider = require('@truffle/hdwallet-provider');
const privateKey = 'YOUR_PRIVATE_KEY'; // Your private key
const bscRpcUrl = 'https://bsc-dataseed.binance.org/'; // BSC RPC URL

module.exports = {
  networks: {
    bsc: {
      provider: () => new HDWalletProvider(privateKey, bscRpcUrl),
      network_id: 56, // BSC network ID
      gasPrice: 20000000000, // BSC gas price
      confirmations: 2,
      timeoutBlocks: 200,
      skipDryRun: true,
    },
  },
  // ...
};
To deploy the same ERC-20 token contract used in the Ethereum example to Binance Smart Chain, execute the following command:
truffle migrate --network bsc
Binance Smart Chain’s JSON-RPC API:
BSC provides a JSON-RPC API akin to Ethereum’s, enabling developers to programmatically interact with the blockchain. This API offers methods for querying the blockchain’s state, managing accounts, deploying and interacting with smart contracts, and submitting transactions.
Here’s an example of interacting with a deployed ERC-20 token contract on BSC using web3.js:
const Web3 = require('web3');

const provider = 'https://bsc-dataseed.binance.org/';
const web3 = new Web3(new Web3.providers.HttpProvider(provider));
const erc20ABI = [...] // The ABI of the deployed ERC-20 token contract
const contractAddress = '0x...'; // The address of the deployed ERC-20 token contract
const myAddress = '0x...'; // Your BSC address
const erc20Contract = new web3.eth.Contract(erc20ABI, contractAddress);
async function getMyTokenBalance() {
  const balance = await erc20Contract.methods.balanceOf(myAddress).call();
  console.log(`MyToken balance: ${web3.utils.fromWei(balance, 'ether')} tokens`);
}
getMyTokenBalance();
This example is quite similar to the Ethereum example, but with a different provider URL for the Binance Smart Chain network.
First, the provider is set to ‘https://bsc-dataseed.binance.org/’, which is the Binance Smart Chain endpoint to connect to. Then, an instance of the Web3 library is created, passing the provider as a parameter to the constructor.
Next, the ABI (Application Binary Interface) of the deployed ERC-20 token contract is defined, which describes how to interact with the contract’s functions. The code also sets the contract address to the address of the deployed ERC-20 token contract and sets ‘myAddress’ to the address of the user’s Binance Smart Chain address.
The code then creates a contract instance of the deployed ERC-20 token contract, passing the ABI and contract address as parameters to the constructor.
Finally, the ‘getMyTokenBalance’ function is defined to retrieve the user’s token balance by calling the ‘balanceOf’ function of the deployed ERC-20 token contract using the user’s address as a parameter. The balance is returned in the smallest unit of the token (wei) and is converted to the standard unit (ether) using the ‘fromWei’ function provided by the Web3 library.
Development tools and libraries (e.g., Binance Chain JavaScript SDK):
BSC supports many of the same development tools and libraries as Ethereum, including web3.js and Truffle. Binance also offers its own JavaScript SDK for interacting with both Binance Chain and BSC.
Here’s an example of using the Binance Chain JavaScript SDK to transfer tokens between Binance Chain and Binance Smart Chain:
First, install the Binance Chain JavaScript SDK:
npm install @binance-chain/javascript-sdk
Then, create a JavaScript file to transfer tokens between Binance Chain and BSC:
const BncClient = require('@binance-chain/javascript-sdk');
const privateKey = 'YOUR_PRIVATE_KEY'; // Your private key
const bncClient = new BncClient('https://dex.binance.org/api');
const bscRpcUrl = 'https://bsc-dataseed.binance.org/';
const web3 = new Web3(new Web3.providers.HttpProvider(bscRpcUrl));

bncClient.chooseNetwork('mainnet');
bncClient.setPrivateKey(privateKey);

const binanceChainAddress = bncClient.getClientKeyAddress(); // Your Binance Chain address
const bscAddress = web3.eth.accounts.privateKeyToAccount(privateKey).address; // Your BSC address
const peggyProxyAddress = '0x…'; // The address of the PeggyProxy contract on BSC

async function transferTokens() {
// Transfer tokens from Binance Chain to BSC
const transferFromBinanceChain = await bncClient.transfer(
binanceChainAddress,
peggyProxyAddress,
'10000000000', // 10 tokens
'BNB', // Token symbol
'',
'0.000375' // Transaction fee
);

console.log(Tokens transferred from Binance Chain: ${JSON.stringify(transferFromBinanceChain)});

// Transfer tokens from BSC to Binance Chain
// … Add logic to transfer tokens from BSC to Binance Chain using web3.js and the BSC JSON-RPC API
}

transferTokens();
This example demonstrates how to use the Binance Chain JavaScript SDK to transfer tokens from Binance Chain to Binance Smart Chain. To transfer tokens from BSC back to Binance Chain, you would need to interact with the PeggyProxy contract on BSC using web3.js and the BSC JSON-RPC API.
These code examples highlight the compatibility and similarities between Ethereum and Binance Smart Chain, illustrating how developers can easily migrate existing Ethereum applications to BSC and utilize the same development tools and libraries.
Following is a diagram illustrating the process of deploying and interacting with a smart contract on the Binance Smart Chain (BSC) network:
The process of deploying and interacting with a smart contract on the Binance Smart Chain (BSC) network
Alternative Blockchain Platforms
Introduction to other platforms (e.g., Polkadot, Cosmos, Avalanche)
A variety of blockchain platforms have been developed to tackle distinct challenges and use cases within the industry, including Polkadot, Cosmos, and Avalanche. Each of these platforms possesses its own unique features and capabilities, providing a diverse set of options for developers aiming to create decentralized applications and services.
Development tools and libraries for each platform
Every platform offers a specific set of development tools and libraries tailored to its needs, such as Polkadot-JS API for Polkadot, Cosmos SDK for Cosmos, and AvalancheJS for Avalanche. These resources assist developers in building, deploying, and interacting with applications on their respective platforms.
Here are practical implementation examples related to each platform:
Polkadot
Focused on interoperability, Polkadot facilitates the exchange of data and assets across multiple blockchains through a relay chain and parachains. Its Substrate framework streamlines the development and deployment of bespoke blockchains.
To interact with the Polkadot relay chain and parachains, you can use the Polkadot-JS API. Start by installing the necessary library:
npm install @polkadot/api
Next, create a JavaScript file to connect to a Polkadot node and obtain basic information:
const { ApiPromise, WsProvider } = require('@polkadot/api');

async function main() {
  const wsProvider = new WsProvider('wss://rpc.polkadot.io');
  const api = await ApiPromise.create({ provider: wsProvider });
  const [chain, nodeName, nodeVersion] = await Promise.all([
    api.rpc.system.chain(),
    api.rpc.system.name(),
    api.rpc.system.version()
  ]);
  console.log(`Connected to ${chain} (${nodeName} v${nodeVersion})`);
}
main();
Cosmos
As a decentralized ecosystem of independent, scalable, and compatible blockchains, Cosmos is powered by Tendermint Core, a Byzantine Fault Tolerant consensus engine. Cosmos employs the Inter-Blockchain Communication (IBC) protocol to facilitate cross-chain transactions.
To engage with a Cosmos-based blockchain, use the Cosmos SDK. Begin by installing the required libraries:
npm install @cosmjs/launchpad @cosmjs/proto-signing
Subsequently, create a JavaScript file to connect to a Cosmos node and retrieve basic information:
const { Tendermint34Client } = require('@cosmjs/tendermint-rpc');
const { QueryClient } = require('@cosmjs/stargate');

async function main() {
  const tmClient = await Tendermint34Client.connect('https://rpc.cosmos.network:443');
  const queryClient = new QueryClient(tmClient);
  const nodeInfo = await tmClient.nodeInfo();
  const latestBlock = await tmClient.block();
  console.log(`Connected to ${nodeInfo.network} (${nodeInfo.application_version.name} v${nodeInfo.application_version.version})`);
  console.log(`Latest block height: ${latestBlock.block.header.height}`);
}
main();
Avalanche
Avalanche is a highly scalable and secure platform for creating custom blockchain networks and decentralized applications. It uses a novel consensus mechanism called Avalanche Consensus, which combines the benefits of classical consensus algorithms and Nakamoto consensus.
To interact with an Avalanche-based blockchain, you can use AvalancheJS. First, install the required library:
npm install avalanche
Then, create a JavaScript file to connect to an Avalanche node and query some basic information:
const { Avalanche } = require('avalanche');

async function main() {
  const avax = new Avalanche('api.avax.network', 443, 'https');
  const infoAPI = avax.Info();
  const networkID = await infoAPI.getNetworkID();
  const nodeName = await infoAPI.getNodeName();
  const nodeVersion = await infoAPI.getNodeVersion();
  console.log(`Connected to Avalanche network ID ${networkID} (${nodeName} v${nodeVersion})`);
}
main();
The following diagram further illustrates the workflow of Polkadot, Cosmos and Avalanche Blockchains:
Diagrammatic view of the workflow of Polkadot, Cosmos and Avalanche Blockchains
The respective development tools and libraries, such as Polkadot-JS API, Cosmos SDK, and AvalancheJS, enable developers to build, deploy, and interact with applications on their chosen platform.
Cross-Chain Interoperability: Tools and Techniques
Cross-chain bridges
In the context of Ethereum and Binance Smart Chain, you can use the TokenBridge by the POA Network. This example demonstrates how to transfer tokens between Ethereum and Binance Smart Chain using the TokenBridge:
First, configure the TokenBridge:
git clone https://github.com/poanetwork/tokenbridge.git
cd tokenbridge
npm install
Then, create a .env file with the required configurations:
ETH_RPC_URL=https://mainnet.infura.io/v3/YOUR-INFURA-API-KEY
BSC_RPC_URL=https://bsc-dataseed.binance.org/
ETH_PRIVATE_KEY=YOUR_ETHEREUM_PRIVATE_KEY
BSC_PRIVATE_KEY=YOUR_BINANCE_SMART_CHAIN_PRIVATE_KEY
BRIDGE_MODE=ERC20_TO_ERC20
Now, transfer tokens from Ethereum to Binance Smart Chain:
node ./transfer-erc20.js --from Ethereum --to BinanceSmartChain --amount 100
DeFi platforms enabling cross-chain transactions
Aave, a popular DeFi platform, provides a JavaScript SDK for interacting with its protocol. You can use this SDK to interact with the Aave protocol on both Ethereum and Polygon, a Layer 2 scaling solution for Ethereum.
First, install the required library:
npm install @aave/protocol-js
Then, create a JavaScript file to interact with the Aave protocol on Ethereum and Polygon:
const { AaveProvider } = require('@aave/protocol-js');

// Ethereum
const ethProvider = new AaveProvider('ethereum', 'mainnet');
const ethLendingPool = await ethProvider.getLendingPool();
console.log(`Ethereum Aave Lending Pool address: ${ethLendingPool}`);
// Polygon
const polygonProvider = new AaveProvider('polygon', 'mainnet');
const polygonLendingPool = await polygonProvider.getLendingPool();
console.log(`Polygon Aave Lending Pool address: ${polygonLendingPool}`);
Inter-Blockchain Communication (IBC):
Cosmos IBC is a protocol for secure and reliable communication between heterogeneous blockchains. To showcase the use of the IBC protocol, we can use the Cosmos SDK and the ibc-go module.
First, install the required libraries:
go get github.com/cosmos/cosmos-sdk
go get github.com/cosmos/ibc-go
Then, create a Go file to interact with the IBC protocol:
package main

import (
 "fmt"
 "github.com/cosmos/cosmos-sdk/client"
 "github.com/cosmos/ibc-go/modules/core/02-client/types"
)
func main() {
 config := client.NewDefaultContext().WithChainID("cosmoshub-4")
 clientState, err := types.UnpackClientState(config)
 if err != nil {
  panic(err)
 }
 fmt.Println("Client State:", clientState)
}
This example demonstrates how to query the client state of an IBC-enabled Cosmos SDK blockchain.
Developers can interact with cross-chain bridges, DeFi platforms, and standardized communication protocols to enable interoperability between different blockchain ecosystems.
Practical Implementation: Interoperability Using Node.js
In this section, we will illustrate how to accomplish interoperability between Ethereum and Binance Smart Chain utilizing Node.js and web3.js. We will develop a basic application that enables cross-chain token transfers between these two platforms by employing a bridge smart contract.
Environment Setup
Initially, ensure that Node.js and npm are installed. Establish a new directory for your project and initialize a new package.json file using this command:
npm init -y
Install web3.js and dotenv:
npm install web3 dotenv
Create a .env file to save your private keys and API endpoints:
ETHEREUM_PRIVATE_KEY=YOUR_ETHEREUM_PRIVATE_KEY
BSC_PRIVATE_KEY=YOUR_BSC_PRIVATE_KEY
INFURA_API_KEY=YOUR_INFURA_API_KEY
Initializing Web3 Instances
Generate a new file named index.js and include the following code to initiate web3 instances for Ethereum and Binance Smart Chain:
require('dotenv').config();
const Web3 = require('web3');

// Ethereum
const ethereumProvider = `https://mainnet.infura.io/v3/${process.env.INFURA_API_KEY}`;
const web3Ethereum = new Web3(new Web3.providers.HttpProvider(ethereumProvider));
// Binance Smart Chain
const bscProvider = 'https://bsc-dataseed.binance.org';
const web3BSC = new Web3(new Web3.providers.HttpProvider(bscProvider));
Deploying Bridge Smart Contracts
In this example, we presuppose that bridge smart contracts have already been deployed on both Ethereum and BSC. These contracts should contain methods to lock and unlock tokens on each platform. Additionally, the contracts must emit events when tokens are locked or unlocked.
For simplicity, we provide the Application Binary Interface (ABI) of the bridge smart contracts, which should be identical for both Ethereum and BSC:
const bridgeABI = [
  // ...bridge contract ABI
];
Implementing Cross-Chain Token Transfer Function
We will now create a function to transfer tokens from Ethereum to BSC. This function will execute the following steps:
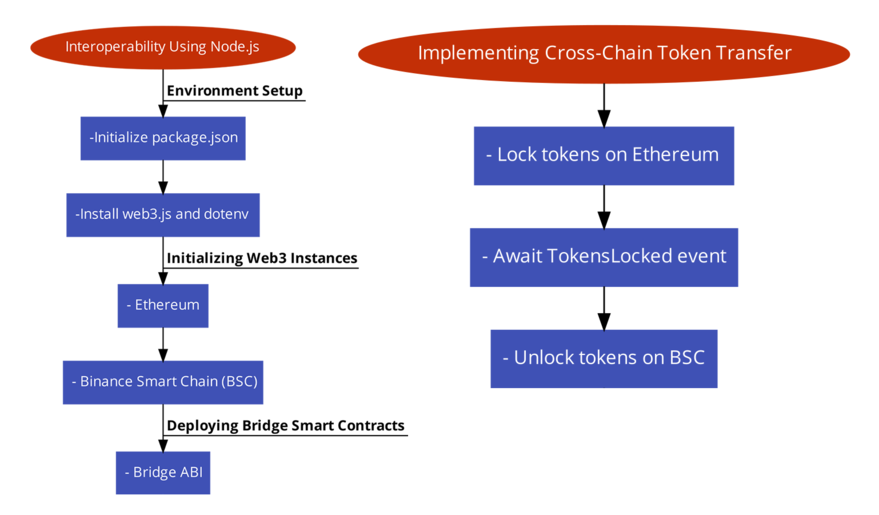
- Lock tokens on Ethereum by invoking the lockTokens method of the Ethereum bridge contract.
- Await the TokensLocked event from the Ethereum contract.
- Invoke the unlockTokens method on the BSC bridge contract to mint the corresponding tokens.
const fromEthereumToBSC = async (amount) => {
  // Ethereum
  const ethAccount = web3Ethereum.eth.accounts.privateKeyToAccount(process.env.ETHEREUM_PRIVATE_KEY);
  const ethBridgeAddress = '0x...'; // Ethereum bridge contract address
  const ethBridgeContract = new web3Ethereum.eth.Contract(bridgeABI, ethBridgeAddress);

// BSC
  const bscAccount = web3BSC.eth.accounts.privateKeyToAccount(process.env.BSC_PRIVATE_KEY);
  const bscBridgeAddress = '0x...'; // BSC bridge contract address
  const bscBridgeContract = new web3BSC.eth.Contract(bridgeABI, bscBridgeAddress);
// Lock tokens on Ethereum
  const lockTokensData = ethBridgeContract.methods.lockTokens(amount).encodeABI();
  const lockTokensTx = {
    from: ethAccount.address,
    to: ethBridgeAddress,
    data: lockTokensData,
    gas: 150000,
    gasPrice: await web3Ethereum.eth.getGasPrice(),
  };
  const signedLockTokensTx = await ethAccount.signTransaction(lockTokensTx);
const lockTokensReceipt = await web3Ethereum.eth.sendSignedTransaction(signedLockTokensTx.rawTransaction);
console.log('Tokens locked on Ethereum:',lockTokensReceipt.transactionHash);
// Wait for the TokensLocked event from the Ethereum contract
ethBridgeContract.once('TokensLocked', { filter: { user: ethAccount.address } },
async (error, event) => {
if (error) {
console.error('Error in TokensLocked event:', error); return;
}
const lockEventTransactionHash = event.transactionHash;
console.log('TokensLocked event received:', lockEventTransactionHash);
// Unlock tokens on BSC
const unlockTokensData = bscBridgeContract.methods.unlockTokens(amount, lockEventTransactionHash).encodeABI();
const unlockTokensTx = {
  from: bscAccount.address,
  to: bscBridgeAddress,
  data: unlockTokensData,
  gas: 150000,
  gasPrice: await web3BSC.eth.getGasPrice(),
};
const signedUnlockTokensTx = await bscAccount.signTransaction(unlockTokensTx);
const unlockTokensReceipt = await web3BSC.eth.sendSignedTransaction(signedUnlockTokensTx.rawTransaction);
console.log('Tokens unlocked on BSC:', unlockTokensReceipt.transactionHash);
}); };
// Transfer tokens const amount = web3Ethereum.utils.toWei('1', 'ether'); // Transfer 1 token fromEthereumToBSC(amount);
In this example, we utilize the private keys for Ethereum and BSC accounts stored in the .env file. We generate web3 contract instances for the bridge contracts on both platforms, lock tokens on Ethereum by invoking the lockTokens method, and listen for the TokensLocked event. Once the event is received, we call the unlockTokens method on the BSC bridge contract to mint the corresponding tokens.
Keep in mind that this example assumes the bridge contracts on both platforms have been correctly set up and possess the necessary methods and events. This example serves illustration purposes and should not be employed in production without thorough testing and security measures.
In real-world scenarios, the process of monitoring events and unlocking tokens on the destination chain would typically be managed by a separate off-chain service or an oracle, ensuring a secure and trustless transfer.
Here’s a diagram illustrating the process of interoperability between Ethereum and Binance Smart Chain using Node.js and web3.js:
Challenges and Limitations
Technical challenges associated with cross-chain interoperability
Achieving cross-chain interoperability is a complex task, as it involves managing consensus mechanisms, data structures, and communication protocols between different blockchain platforms.
Security and trust concerns
Cross-chain bridges and oracles introduce potential security risks, as they can be vulnerable to attacks or manipulation. It’s essential to evaluate the trustworthiness and security measures of these components when implementing interoperability.
Scalability and performance considerations
Interoperability solutions may face scalability and performance challenges, as they need to handle a growing number of transactions and data across multiple blockchains.
Future Developments and Trends
Emerging technologies and protocols for enhanced interoperability
New technologies and protocols, such as zk-rollups, optimistic rollups, and sharding, are being developed to address the challenges of blockchain interoperability and improve efficiency, security, and scalability.
The role of blockchain interoperability in the growing DeFi and NFT ecosystems
Interoperability will play a crucial role in the continued growth of DeFi and NFT ecosystems, enabling users to access a broader range of assets, services, and applications across different blockchain platforms.
Potential impact of blockchain interoperability on the broader technology landscape
As blockchain interoperability solutions mature, they could significantly impact various industries, such as finance, supply chain, and gaming, by enabling seamless integration of blockchain technology into existing systems and processes.
Conclusion
Recap of key takeaways
This article provided a comprehensive overview of blockchain interoperability using Node.js, covering Ethereum, Binance Smart Chain, and other platforms. By leveraging Node.js and its vast ecosystem of libraries and tools, developers can achieve cross-chain interoperability, facilitating seamless interactions between different blockchain platforms.
The importance of continued innovation in blockchain interoperability
Continued innovation in blockchain interoperability is essential to unlock the full potential of the technology, enabling seamless integration, collaboration, and value creation across different platforms.
Encouraging further research and development in the field
Developers, researchers, and industry stakeholders are encouraged to continue exploring and developing innovative solutions for blockchain interoperability, helping to drive the technology’s adoption and maximize its impact on a global scale.
Sources:
- https://ethereum.org/en/developers/docs/
- https://docs.bnbchain.org/
- https://web3js.readthedocs.io/en/v1.3.4/
- https://www.binance.com/en/blog/all/powering-defi-and-crosschain-interoperable-decentralized-applications-with-binance-api-using-band-protocol-406006839228116992
- https://academy.binance.com/en/articles/what-is-cross-chain-interoperability
- https://www.hashkey.com/en/insights/cross-chain-bridge-transfer-crypto-blockchain.html
- https://cointelegraph.com/learn/what-is-blockchain-interoperability-a-beginners-guide-to-cross-chain-technology


