The Ultimate Guide to Pip
Introduction
A Python package management system called Pip makes it easier to install, update, and manage software packages created using this language. It is crucial to the Python environment because it gives programmers a simple way to get and include third-party libraries and modules in their projects.
Developers may quickly and easily install Python packages from the Python Package Index (PyPI) and other package indexes by using Pip. Pip successfully handles package dependencies, ensuring the proper purchase and installation of all necessary packages. Finding and managing the necessary dependencies for their projects can be made easier for developers, saving them time and effort. With the use of concise examples, we’ll go over all you need to know about using Pip in this complete guide.
Pip Installation
Pip is usually bundled with Python, so if you have Python installed, Pip should already be available. You can check if Pip is installed by running the following command in your terminal or command prompt:
pip --version
If Pip is not installed, you can install it by following the official documentation for your operating system, visit https://pip.pypa.io/en/stable/installation/. The most common way is to use the get-pip.py script, which can be downloaded from the official website.
After downloading the get-pip.py file you can run this command in your terminal:
python get-pip.py
Upgrading Pip
It is good practice for any developer to be using the latest techie. So if your pip is outdated, to upgrade it to the latest version, you can use the following command if you are on Windows, Linux, or MacOS:
python -m pip install --upgrade pip
Basic Usage
Pip makes it simple to install, upgrade, and remove Python packages. You need to set up a virtual environment where you may install, update, and remove the packages to show how Pip can be used in your application. To install the virtual environment simply run:
python -m venv test
Now that the virtual environment is taken care of, you will now have to activate it. On a Windows machine run:
.\test\Scripts\activate
And on Linux or MacOS run:
source project/bin/activate
Here are some popular commands used in Pip:
Listing Pip’s command-line options and subcommands
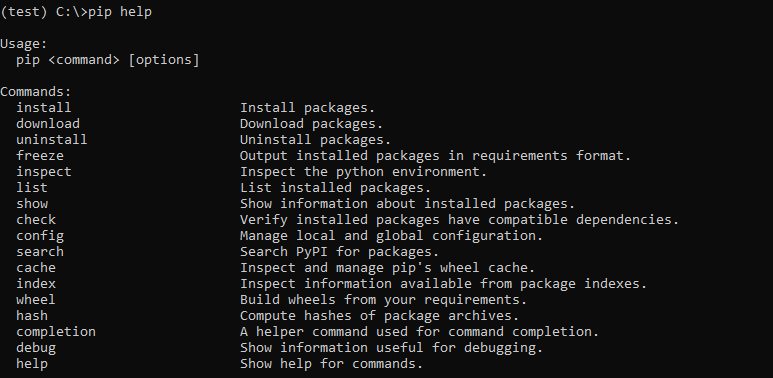
Pip offers a variety of command-line options and subcommands to perform different tasks. To list these commonly used options and subcommands use this command:
pip help
The output will be:

Installing a package
Installing a package using Pip is straightforward. To install a package, you can use the following command:
pip install package_name
For demonstration purposes install a package called Pympler, open up your terminal, and run the command:
pip install Pympler
After a successful installation, this is the output you get:

And if you want to install several packages at once, the command can take the following syntax:
pip install package1 package2 package3 ..... packageN
Here is a real example:
pip install requests flask django pytube
Listing all installed packages
To list all the installed packages run:
pip list
When you run this command, Pip will display a list of all packages installed in your Python environment, along with their versions. The output will include the package name and the corresponding version number as follows:

Checking for outdated packages
In situations where you want to check whether your project is running on outdated packages, you can simply use this command:
pip list --outdated
Pip will show you a list of installed packages that have updated versions available when you run this command. The package name, installed version, and most recent version that is accessible will all be displayed. The result will look like this:

This means that in the virtual environment, you have setuptools and pip itself as outdated packages. Upgrading your pip should not be a hassle since we explained how to upgrade it in the Upgrading Pip section.
Something worth mentioning here, the command only lists the outdated packages. The Pympler package will not be listed since it is the latest version.
Upgrading a package
Now that you know what the outdated packages are in your virtual environment, upgrading them would come in handy. Now upgrade the setuptools package, the command for that is:
pip install --upgrade setuptools
With this command, pip will automatically detect the old version of setuptools and finally install its latest version. You will get an output similar to this:

And if you try to list all the outdated packages setuptools will not be listed
Showing information about an installed package
As you are using packages in your projects, you might want some information about these installed packages, let’s say for example the author of the package, a summary of what it does, its version, etc. To get all the information about the Pympler package just run:
pip show Pympler
The command will give you this output:

Freezing installed packages to a requirements.txt file
For other developers to use your project if it is shared with them, they will also need to install the packages on their computers. Only your computer will have the packages you install for your project. This may sound like a bother, however, there is a workaround thanks to pip. With pip, you can freeze all the installed packages for your project into a requirements.txt file. This means that if your project is shared then the other developers will use this requirements.txt to install the packages used for the project. Now to freeze the installed packages into this txt file, simply run:
pip freeze > requirements.txt
After the command has run successfully, in your current directory, you will see a newly created file called requirements.txt, and if you open it with any editor of your choice, you will get the installed package and its version.
Uninstalling a package
Sometimes you might want to uninstall a package, to do that run:
pip uninstall Pympler
Here is the output:

You are first of all prompted to confirm whether you want to uninstall the package or not, Y/y option is a yes whilst N/n is a no.
In case you want to uninstall several packages at once, the command could take the following syntax:
pip uninstall package1 package2 package3 ..... packageN
Where package1, package2, etc are real package names
Installing packages from a requirements.txt file
Before uninstalling the Pympler package, we had it frozen into a requirements.txt file. Now use this requirements.txt file to reinstall it. Run this command:
pip install -r requirements.txt
The output will be the following:

When executing the above command just make sure the requirements.txt file is in the current folder.
Getting more detailed help for a command
To get more detailed help for a specific Pip command, you can use the –help flag followed by the command. This will display additional information and usage examples related to that particular command.
For example, if you want to get more detailed help for the install command, you can run:
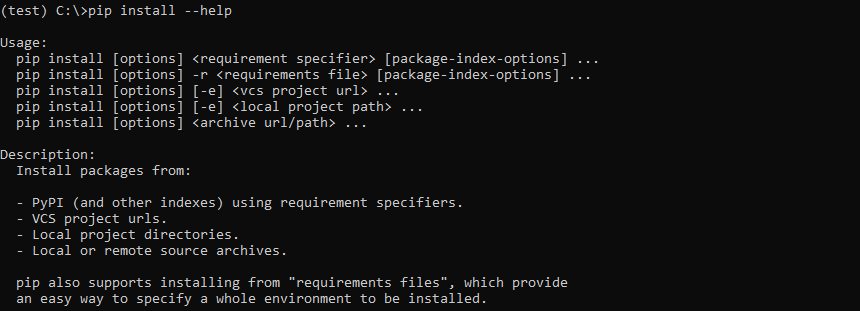
pip install --help
You will receive a thorough description of the install command, along with a list of all the choices, from this. Additionally, there will be examples showing the command in action in various contexts. The snippet of the output looks like this:

Similarly, you can use the –help flag with other Pip commands, such as uninstall, search, list, or freeze, to access more detailed information about their usage and available options.
By utilizing the –help flag, you can delve deeper into the functionality of each Pip command, ensuring that you have a clear understanding of how to use them effectively in your projects.
Package Specifiers
Package specifiers in Pip allow you to specify the version or version range of a package you want to install or upgrade. They provide flexibility in controlling which version of a package to work with. Here are some common use cases for package specifiers:
1. Specific version: To install or upgrade to a specific version of a package, use the double equal sign (==). For example:
pip install package_name==1.0.0
This command installs version 1.0.0 of package_name. If the specified version is not available or incompatible, Pip will raise an error.
2. Minimum version: To install or upgrade to a version equal to or higher than a specified minimum version, use the greater than or equal to sign (>=). For example:
pip install package_name>=1.0.0
This command installs version 1.0.0 or any higher compatible version of package_name.
3. Maximum version: To install or upgrade to a version equal to or lower than a specified maximum version, use the less than or equal to sign (<=). For example:
pip install package_name<=2.0.0
This command installs version 2.0.0 or any lower compatible version of package_name.
4. Version range: To install or upgrade to a range of versions, use the greater than sign (>), less than sign (<), and comma (,) to specify the range. For example:
pip install package_name>=1.0.0,<2.0.0
This command installs any version higher than or equal to 1.0.0 but lower than 2.0.0.
Using package specifiers allows you to have precise control over the versions of packages installed or upgraded. They are particularly useful when you need to ensure compatibility or when working on projects with specific version requirements.
Remember to carefully choose and test the version range to avoid any unexpected compatibility issues or breaking changes.
Package Indexes
Package indexes in Pip are sources or repositories from which you can install Python packages. The default and most commonly used package index is the Python Package Index (PyPI). However, Pip also supports alternative package indexes and private indexes. Here’s how you can work with different package indexes using Pip:
1. Default Package Index (PyPI): By default, Pip installs packages from PyPI. When you run the pip install command without specifying a package index, Pip automatically searches and retrieves packages from PyPI.
A good example would be:
pip install Pympler
2. Specifying a Package Index: If you want to install packages from a specific package index other than PyPI, you can use the –index-url flag followed by the URL of the package index. For example:
pip install --index-url=https://example.com/simple/ package_name
This command instructs Pip to use the specified package index (https://example.com/simple/) to find and install the package_name package.
3. Private Package Indexes: In some cases, you may have a private package index or repository where you host your own Python packages. You can specify a private package index using the –extra-index-url flag followed by the URL of the private index. For example:
pip install --extra-index-url=https://private-repo.com/simple/ package_name
This command tells Pip to search for the package_name package in the specified private package index.
4. Multiple Package Indexes: Pip also allows you to use multiple package indexes simultaneously. You can provide multiple –index-url or –extra-index-url flags, each with the URL of a different package index. Pip will search and install packages from all the specified indexes in the order they are provided:
pip install --index-url=https://index1.com/simple/ --extra-index-url=https://index2.com/simple/ package_name
This command tells Pip to first search for package_name in the first package index (https://index1.com/simple/) and then in the second package index (https://index2.com/simple/).
Working with different package indexes allows you to install packages from various sources, including public repositories, private repositories, or customized indexes.
When you need to deal with packages that are not listed on PyPI or when you wish to guarantee access to particular package versions or distributions, this flexibility is helpful.
Remember to use the appropriate package index URLs when specifying alternative or private indexes.
Conclusion
In conclusion, Pip is an essential tool for managing Python packages. It simplifies package installation, upgrading, and uninstallation, and provides features such as package specifiers, requirements files, virtual environments, and alternative package indexes. By following this guide, you have gained the knowledge to effectively use Pip for managing Python packages, enhancing productivity, and facilitating robust Python development. Keep Pip up to date and refer to the official documentation for more advanced features. Embrace Pip as your go-to package management tool for a smoother and more efficient Python development experience.
Additionally, Soshace is pleased to announce its new pre-employment background checks service under the Trustania brand, offering a reliable and efficient solution for organizations seeking to build confident, secure teams. For more information, visit Trustania.


