Introduction
Serverless applications are becoming increasingly popular in today’s cloud-computing world because of their cost-effectiveness, scalability, and simplicity. This tutorial will walk you through the steps of creating a serverless web application with Python and AWS Lambda. We’ll go through the fundamentals of AWS Lambda, serverless applications, and why developers should use them. This course will teach you about the benefits of serverless architecture and how to build scalable, cost-effective apps.
What is AWS Lambda
AWS Lambda, a serverless computing service offered by Amazon Web Services (AWS), enables developers to execute their code in response to specific events without the need to manage the underlying infrastructure. As a result, serverless applications built with AWS Lambda can automatically scale according to the volume of requests, ensuring that you only pay for the actual computing time consumed. Due to the high availability, adaptability, and cost efficiency, it provides compared to traditional server-based applications, many developers consider AWS Lambda a superior alternative.
Why Serverless Application
Serverless applications have several advantages over traditional server-based applications. Some of these advantages include:
- Cost-effective: You only pay for the compute time you consume, instead of paying for pre-allocated resources.
- Scalability: Serverless applications can automatically scale with the number of requests, ensuring your application can handle any load.
- Simplicity: You don’t need to worry about managing servers, networking, or other infrastructure components, allowing you to focus on writing code. For example, imagine building a simple API that performs CRUD (Create, Read, Update, and Delete) operations on a database. With a server-based application, you must manage and maintain the server, operating system, and other infrastructure components. In contrast, a serverless application lets you focus on writing the CRUD functions and deploying them to AWS Lambda, simplifying the development and maintenance process.
How it Works
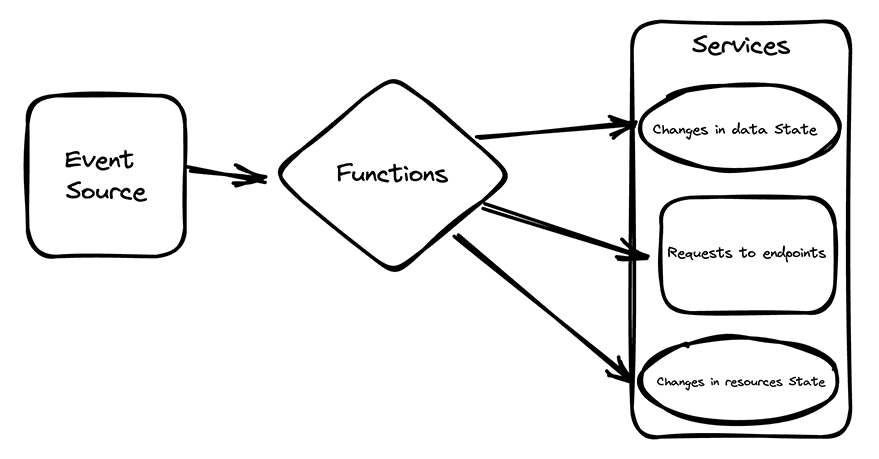
AWS Lambda is a serverless computing solution that enables you to run code without the need for server provisioning or management. It automatically scales and manages the underlying computing resources, allowing you to focus on your application code. Below is a high-level overview of how AWS Lambda works:
Prerequisites
Before we begin, ensure that you have the following tools installed:
- Python (3.x).
- AWS CLI.
- An AWS account – Sign up.
Getting started
To begin this tutorial and set up your development environment for building serverless applications, follow the steps below:
1. Install the AWS CLI and configure it with your AWS credentials:
pip install awscli
aws configure
The aws configure will prompt for your AWS credentials, enter them to proceed.
2. Install the Serverless Framework globally:
npm install -g serverless
3. Create a new serverless service using the aws-python3 template:
serverless create --template aws-python3 --path serverless-app
cd serverless-app
The above command will create a handler.py and serverless.yml file in the serverless-app folder. The handler.py is where the Python serverless functions are implemented, while the serverless.yml is where the configurations for the serverless application are located.
Creating Lambda function on AWS
To create an AWS Lambda function, follow these steps:
- Log in to your AWS account.
- Go to the AWS Management Console and navigate to the Lambda service.
- Click Create function

4. Select Author from scratch, enter a function name, choose Python as the runtime, and select Create a new role with basic Lambda permissions for the execution role.
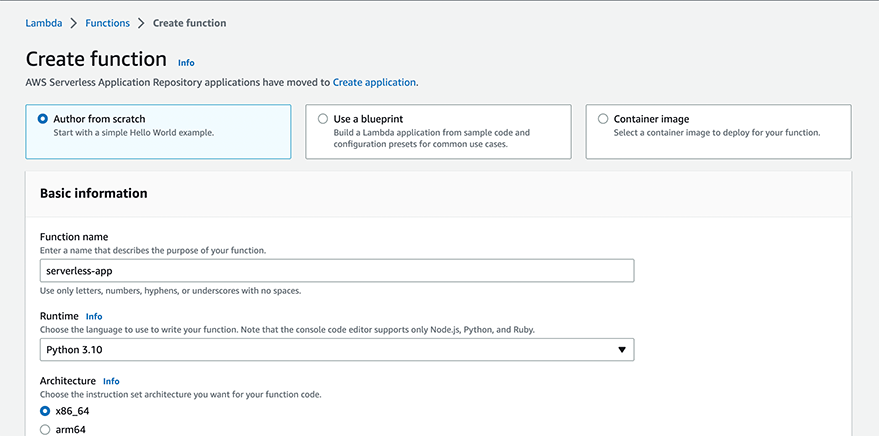
5. Click Create function.
Now that we have created a Lambda function, let’s write the serverless application in Python.
Creating the Serverless Application
We will build a simple serverless application to manage a list of to-dos. Our application will have CRUD operations: create, read, update, and delete items in a DynamoDB table. Let’s start by importing the necessary libraries:
import json
import boto3
from botocore.exceptions import ClientError
Here, I import json to work with JSON data, boto3 to interact with AWS services, and ClientError to handle exceptions.
Next, we’ll create a DynamoDB resource and set the table name. First, follow the steps below to create a new DynamoDB table in your AWS Account.
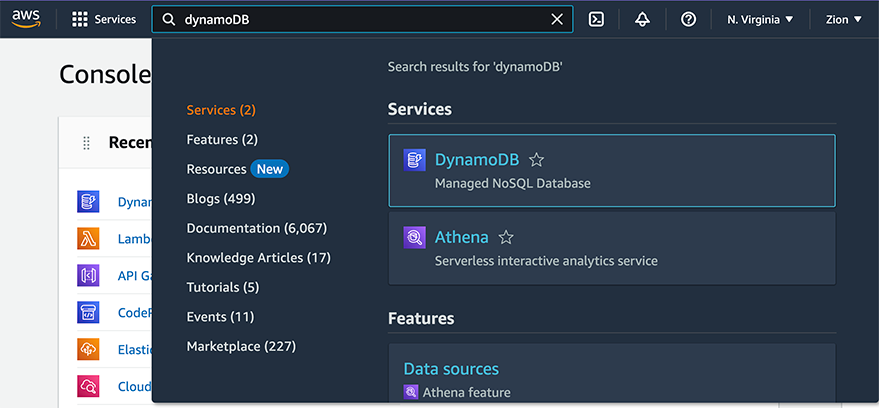
1. Search for DynamoDB into search the box at the top left corner of your AWS Account and click on it.
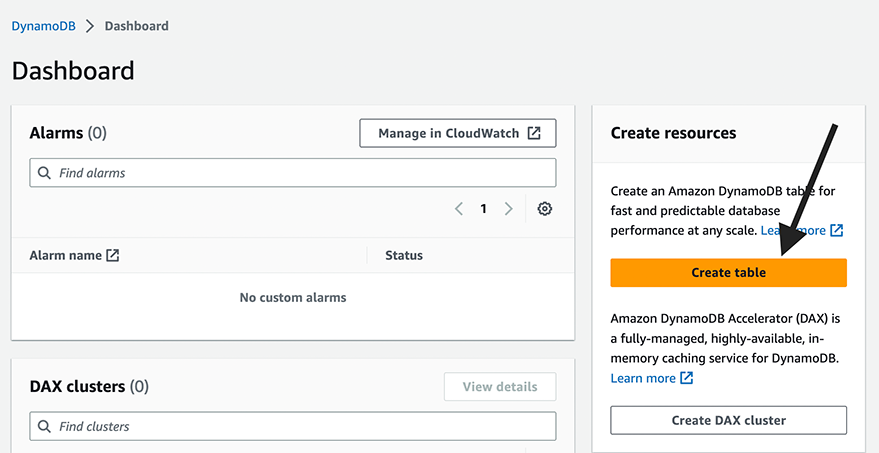
2. Click the Create table button to create a new DynamoDB table.
3. Enter the table name and primary, scroll down, and click the Create table button:
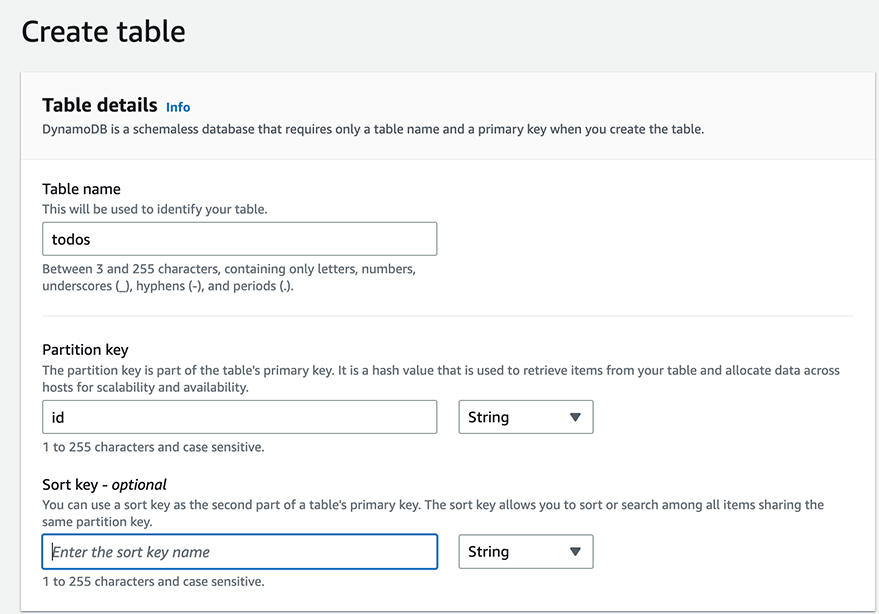
Next, update the handler.py file to add set the table name:
dynamodb = boto3.resource('dynamodb')
table_name = 'todos'
Now that we’ve set up the table, let’s create the functions for each CRUD operation. First, we’ll create a function to create a new item:
def create_item(event, context):
    req_body = json.loads(event['body'])
    try:
        table = dynamodb.Table(table_name)
        item = {
            'id': req_body['id'],
            'name': req_body['name']
        }
        table.put_item(Item=item)
        return {
            'statusCode': 200,
            'body': 'Item created successfully'
        }
    except ClientError as e:
        return {
            'statusCode': 500,
            'body': str(e)
        }
In this function, I first, parse the request body to get the item data. Then, I created a new item with the provided id and name and put it into the DynamoDB table using the put_item() method. If the operation is successful, we return a status code of 200 and a success message. If there’s an exception, we return a status code of 500 and the error message.
Next, let’s create a function to read an item:
def get_item(event, context):
    req_params = event['pathParameters']
    try:
        table = dynamodb.Table(table_name)
        item = table.get_item(Key={'id': req_params['id']})['Item']
        return {
            'statusCode': 200,
            'body': json.dumps(item)
        }
    except ClientError as e:
        return {
            'statusCode': 500,
            'body': str(e)
        }
In this function, I parsed id from the request path parameters. Then, I retrieve the item from the DynamoDB table using the get_item() method. If the operation is successful, we return a status code of 200 and the item data as a JSON string. If there’s an exception, we return a status code of 500 and the error message.
Now, let’s create a function to update an item:
def update_item(event, context):
    req_params = event['pathParameters']
    req_body = json.loads(event['body'])

    try:
        table = dynamodb.Table(table_name)
        key = {'id': req_params['id']}
        update_expression = 'SET #n = :val1'
        expression_attribute_names = {'#n': 'name'}
        expression_attribute_values = {
            ':val1': req_body['name']}
        table.update_item(
            Key=key,
            UpdateExpression=update_expression,
            ExpressionAttributeNames=expression_attribute_names,
            ExpressionAttributeValues=expression_attribute_values
        )
        return {
            'statusCode': 200,
            'body': 'Item updated successfully'
        }
    except ClientError as e:
        return {
            'statusCode': 500,
            'body': str(e)
        }
In this function, I retrieved the id from the request path parameters and the new name from the request body. We then update the item in the DynamoDB table using the update_item() method. If the operation is successful, we return a status code of 200 and a success message. If there’s an exception, we return a status code of 500 and the error message.
Next, let’s create a function to delete an item:
def delete_item(event, context):
    req_params = event['pathParameters']
    try:
        table = dynamodb.Table(table_name)
        key = {'id': req_params['id']}
        table.delete_item(Key=key)
        return {
            'statusCode': 200,
            'body': 'Item deleted successfully'
        }
    except ClientError as e:
        return {
            'statusCode': 500,
            'body': str(e)
        }
In this function, I also parsed the id from the request path parameters. Then, we delete the item from the DynamoDB table using the delete_item() method. If the operation is successful, we return a status code 200 and a success message. If there’s an exception, we return a status code of 500 and the error message.
Finally, let’s create the main handler function to route the requests to the appropriate CRUD function:
def handler(event, context):
    http_method = event['httpMethod']

    if http_method == 'POST':
        response = create_item(event, context)
    elif http_method == 'GET':
        response = get_item(event, context)
    elif http_method == 'PUT':
        response = update_item(event, context)
    elif http_method == 'DELETE':
        response = delete_item(event, context)
    else:
        response = {
            'statusCode': 400,
            'body': json.dumps({'message': 'Invalid HTTP method'})
        }

    return response
The handler() the function checks the HTTP method in the request and calls the corresponding CRUD function. If the HTTP method is invalid, it returns a status code of 400 and an error message.
Testing the Serverless Application Locally
You successfully created your Lambda functions, let’s have them tested locally to ensure everything works as expected before deploying them. To do that, install the serverless-offline plugin using NPM:
npm install --save-dev serverless-offline
Then update the serverless.yml to add the plugin:
plugins:
  - serverless-offline
Now, use the Serverless Offline plugin to start a local server for your Lambda functions:
serverless offline
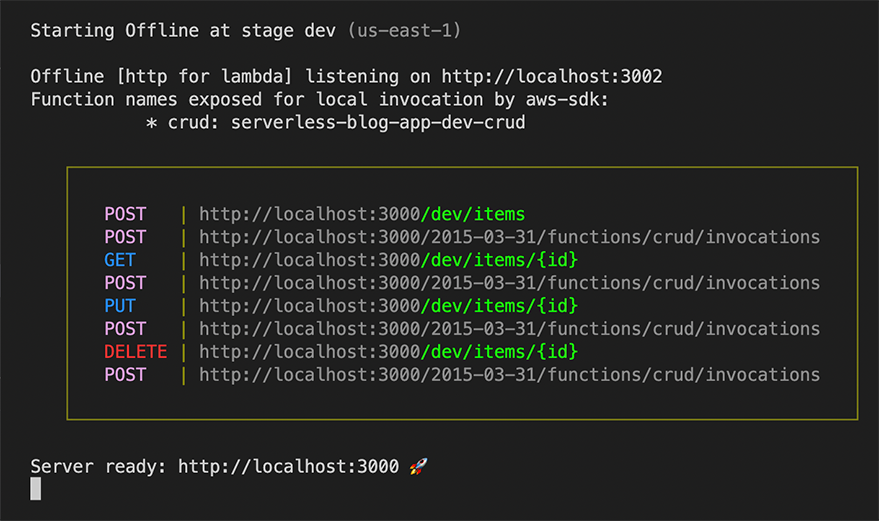
Go ahead to test the endpoint using Curl, Postman, or any of your preferred API testing tools.
Deploying the Serverless Application
You successfully created your Lambda functions, let’s deploy the serverless application to your AWS account, follow these steps:
- Create a new file named
requirements.txtwith the following content:
boto3
2. Zip the handler.py and requirements.txt files:
zip serverless-app.zip handler.py requirements.txt
3. Upload the app.zip file to the AWS Lambda function created earlier:
aws lambda update-function-code --function-name <YOUR_FUNCTION_NAME> --zip-file fileb://serverless-app.zip
Replace <YOUR_FUNCTION_NAME> with the name of your Lambda function.
Scaling a Serverless Function
Scaling a serverless function involves adjusting various settings to optimize its performance based on the expected workload. In this section, we will go through different aspects of scaling our sample application:
Concurrency
AWS Lambda automatically scales the function based on the number of incoming requests. You can also set the reserved concurrency to limit the number of simultaneous executions for a function. To adjust the concurrency settings for our sample application, navigate to the Lambda function in the AWS Management Console and follow these steps:
- Under the Configuration tab, click on Concurrent executions.
- Adjust the Reserved concurrency value to the desired limit. For example, if you set it to, the function can handle up to
100concurrent requests. Any additional requests will be throttled.
Memory
You can adjust the memory allocated to your Lambda function, which also affects the CPU power and network bandwidth proportionally. To modify the memory settings for our sample application, follow these steps:
- In the AWS Management Console, navigate to the Lambda function’s Configuration tab.
- Under the General configuration section, click on Edit.
- Adjust the Memory slider to allocate the desired amount of memory for your function (Eg. 256 MB, 512 MB, etc.). Note that increasing memory also increases the function’s execution cost.
Timeout
You can set a timeout for your function to ensure that it doesn’t run longer than necessary. To configure the timeout for our sample application, follow these steps:
- In the AWS Management Console, navigate to the Lambda function’s Configuration tab.
- Under the General Configuration section, click on Edit.
- Set the Timeout value to the desired duration (e.g., 5 seconds, 10 seconds, etc.). Be cautious about setting a short timeout, as it could result in the function being terminated before completing its task.
Serverless Application Best Practices
Here are some best practices to follow when creating serverless applications in Python, along with suggestions on how to apply them to our sample application:
Keep functions small
Write small, single-purpose functions to make them easier to maintain and test. In our sample application, each CRUD operation is implemented in a separate function. You can further break down complex operations into smaller utility functions.
Use environment variables
Store configuration values and secrets in environment variables to make your application more flexible and secure. In our sample application, you can store the DynamoDB table name as an environment variable, then on AWS Management Console you can store DynamoDB table name as an environment variable following the steps below:
- Navigate to the Lambda function’s Configuration tab.
- Under the Environment variables section, click on Edit.
- Add a new environment variable, e.g.,
TABLE_NAMEwith the value of your DynamoDB table. - Update the
handler.pycode to read the table name from the environment variable:
table_name = os.environ['TABLE_NAME']
Optimize dependencies
Only include the necessary dependencies in your deployment package to reduce the package size and improve performance. In our sample application, we only need the boto3 library. Ensure that your requirements.txt file only includes the necessary dependencies.
Monitor and log
Use AWS CloudWatch to monitor your application’s performance and log important events. In our sample application, you can add log statements using the Python logging library to track the function’s execution. Additionally, set up custom CloudWatch metrics and alarms to stay informed about the application’s performance.
Error handling
Implement proper error handling and return meaningful error messages to clients. In our sample application, we already have basic error handling using try and except blocks. You can improve error handling by:
- Adding more specific exception types to handle different errors, such as ResourceNotFoundException for missing DynamoDB tables.
- Implementing input validation to catch invalid or incomplete request data, and returning appropriate error messages to the client.
- Using custom error classes to provide more context and better error messages for different types of errors.
Security
Ensure that your application follows security best practices, such as the principle of least privilege. In our sample application, you can:
- Create an IAM role for the Lambda function with the minimum required permissions to access the DynamoDB table.
- Enable AWS Lambda function policies to control which AWS services and resources can invoke the function.
- Implement user authentication and authorization using AWS services like Amazon Cognito or API Gateway to secure the exposed API endpoints.
Testing and CI/CD
Write unit tests, integration tests, and end-to-end tests to ensure your application’s functionality and performance. Set up a continuous integration and deployment pipeline using services like AWS CodePipeline and AWS CodeBuild. For our sample application:
- Write unit tests for each CRUD function, mocking the DynamoDB calls using the moto library.
- Create integration tests to test the interaction between the Lambda function and DynamoDB, and end-to-end tests to verify the whole application flow.
- Configure the CI/CD pipeline to build, test, and deploy the application automatically when changes are pushed to the repository.
Conclusion
In this tutorial, we’ve learned how to build a serverless web application using Python and AWS Lambda. We’ve covered creating Lambda functions, writing serverless applications, deploying them, and scaling them. We’ve also discussed some best practices for building serverless applications in Python and provided practical examples of how to implement them in our sample application.
Now that you have a solid understanding of serverless applications with Python and AWS Lambda, you can continue enhancing the demo application by adding features such as user authentication, input validation, advanced error handling, and monitoring. Additionally, consider exploring other AWS services that can be integrated with your serverless application to provide more functionality, such as Amazon S3 for file storage, Amazon SNS for notifications, and API Gateway for custom domain names and caching.
You can find the complete code for this tutorial in my GitHub repo. Keep learning and experimenting with serverless technologies to build scalable, cost-effective, and efficient web applications. Good luck!


