Since they were introduced in late 2019, GitHub Actions have completely changed the ways in which developers handle workflow automation. GitHub Actions allow you to automate tedious repetitive workflows like installing dependencies (npm ci), running tests (npm test), scanning for vulnerabilities (npm audit) and deploying to a server.
Manual deployment should be a thing of the past. A lot of developers simply SSH into their servers, `git pull` and restart the app. This process is prone to run into a myriad of errors, though, not to mention the fact that it’s slow and repetitive. We can remedy that (for free!) with GitHub Actions.
You can think of an action as a third party library that you can insert somewhere in your pipeline to perform certain tasks. There’s an action for almost anything you can think of – from setting up NodeJs to sending text messages. Individual actions are used inside workflows.
Workflows are triggered by events. An event is almost anything that happens in your git repository – a push, commit, merge, etc. Essentially, any GitHub webhook event will trigger a workflow.
Finally, workflows run on separate Github-owned servers. These servers are referred to as runners. You can host your own runners, but GitHub’s hosted ones will do just fine for our purposes.
Let’s see this in action (no pun intended).
Creating a workflow
A workflow is a custom automated process consisting of jobs that are run in steps. Inside these steps, you can use actions or run bash commands within your package. This way, you can build, test, scan, package and deploy any project on Github.
A workflow is configured using YAML syntax and saved in the ‘.github/actions’ folder. The directory structure should look like this:
.github
└── workflows
    └── hello-world.yml
So, say we wanted to write a simple command that prints “Hello World” every time we push to the server.
First, we need to specify the name of the workflow
name: Hello World
Since we only need our workflow to be triggered when a push is made to our git repository, we need to specify it as such.
name: Hello World

on:
  push:
    branches: [ master ]
Every workflow must contain at least one job. We only have one job in this case so that shouldn’t be a problem.
We’ll name our job “echo.”
We also need to specify the operating system our job will run on. The latest version of Ubuntu will do just fine.
name: Hello World

on:
  push:
    branches: [ master ]

jobs:
  echo:
    runs-on: ubuntu-latest
Lastly, we need to define a series of steps that will run sequentially inside our job.
name: Hello World

on:
  push:
    branches: [ master ]

jobs:
  echo:
    runs-on: ubuntu-latest
    steps:
    steps:
      - name: Checkout source code
        uses: actions/checkout@v2
      - name: Echo Hello World
        run: echo "Hello World"
This job has two steps:
- Checkout the source code from our git repo using “actions/checkout@v2.” Notice that this is just an action, not a command. You can also leave out the ‘name’ property if you like.
- Run “Hello World” on the runner. ‘run’ accepts any valid bash commands.
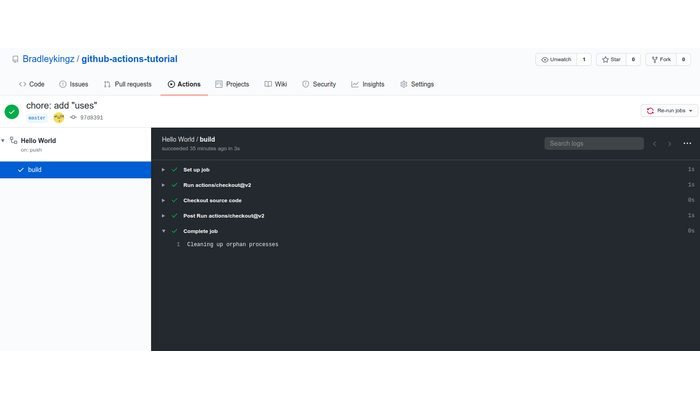
This is the output we get from Github once you push to the repo.

With the fundamentals out of the way, let’s apply the same principles to see how we can deploy a simple express app every time we push to the master branch.
Deploying to an SSH server
If you don’t have a project up and running already, you can bootstrap one using the command
npx express-generator
Before we proceed, let’s lay out the groundwork. Here is how the application is supposed to work:
- The developer pushes to a github repo
- A deploy workflow is triggered.
- The task runner connects to the SSH server.
- On the SSH server, the task runner clones the repo.
- Dependencies are installed.
- Start (or restart) any relevant processes.
You might be curious as to why there isn’t a step for checking out the repo like in the previous section.
We don’t need to checkout or clone the repo because we don’t run any direct commands on it from the runner. We simply connect to the SSH server and run all our commands there.
This is a direct consequence of the lack of potentially resource-intensive tasks such as running tests, creating coverage reports, static code analysis and transpilation. Projects based on frameworks such as React and Typescript (that need a build step) will probably have a different-looking flow.
This is how the above pseudocode looks when represented as a workflow YAML file.
name: Deploy application

on:
  push:
    branches: [ master ]

jobs:
  deploy:
    runs-on: ubuntu-latest
    steps:
      - name: Deploy NodeJS app
        uses: appleboy/ssh-action@v0.1.2
        with:
          host: ${{secrets.SSH_HOST}}
          username: ${{ secrets.SSH_USERNAME }}
          password: ${{ secrets.SSH_PASSWORD }}
          script: |
            mkdir -p ~/my-express-app/ # create a new folder
            cd ~/my-express-app/ # navigate into the folder
            git clone https://github.com/Bradleykingz/github-actions-tutorial app # clone the repo into the 'app' folder
            cd github-actions-tutorial # navigate into the repo
            npm install # install dependencies
            pm2 start app.js # start as a background service.
Some steps are unique to this application because we are running it for the first time. Typically, for example, you won’t need to create new folders or clone your repo.
A more typical script would look like this:
   script: |
	cd ~/my-express-app/
        git pull
        npm install
        pm2 restart app.js
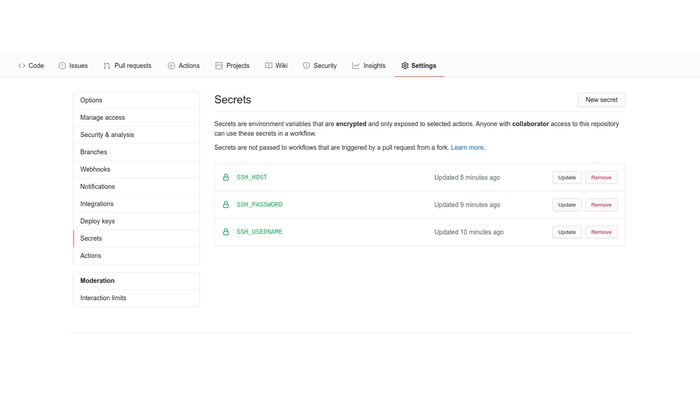
In order to log into our server, we have to provide the relevant credentials. These are defined as repository or organization-level secrets.
Creating secrets
To create a secret, head over to the “Settings” tab of your Github repo and click on “Secrets.” Here are the above SSH secrets set up in our dummy repository:

To learn more about how secrets are encrypted, how they are passed to your workflow and the limits imposed on them, follow this Github guide.
Since this is SSH, you’re free to use a private/public key pair if you prefer. Save it as a secret in your repository and supply it to your workflow file in the same manner as above.
If you’d like to see the code on Github (you can’t see the secrets, though.)
Github link: https://github.com/Bradleykingz/github-actions-tutorial
Troubleshooting
There are a couple of issues you may run into while attempting to run this tutorial.
npm: command not found – this error is as a result of how commands are run once the task runner connects to your server. If you encounter this add NodeJS to your PATH.
If Node is already included in your path and you still experience this, you will have to run all node-related commands explicitly. If you use NVM, for instance, you will need to run ` ~/.nvm/versions/node/v12.14.0/bin/npm install` instead of regular old ‘npm install’. Additionally, commands such as ‘pm2’ will need to be re-written.
/usr/bin/env: ‘node’: No such file or directory – you will either run into this error because of PM2 or installing Node using a package manager like apt.
For nvm users: `ln -s .nvm/versions/node/v<your node version>/bin/node`
For apt users: `ln -s /usr/bin/nodejs /usr/bin/node`
Be careful with this approach. If you ever change your node version, you will also need to change these commands to reflect the change.
Conclusion
Hopefully, this article serves as a great introduction to the world of automated development practices. Modifying your pipeline to automate boring repetitive bits gives developers time to concentrate on more important tasks at hand, besides greatly reducing human interaction with sensitive bits of the system such as deployment.
Lastly, we didn’t get to showcase a lot of impressive things that Github Actions can do in this tutorial, but you’d do well to learn how to integrate a whole CI/CD pipeline just within Github itself.


