
Introduction
In this tutorial, you’ll learn how to implement machine learning in web applications using Python and TensorFlow. By the end of this tutorial, you’ll be able to create a simple web application that utilizes a machine-learning model. Without much ado, let’s begin!
Overview
This tutorial’s main goal is to walk you through the creation of a web application that uses a machine learning model. First, we’ll use TensorFlow to build a straightforward machine-learning model. Next, we’ll create a web application with Flask, a quick and easy Python web framework. The model will then be deployed and integrated into the web application.
What is Tensorflow
The Google-developed open-source software package TensorFlow is used to create and train machine learning models. Because it functions particularly well with large-scale neural networks, it has become one of the most extensively used machine learning frameworks. One of TensorFlow’s key advantages is its simplicity in handling complex calculations and large datasets. It is designed to operate well with GPUs and other hardware accelerators, allowing deep neural networks to be trained much more quickly than with other frameworks.
In addition to its speed advantages, TensorFlow offers a range of tools and APIs for developing and deploying machine learning models. Using the wide range of pre-built components it includes for tasks like data processing, model construction, and visualization will speed up and save time during the development of machine learning applications. Another benefit of TensorFlow is its versatility. It can be used for a variety of machine-learning tasks, such as sentiment analysis, natural language processing, and image identification.
Setting up the Environment
Let’s set up our environment. You’ll use Python and TensorFlow for our machine learning model, and Flask for your web application. First, you need to install Anaconda to be able to install and use the Tensorflow library. To do that, follow the steps below:
- Visit the download page for Anaconda.
- Click the download button after selecting the suitable installer for your operating system (Windows, macOS, or Linux).
- To start the installer after the download is finished, double-click it.
- To install Anaconda on your PC, adhere to the instructions.
- You might be given the option to install Anaconda for all users or just the current user on Windows. Click Next after selecting the suitable option.
- You might come across a macOS warning stating that the installer is an internet-downloaded program. To continue with the installation, click Open.
- You might be prompted to accept the Anaconda End User License Agreement during the installation. Click I Agree if you agree.
Once the installation is complete, open a terminal or Anaconda Prompt and create a new conda environment for your project.
conda create --name myenv python=3.8
This creates a new environment named myenv Python 3.8 installed. You can replace myenv with the name you want to use for your environment.

Now activate the new environment by running the following command:
conda activate myenv
This activates the myenv environment and prepares your terminal or Anaconda Prompt to use it. You can now install TensorFlow and Flask in the new environment by running the following commands:
conda install tensorflow
pip install flask
This installs TensorFlow and Flask in the myenv environment.
Project Structure
After setting up the environment for this tutorial, Let me show you what the project structure of the application I’ll be building throughout this tutorial will look like:
📦mypyapp
┣ 📂templates
┃ ┣ 📜index.html
┃ ┗ 📜result.html
┣ 📜app.py
┣ 📜housing_data.csv
┗ 📜model.py
Let me talk briefly about these files:
- templates folder: Here is where you will add all the template files for the project.
- templates/index.html: This is the root template that is rendered when a user visits the app.
- templates/result.html: Here is where the result of the prediction from the model is rendered.
- app.py: This is the Flask application file.
- housing_data.csv: This file is where the data sets used by the model for prediction are stored.
- model.py: Here is the machine learning prediction model.
Creating a Simple Machine Learning Model
With the project environment setup, create a simple linear regression model to predict housing prices based on the size of a house. This model is chosen for its simplicity, but you can replace it with any other model you’d like.
First, let’s create a new Python file called model.py. I’ll import the necessary libraries and load our dataset:
# Load the dataset
import tensorflow as tf
import numpy as np
import pandas as pd

data = pd.read_csv('housing_data.csv')
In the above code snippet, I’ve imported the Python machine-learning packages required for the model. The code will load the data sets in the housing_data.csv which you’ll be creating shortly to train the model using some data sets I pass to it. Now create the housing_data.csv file and add records with two columns: “Size” (in square feet) and “Price” (in USD).
Size,Price
1000,120000
1200,140000
1400,160000
1600,180000
1800,210000
2000,240000
2200,260000
2400,290000
2600,320000
2800,340000
Then I will update the file to the code below to split the data into training and testing sets:
# Split data into training and testing sets
train_data = data.sample(frac=0.8, random_state=42)
test_data = data.drop(train_data.index)
Now, I will create the linear regression model using TensorFlow:
# Create a linear regression model
model = tf.keras.Sequential([
    tf.keras.layers.Dense(units=1, input_shape=[1])
])

# Compile the model
model.compile(optimizer=tf.keras.optimizers.Adam(0.1), loss='mean_squared_error')
Next, train the model with your training data:
# Train the model
history = model.fit(train_data['Size'], train_data['Price'], epochs=100, verbose=False)
To evaluate the performance of your model, I’ll use the test data:
# Evaluate the model
loss = model.evaluate(test_data['Size'], test_data['Price'], verbose=False)
print(f"Mean squared error: {loss:.2f}")
Finally, I will save the trained model to use it later in the web application:
# Save the model
model.save('linear_regression_model')
Building the Web Application
With the machine learning model ready, let’s create the web application using Flask. First, create a new Python file called app.py and import the necessary libraries:
from flask import Flask, render_template, request, jsonify
import tensorflow as tf
import numpy as np

app = Flask(__name__)
Now, let’s load the previously saved linear regression model:
# Load the saved model
model = tf.keras.models.load_model('linear_regression_model')
Next, I’ll create a route for our home page where users can input the house size and receive a predicted price. I’ll use an HTML template for this purpose. Create a new folder called templates and a file named index.html inside it. Add the following code to index.html:
<!DOCTYPE html>
<html lang="en">
  <head>
    <meta charset="UTF-8" />
    <title>House Price Predictor</title>
    <style>
      body {
        font-family: Arial, sans-serif;
        margin: 0;
        padding: 0;
        background-color: #f2f2f2;
      }

      h1 {
        text-align: center;
        margin-top: 50px;
        margin-bottom: 30px;
        font-size: 36px;
      }

      form {
        max-width: 500px;
        margin: 0 auto;
        padding: 30px;
        background-color: #fff;
        border-radius: 5px;
        box-shadow: 0px 0px 10px 0px rgba(0, 0, 0, 0.1);
      }

      label {
        display: block;
        margin-bottom: 10px;
        font-size: 18px;
      }

      input[type="number"] {
        display: block;
        width: 100%;
        padding: 10px;
        border: 1px solid #ccc;
        border-radius: 5px;
        font-size: 16px;
        box-sizing: border-box;
      }

      button[type="submit"] {
        display: block;
        width: 100%;
        padding: 10px;
        background-color: #4caf50;
        color: #fff;
        border: none;
        border-radius: 5px;
        font-size: 18px;
        cursor: pointer;
        transition: background-color 0.3s ease;
      }

      button[type="submit"]:hover {
        background-color: #3e8e41;
      }
    </style>
  </head>
  <body>
    <h1>House Price Predictor</h1>
    <form action="/predict" method="post">
      <label for="size">Size (in square feet):</label
      ><input type="number" id="size" name="size" required /><button
        type="submit"
      >
        Predict Price
      </button>
    </form>
  </body>
</html>
Then create a result.html file in the templates folder to render the result of the predictions with the code snippet below:
<!DOCTYPE html>
<html lang="en">
  <head>
    <meta charset="UTF-8" />
    <title>House Price Predictor</title>
    <style>
      body {
        font-family: Arial, sans-serif;
        margin: 0;
        padding: 0;
        background-color: #f2f2f2;
      }

      h1 {
        text-align: center;
        margin-top: 50px;
        margin-bottom: 30px;
        font-size: 36px;
      }

      form {
        max-width: 500px;
        margin: 0 auto;
        padding: 30px;
        background-color: #fff;
        border-radius: 5px;
        box-shadow: 0px 0px 10px 0px rgba(0, 0, 0, 0.1);
      }

      label {
        display: block;
        margin-bottom: 10px;
        font-size: 18px;
      }

      input[type="number"] {
        display: block;
        width: 100%;
        padding: 10px;
        border: 1px solid #ccc;
        border-radius: 5px;
        font-size: 16px;
        box-sizing: border-box;
      }

      button[type="submit"] {
        display: block;
        width: 100%;
        padding: 10px;
        background-color: #4caf50;
        color: #fff;
        border: none;
        border-radius: 5px;
        font-size: 18px;
        cursor: pointer;
        transition: background-color 0.3s ease;
      }

      button[type="submit"]:hover {
        background-color: #3e8e41;
      }

      .result {
        max-width: 500px;
        margin: 0 auto;
        padding: 30px;
        background-color: #fff;
        border-radius: 5px;
        box-shadow: 0px 0px 10px 0px rgba(0, 0, 0, 0.1);
        margin-top: 50px;
      }

      .result h2 {
        margin-top: 0;
        margin-bottom: 20px;
        font-size: 24px;
        text-align: center;
      }

      .result p {
        margin-top: 0;
        font-size: 18px;
        text-align: center;
      }
    </style>
  </head>
  <body>
    <h1>House Price Predictor</h1>
    <form action="/predict" method="post">
      <label for="size">Size (in square feet):</label
      ><input type="number" id="size" name="size" required /><button
        type="submit"
      >
        Predict Price
      </button>
    </form>
    {% if price %}
    <div class="result">
      <h2>Predicted House Price:</h2>
      <p>${{ price }}</p>
    </div>
    {% endif %}
  </body>
</html>
Now, create a route in app.py to render the index.html template:
@app.route('/')
def index():
    return render_template('index.html')
Next, I’ll create a route to handle the price prediction when the user submits the form:
@app.route('/predict', methods=['POST'])
def predict():
    size = float(request.form['size'])
    price = model.predict(np.array([size]))[0][0]
    return jsonify({'price': price})
Finally, let’s run our Flask application:
if __name__ == '__main__':
    app.run(debug=True)
Integrating the Model with the Web Application
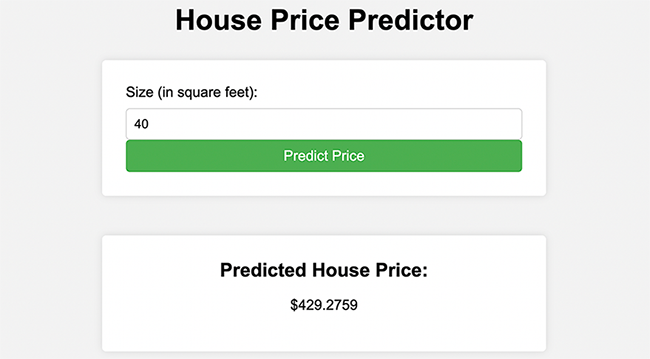
I have integrated the machine learning model into the web application in the previous step. Users can input the house size, and our Flask app will return the predicted price using the trained linear regression model.
Conclusion
Congratulations! You have successfully built a web application that uses a machine-learning model to predict house prices based on size. I hope this tutorial has been both informative and enjoyable. You can now take this knowledge and apply it to your projects, whether it’s for personal or professional use. The code for this tutorial is available here on my GitHub repository, feel free to clone it. Happy coding!
——————