

Today we’re going to learn Redux but first, we will complete the homework from the last lesson. Remember when we learned how to take help from the amazing world of Open-Source? This is one of those times. We are going to add the day picker module built and tested by the react community. Let’s get started.
Install react-day-picker
You can use either yarn or npm as convenient:
yarn add react-day-picker
Import module and CSS inside ArticleList
import DayPicker, { DateUtils } from "react-day-picker";
import "react-day-picker/lib/style.css";
Update state
DayPicker expects to and from value. Let’s add it to the state:
state = {
  selectedArticles: null,
  from: undefined,
  to: undefined
};
Add DayPicker inside render:
const { from, to } = this.state;
const modifiers = { start: from, end: to };
return (
  <div>
    <h1>Article list</h1>
    <Select
      options={options}
      isMulti={true}
      value={this.state.selectedArticles}
      onChange={this.handleSelectChange}
    />
    <DayPicker
      className="Selectable"
      selectedDays={{ from, to }}
      modifiers={modifiers}
      onDayClick={this.handleDayClick}
    />
    <ul>{this.renderListItem()}</ul>
  </div>
);
className add styling to the date picker. selectedDays expects you to pass from and to props to be shown on the calendar. Let’s add the handleSelectChange method to save user response.
Add click handler
handleDayClick = day => {
  const range = DateUtils.addDayToRange(day, this.state);
  const { from, to } = range;
  this.setState({ from, to });
};
Finally, add a small function to render day picker
getRangeTitle() {
const { from, to } = this.state;
return (
<p>
{!from && !to && "Please select the first day."}
{from && !to && "Please select the last day."}
{from &&
to &&
`Selected from ${from.toLocaleDateString()} to
${to.toLocaleDateString()}`}{" "}
{from && to && (
<button className="link" onClick={this.handleResetClick}>
Reset
</button>
)}
</p>
);
}
//to reset date
handleResetClick = () => {
this.setState({ from: undefined, to: undefined });
};
//render getRangeTitle()
render(){
//...
return(
<div>
<h1>Article list</h1>
{this.getRangeTitle()}
{/* previously added code...*/}
</div>
);
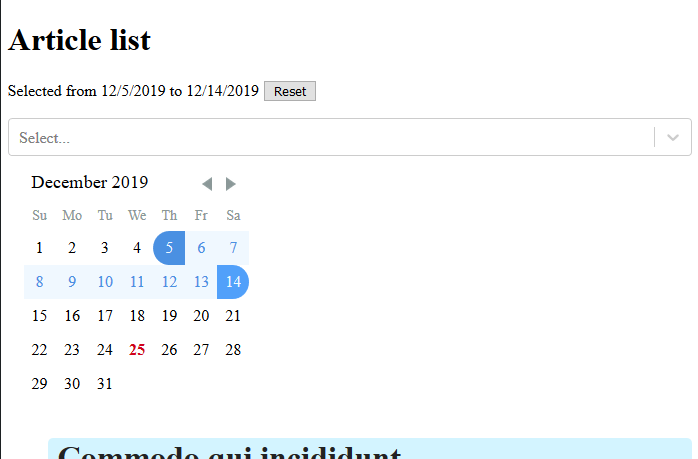
}Let’s see how it looks:
You can visit documentation for more information.
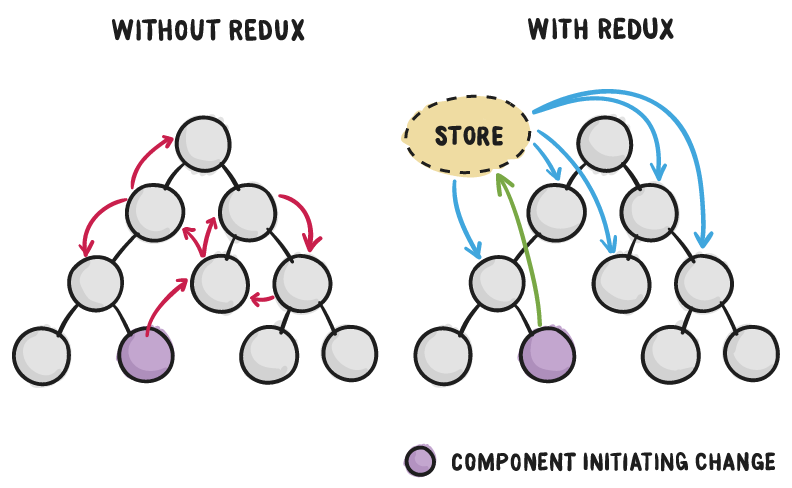
We can see that our component state is getting more complex and we are losing atomicity. It means that one component should take one single task. We added Select and DayPicker together and this is the first sign we have to take care of State Management.
With the increasing complexity of our app, it is very easy to introduce bugs because of poor state management. The React team offered a solution for logics building – Unidirectional Data Flow. So, let us see Redux working principles:
Redux
Redux is a predictable state container that supports the idea of a single source of truth. This simply means that the complete state of the application will reside in one place only.
Redux is more focused on the concepts of functional programming and is inspired by Flux: A uni-directional way of updating Views and handling user actions.

Concept
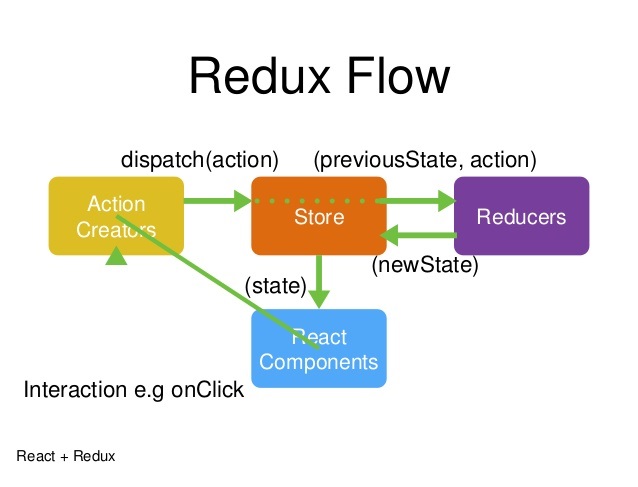
As we can see in the image above. Redux consist of mainly 4 components. We will go through each of them and build a basic counter using redux. First, install the required modules:
yarn add redux react-redux
1. Store
A store is just a container that contains the state of our whole application in an object tree. This is also called a “Single source of truth”. This makes debugging easier.
Let’s create a new directory store and add an index.js file:
import { createStore } from "redux";
import reducer from "../reducers";

const store = createStore(reducer);

export default store;
The store receives a reducer which we will see in a minute. But first, let’s see actions.
2. Actions
Another important concept is that the State is Read-Only. The only way to change the state is to emit an action, an object describing what happened. In short, actions are a piece of code that tells how to change state.
Let’s create a new directory actions and write two actions inside index.js to increment and decrement the counter.
import { INCREMENT, DECREMENT } from "../types";

export const increment = () => {
  return {
    type: INCREMENT
  };
};

export const decrement = () => {
  return {
    type: DECREMENT
  };
};
Types are just to specify the type of action triggered. We will use it inside the reducer. I have defined types inside a different file to avoid misspelling.
export const INCREMENT = "increment";
export const DECREMENT = "decrement";
3. Reducers
Views cannot change the state DIRECTLY! It means the only way to update views is to trigger a state change inside reducer.
In Redux, you dispatch actions. These actions tell a reducer to update the state. Redux docs also recommend not mutating the state. Each action instructs the reducer to replace the existing state with a new version.
Let’s create a reducers directory and index.js file inside it.
//import type constants
import { INCREMENT, DECREMENT } from "../types";

// state to begin with
const INITIAL_STATE = {
  count: 0
};

// switch action based on types
export default (state = INITIAL_STATE, action) => {
  switch (action.type) {
    case INCREMENT:
      return { ...state, count: state.count + 1 };
    case DECREMENT:
      return { ...state, count: state.count - 1 };
    default:
      return state;
  }
};
Reducers are just pure functions that return a new state every time we dispatch an action which in turn re-render the View.
4. View
We need to access this state inside our component. Let’s see how we can do that:
Step 1:
Let’s create a component Counter to show count and trigger increment or decrement action.
import React, { Component } from "react";
import PropTypes from "prop-types";
import { connect } from "react-redux";
import { increment, decrement } from "../actions";

class Counter extends Component {
  static propTypes = {
    count: PropTypes.number,
    increment: PropTypes.func
  };

  handleIncrement = e => {
    e.preventDefault();
    this.props.increment();
  };

  handleDecrement = e => {
    e.preventDefault();
    this.props.decrement();
  };

  render() {
    return (
      <div>
        <h1>{this.props.count}</h1>
        <a href="#" onClick={this.handleIncrement}>
          increment
        </a>
        <a href="#" onClick={this.handleDecrement}>
          decrement
        </a>
      </div>
    );
  }
}

const mapStateToProps = state => {
  return {
    count: state.count
  };
};

export default connect(
  mapStateToProps,
  { increment, decrement }
)(Counter);
We are using a connect function to connect our component with the store. Connect function is a Higher-Order component that adds extra functionality to our component. It receives few arguments.
- One is mapStateToProps which let us access redux state inside the component.
- The second argument is mapDispatchToProps which takes actions that we need to dispatch.
Step 2:
We have to wrap our whole application with Provider from ‘react-redux’ and pass the store. Update root file as:
//add imports
import Counter from "./components/Counter";
import { Provider } from "react-redux";
import store from "./store";

function App() {
  return (
    <Provider store={store}>
      <Counter />
    </Provider>
  );
}
Our counter is ready. You can visit this codesandbox below to see the counter in action.

The lesson code can be found here.
We are looking forward to meeting you on our website soshace.com