Whenever you start learning a new technology, learning about its structure is one of the most important things. Let’s understand the Angular structure with an example:
Start with Creating a new project

Just select a folder where you want to put your project and then open the terminal and write the following command
->ng new yourAppName

After that, you will be asked to add routing or not.in my case, every project that I have worked on required routing so I suggest you add routing

Same as routing now you will be asked to which style-sheet you want to use.select whichever you are familiar with.
- Now it will take a couple of minutes to create the whole structure required for angular projects.
- After the process is done you will be able to see a bunch of files created in your explorer menu.
Explanation of Angular structure
Let’s first Talk about files which you can see in this Screenshot.
editorconfig
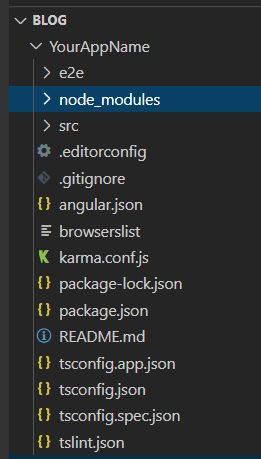
You can maintain a consistent coding style for the whole project using editorconfig.assume a scenario where multiple developers are working on the same project with different using Editors so for that editorConfig is used to prevent conflicts in file format
.gitignore
- This file is used to provide instructions on which files you want to ignore while committing your code on git.
- for example: by default, angular take /node module in gitignore file because /node module includes a large number of small files which will reduce efficiency while sharing your code with other developers.
angular.json
- this file is used to provide workspace-wide and project-specific configuration defaults for build and development tools provided by the Angular CLI.
- In simple words, you can set the configuration of your projects from projectVersion to setting project budget (like minWaring at crossing 2mb size of your project)
browserlist
- You can create different loading using browserlist and tsconfig.json.let’s understand it with one example:
- Add this in your .browserlist

browserlist tsconfig.json:

Compiler option - This will create two different bundles, one for es5 and the second one for es2015.Here is the difference:
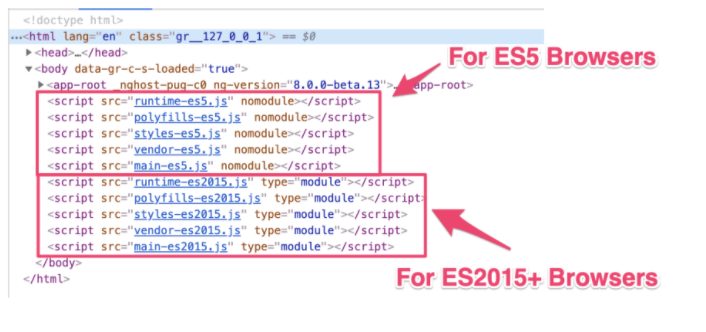
Bundles for ES5 and ES2015+ browsers
karmaconf.js
Karma is used to test the workflow of the application.it collects all our testing tools to one place to define the framework we want to use like the specific actions we want to perform, testing different environment, etc
package.json
- It is used to install different open source and other available packages to your project.
- It is used for more than dependencies – like defining project properties, description, author & license information, scripts, etc.
- Package-lock.json will tell you the current version of that package where package.json will tell you the minimum version required of that package
tsconfig.js
- In the current scenario Typescript is the main script file for angular. Typescript is a superset of JavaScript with design-time support for type safety and tooling.
- you can add a TypeScript configuration to tsconfig.json in your project to guide the compiler as it generates JavaScript files.
tslint.json
- tslint is used for static analysis of typescript.
- It is used for code readability, maintainability, and some other function errors.it is also widely supported across modern editors & build systems, it can be customized with your own lint rules, configuration, and formatters
Now let’s move to the folder section:
E2e
- End to end testing which is also known as integration testing.it is a good way to make sure at a higher level your applications function correctly.
- We do have a separate file for each component of e2e testing, to test that function is working as expected or not.
- At a higher level, we will try a common e2e testing file to check whether all components work correctly with each other or not.
- E2e testing is the best way to check your main function are working as expected or not like payment module or sign in etc.
- Most developers don’t focus on this part and there is nothing wrong with that but Its a good way for testing your code logic whether its working fine or not.
node_module
- node_module is specifically build to store plugins and packages installed in your project.
- You can see a bunch of packages name installed for your project when you open this folder
- Package.json keeps track of the installed package version, and those packages are installed in node_module.
- One important thing to note here is when you copy your project to share with others you have to avoid this folder because this folder includes a large number of small files.
- One the receiving end(the person who is going to take your project) has to write this command to include all the necessary package for your project to work completely as you expected.
->npm install
This might be a small code but it will make a huge difference.
Now move to the next folder where you are going to spend most of your time coding.
src
- You will find some folder called app, asset, environment, and some files here as well.
- Let’s talk about the first folder
app
- The app folder contains all the component you have created or You are going to create.
- You will find six files when you open the app folder
- app.component.html: this file contains HTML related code for your component.you can use this page for data-binding with ts file
- app.component.css: file extension will differ on which stylesheet you are using.you can apply style properties for HTML page using this file.
- app.component.spec.ts: this file is related to unit testing, it’s the same as other testing files you can run testing files using
->ng test
- app.component.ts : this is one of the most important files which include typescript.you can write your logical code for your component using this file
- app.module.ts : this is also a typescript file that includes necessary dependency for the project. this file is used to define necessary modules imports, component declaration and main component to be bootstrapped
- app-routing.module.ts: this is a typescript file as well.this file includes routing configuration for the project.routing is not the same as other technology in angular, its a lot more complected.You can create a new component with this command which will include .html, .css , .spec.ts and .ts file:
->ng g c ComponentName
And you can create a module as well :
->ng g m ComponentName
Assets
The assets folder is generally used to store images, videos which are used in our project
Environment
- This folder contains base configuration file,environment.ts which is the default setting when you run your code in
->ng serve or ng build
- If you want to use the production environment you will have to use a command
->ng s --prod or ng b --prod
Files
Now let’s take a look at the files which are included in the src folder
favicon.icon
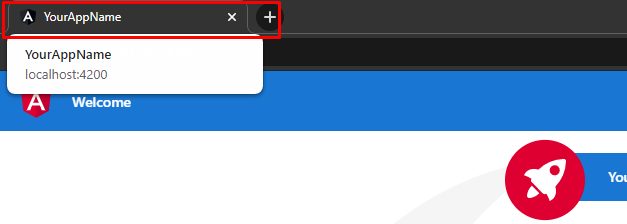
This will be the icon showing in your browser tab for your application
Index.html
Index.html is the first Html page that will be called and after that, it will load the page according to the selector tag which you have written on this page
Main.ts
This is the entry point of the app, it compiles the web-app and bootstrap app module to run the app
Pollyfills.ts
Pollufills.ts Is used to make your app compatible with other browsers.most of the code we write is in ES6 and there are some browsers like firefox, IE which will not support so there is a need to set up some environment before being able to viewed or used in those browsers.
Style.css
This file is used to provide common style properties for the whole project
Conclusion
This was all the necessary things you need to know about angular structure. In short, you are going to spend most of your time in the src folder for implementing your project functionality.every file which has a “spec” word in its name is used for testing purpose, and there is some configuration file which you will have to understand in-depth for a better result in future.
Author Bio: Ajay Patel – Technical Director, iFour Technolab Pvt Ltd
A seasoned technocrat with years of experience building technical solutions for various industries using Microsoft technologies. Wish sharp understanding and technical acumen, have delivered hundreds of Web, Cloud, Desktop, and Mobile solutions and is heading the technical department at Angular Frontend Development Company – iFour Technolab Pvt. Ltd.


