Introduction
There has been a steady increase in the adoption of GraphQL in the last few years. More businesses and developers are opting for GraphQL for their API implementation. While GraphQL is not necessarily a replacement for REST APIs, understanding how it works will help you develop more flexible and efficient mobile applications, especially when working with remote data. In this article, we’ll extensively discuss GraphQL, how it compares to REST, why to use it, and how to implement it with Flutter by building a simple TodoList application.
Prerequisites
This article assumes you have
- Flutter SDK installed on your machine.
- Basic knowledge of Flutter and Dart (You’ve built a Flutter application before).
- Some experience making network calls with Flutter.
- Android studio/VS Code or your preferred IDE.
GraphQL
GraphQL is a query language that facilitates communication between a server (API) and a client. It was developed by Facebook (Meta) and released to the public in 2015. With GraphQL, you can request just the data you need and nothing more, having more control over what is sent by the server. GraphQL uses a JSON-like document for sending queries and returns a JSON response similar in shape to the query. A typical GraphQL query document has the following structure:
query NameOfCountries {
  countries {
    name
  }
}
In this example, the query keyword represents the operation type. NameOfCountries is the operation name. countries is the field being requested. The nested name field ensures that we only get back the name of a country.
This query will produce the following result:
{
  "data": {
    "countries": [
      {
        "name": "Andorra"
      },
     {
        "name": "Peru"
      }
    ]
  }
}
In GraphQL, there are three main operation types:
- Query: Used when reading data.
- Mutation: Used when making changes to data.
- Subscription: Used when listening for real-time updates.
GraphQL vs REST
GraphQL and REST (Representational State Transfer) are the most common implementation of web services (API) today. The major difference between them lies in how requests are sent to and handled by the server. While both GraphQL and REST communicate using HTTP(s), they differ greatly in how communication is executed. In REST, requests are sent using the HTTP methods of POST, GET, PUT, and DELETE to perform CRUD (Create, Read, Update, and Delete) operations on a resource. However, GraphQL uses query and mutation operation types for performing read and write actions as defined in a GraphQL document. Unlike REST, where different URLs (endpoints) are defined for accessing different resources. A GraphQL API uses a single URL with multiple fields defined in a query to access different resources.
Why You Should Use GraphQL
GraphQL is beneficial in many ways, especially when used in mobile applications. Some of its benefits are highlighted below:
1. GraphQL solves the problem of over-fetching/under-fetching:
This is perhaps the most important reason to use GraphQL. A common problem that developers often have to deal with when working with RESTful APIs is data over-fetching or under-fetching. Because the server determines the amount of data to return, clients would often end up in situations where they get more data than is required (over-fetching) or insufficient data (under-fetching) leading to multiple API calls to the server. With GraphQL, clients get all the requested data needed using only a single query. This brings savings in bandwidth leading to faster performance and is especially useful in poor network situations.
2. GraphQL is strongly-typed:
GraphQL uses a strongly-typed schema, reducing miscommunication between the server and the client as queries from the client to the server will always follow the defined schema. This system also allows the server to validate incoming requests before executing them, ensuring that errors are caught in time and improving the reliability of the API.
GraphQL Implementation in Flutter
We’ll leverage GraphQL to build a demo Flutter TodoList application to illustrate how GraphQL can be integrated with Flutter. We’ll use the https://graphqlzero.almansi.me/api GraphQL API, which provides mock data that we can consume in our application. It returns a successful response but won’t actually make changes to the real data. It’s similar to http://jsonplaceholder.typicode.com.
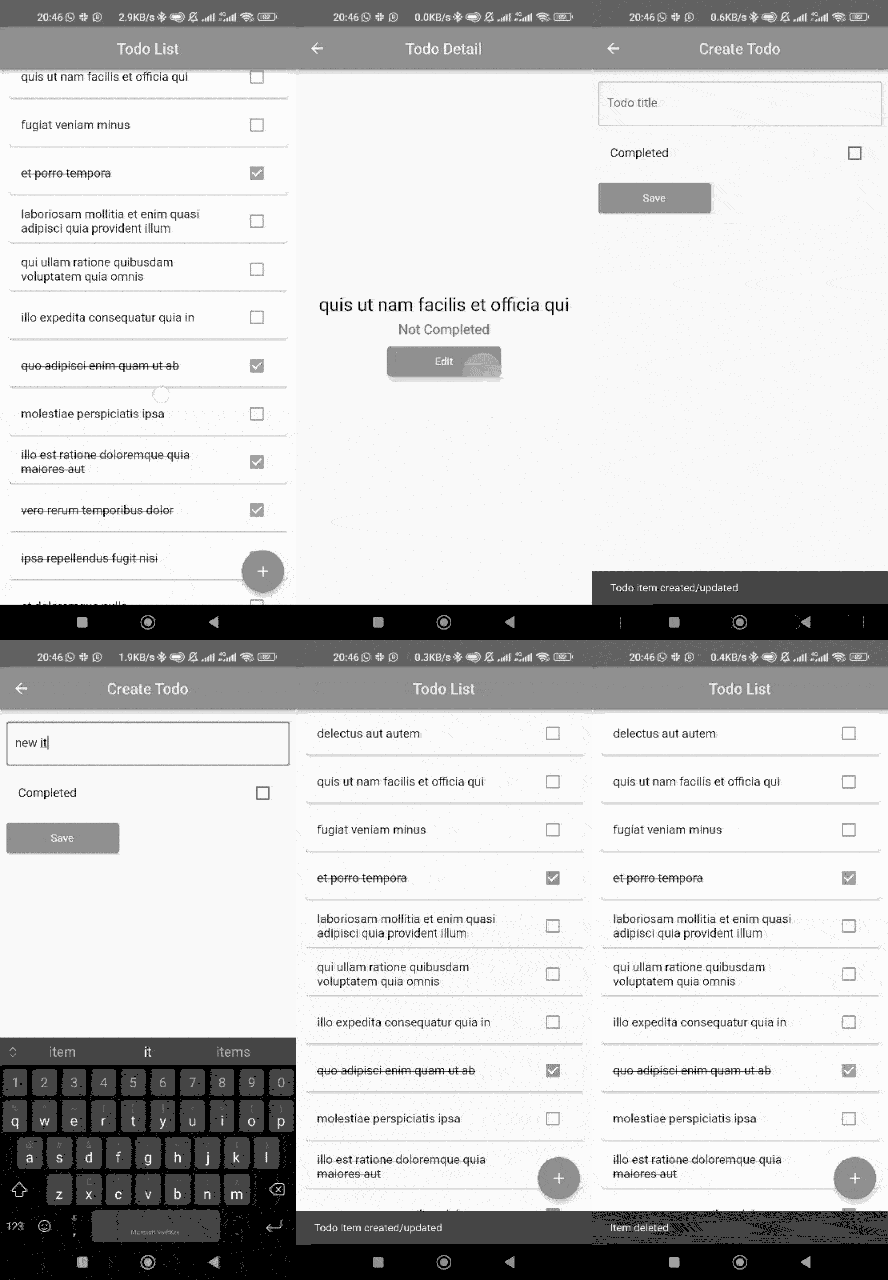
At the end of the article, the application will do the following:
- Fetch the available TodoList items
- Show a detailed view of a TodoList item.
- Create a new TodoList item.
- Update an existing TodoList item.
- Delete a TodoList item.
The project will have the following structure:
lib
├── data
│   └── models
│       └── todo_model.dart
├── ui
│   └── screens
│       ├── create_update_todo_screen.dart
│       ├── todo_details_screen.dart
│       └── todo_list_screen.dart
├── utils
│   └── context_extension.dart
└── main.dart
Our finished application will look like this:
Creating the Application
Let’s begin by creating the Flutter project. In your terminal, run the following command to create a new Flutter project:
flutter create todolist_graphql
Open the project in the IDE/Text editor of your choice and add the graphql_flutter package as a dependency in your pubspec.yaml.
dependencies:
  graphql_flutter: ^5.1.2
graphql_flutter provides utility widgets and classes, enabling GraphQL use in a Flutter application. Run the following command in your terminal to install the package:
flutter pub get
Initializing graphql_flutter
The graphql_flutter package provides a GraphQLClient class, which facilitates communication between a GraphQL API and our application. In lib/main.dart, replace the main method with the following code:
void main() async {

 //Initializes the HiveStore used for caching
 await initHiveForFlutter();

 final GraphQLClient graphQLClient = GraphQLClient(
   link: HttpLink("https://graphqlzero.almansi.me/api"),
   cache: GraphQLCache(
     store: HiveStore(),
   ),
 );

 final client = ValueNotifier(graphQLClient);
 runApp(
   GraphQLProvider(
     client: client,
     child: const MyApp(),
   ),
 );
}
Here, we are creating a GraphQLClient object, which is required to establish a connection with a GraphQL API. The GraphQLClient object has two required properties:
- link: An HttpLink object that wraps around the API URL.
- cache: A GraphQLCache object which makes data caching possible.
The graphQLClient object is then wrapped with a ValueNotifier and passed to GraphQLProvider. GraphQLProvider wraps the MyApp widget as the root widget of the application, making the GraphQLClient object available to Query and Mutation widgets below the widget tree. Replace MyApp Widget in main.dart with the following code:
class MyApp extends StatelessWidget {
 const MyApp({super.key});

 // This widget is the root of your application.
 @override
 Widget build(BuildContext context) {
   return MaterialApp(
     title: 'TodoList GraphQL',
     debugShowCheckedModeBanner: false,
     theme: ThemeData(
       primarySwatch: Colors.blue,
     ),
     initialRoute: "/",
     routes: {
       "/": (context) => const TodoListScreen(),
     },
   );
 }
}
Here, we define MaterialApp and routes for our application. Ignore the red squiggly line under TodoListScreen for now.
Creating the Models
A query to the GraphQL API for our TodoList items returns the following JSON response:
{
  "data": {
    "todos": {
      "data": [
        {
          "id": "1",
          "title": "delectus aut autem",
          "completed": false
        },
      ]
    }
  }
}
This response needs to be parsed to data classes that can be used in our application. In the lib folder, create the data/models directories. Then, under the data/models directory, create a new file named todo_model.dart. Add the following code to todo_model.dart:
class TodoModel {
 TodoModel({
   required this.id,
   required this.title,
   required this.isCompleted,
 });

 final String id;
 final String title;
 final bool isCompleted;

 factory TodoModel.fromJson(Map<String, dynamic> json) {
   return TodoModel(
     id: json['id'],
     title: json['title'],
     isCompleted: json['completed'],
   );
 }
}
This creates a data model class representing a Todo item. Next, let’s add the following code right below TodoModel class:
class TodoList {
 final List<TodoModel> todos;

 TodoList({required this.todos});

 factory TodoList.fromJson(Map<String, dynamic> json) {
   return TodoList(
     todos: (json['data'] as List<dynamic>)
         .map((todoJson) => TodoModel.fromJson(todoJson))
         .toList(),
   );
 }
}
This class handles the parsing of each Todo item JSON object into a List of TodoModel objects.
GraphQL Query
As previously noted, a GraphQL query is used when reading data. graphql_flutter provides the Query widget, which is used for performing query operations. Create a new file named todo_list_screen.dart under lib/ui/screens directory. Add the following code in the newly created todo_list_screen.dart:
import 'package:flutter/material.dart';
import 'package:graphql_flutter/graphql_flutter.dart';
import 'package:todolist_graphql/data/models/todo_model.dart';

class TodoListScreen extends StatelessWidget {
 const TodoListScreen({Key? key}) : super(key: key);

 @override
 Widget build(BuildContext context) {
   return Scaffold(
     appBar: AppBar(
       title: const Text("Todo List"),
       centerTitle: true,
     ),
     body: Query(
       options: QueryOptions(document: gql(getTodoListQuery())),
       builder: (result, {VoidCallback? refetch, FetchMore? fetchMore}) {
         if (result.isLoading) {
           return const Center(child: CircularProgressIndicator());
         }

         if (result.hasException) {
           return Center(
             child: Text(result.exception.toString()),
           );
         }

         final data = result.data?['todos'];

         if (data == null || data.isEmpty) {
           return const Center(
             child: Text("No todo items yet"),
           );
         }
         final todoList = TodoList.fromJson(data).todos;
         return Padding(
           padding: const EdgeInsets.symmetric(horizontal: 8),
           child: ListView.builder(
             itemCount: todoList.length,
             physics: const BouncingScrollPhysics(),
             itemBuilder: (context, index) {
               final todoItem = todoList[index];
               return Card(
                 elevation: 2.0,
                 child: ListTile(
                   title: Text(
                     todoItem.title,
                     style: TextStyle(
                       decoration: todoItem.isCompleted
                           ? TextDecoration.lineThrough
                           : TextDecoration.none,
                     ),
                   ),
                   onTap: () {

                   },
                   trailing: Checkbox(
                     value: todoItem.isCompleted,
                     onChanged: null,
                   ),
                 ),
               );
             },
           ),
         );
       },
     ),
     floatingActionButton: FloatingActionButton(
       onPressed: () {
       },
       child: const Icon(Icons.add),
     ),
   );
 }
}
In the code above, we define a TodoListScreen. The Scaffold’s body is a Query widget from graphql_flutter, which manages query operations. Query has two required properties:
- options: This takes a QueryOptions object that holds the configuration of a query.
- builder: This callback method returns a widget, which is shown when a query is executed.
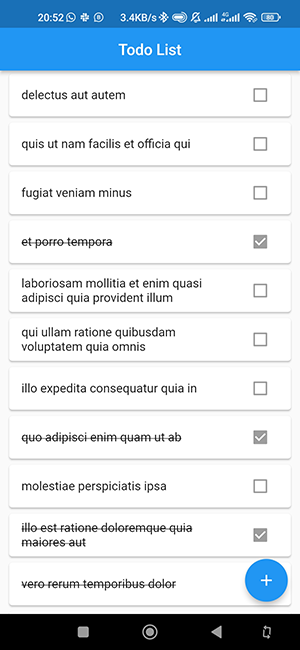
Here, we’re showing different widgets depending on the status of the query result. A CircularProgressIndicator is shown while the data is being fetched. A Text widget is shown instead if an exception occurs. When the data is successfully retrieved, it is parsed into a List of TodoModel objects and displayed using a ListView. QueryOptions has a document property that takes a DocumentNode object. This object creates the GraphQL query. To create a DocumentNode, we use the gql() function from graphql_flutter, which parses our query document string into a DocumentNode.
Inside TodoListScreen, add the following code below the build method:
String getTodoListQuery() {
 return '''
 query GetTodoList {
   todos {
     data {
       id
       title
       completed
     }
   }
 }
 ''';
}
This method creates and returns a multiline string containing the GraphQL query document, which is passed to the gql() function. In this document, the query is requesting a list of todos, specifying that our application is only interested in the id, title, and completed fields. To resolve the missing dependencies error, add the following imports to the main.dart file:
import 'package:flutter/material.dart';
import 'package:graphql_flutter/graphql_flutter.dart';

import 'lib/ui/screens/todo_list_screen.dart';
Output:
GraphQL Filtering & Variables
GraphQL also allows filtering for a specific item. It also supports variables, making queries more dynamic. Create a new file named todo_detail_screen.dart in the lib/ui/screens directory. Add the following code to todo_detail_screen:
import 'package:flutter/material.dart';
import 'package:graphql_flutter/graphql_flutter.dart';
import 'package:todolist_graphql/data/models/todo_model.dart';

class TodoDetailScreen extends StatelessWidget {
 const TodoDetailScreen({
   Key? key,
   required this.todoId,
 }) : super(key: key);

 final String todoId;

 @override
 Widget build(BuildContext context) {
   return Scaffold(
     appBar: AppBar(
       title: const Text('Todo Detail'),
       centerTitle: true,
     ),
     body: Query(
       options: QueryOptions(
         document: gql(getTodoItemQuery()),
         variables: {'id': todoId},
       ),
       builder: (result, {VoidCallback? refetch, FetchMore? fetchMore}) {
         if (result.isLoading) {
           return const Center(child: CircularProgressIndicator());
         }

         if (result.hasException) {
           return Center(
             child: Text(result.exception.toString()),
           );
         }

         final data = result.data?['todo'];

         if (data == null) {
           return const Center(
             child: Text("Todo Item not found"),
           );
         }
         final todo = TodoModel.fromJson(data);
         return Padding(
           padding: const EdgeInsets.symmetric(horizontal: 8),
           child: SizedBox(
             width: double.infinity,
             child: Column(
               mainAxisAlignment: MainAxisAlignment.center,
               children: [
                 Text(
                   todo.title,
                   textAlign: TextAlign.center,
                   style: const TextStyle(fontSize: 24),
                 ),
                 const SizedBox(height: 8),
                 Text(
                   todo.isCompleted ? 'Completed' : 'Not Completed',
                   style: TextStyle(
                     fontSize: 18,
                     color: todo.isCompleted ? Colors.green : Colors.red,
                   ),
                 ),
                 const SizedBox(height: 8),
                 ElevatedButton(
                   onPressed: () {

                   },
                   style: ElevatedButton.styleFrom(
                       minimumSize: const Size(150, 40)),
                   child: const Text('Edit'),
                 )

               ],
             ),
           ),
         );
       },
     ),
   );
 }
}
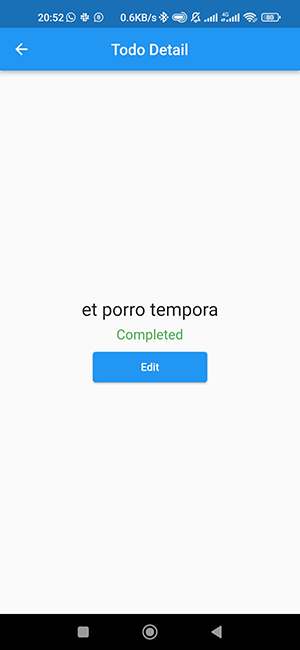
In the code above, we define a TodoDetailScreen, which shows a detailed view of a TodoList item. This class has a todoId field, which is used to filter for a single TodoList item. In the build method, the QueryOptions object passed to the Query widget has a variables property that takes a Map<String, dynamic> containing a key, ‘id’. This key corresponds to the $id variable defined in the query document. It is assigned a value, todoId. This value will be used when the query is executed. Next, let’s create the query for an item by adding the following code below the build method:
String getTodoItemQuery() {
 return '''
 query GetTodoList(\$id: ID!) {
   todo(id: \$id) {
       id
       title
       completed
     }
 }
 ''';
}
Here, a variable $id of scalar type ID! is defined in the query document and used to retrieve a TodoList item. Next, let’s add a route for TodoDetailScreen in main.dart for navigation. Go to main.dart and replace the routes property of MaterialApp with the following code:
routes: {
 "/": (context) => const TodoListScreen(),
 '/detail': (context) {
   final todoId = ModalRoute.of(context)?.settings.arguments as String;
   return TodoDetailScreen(todoId: todoId);
 }
},
Then, go to lib/ui/screens/todo_list_screen.dart and replace the onTap() callback of the ListTile widget with the following code:
onTap: () {
 Navigator.of(context)
     .pushNamed('/detail', arguments: todoItem.id);
},
The code above enables navigation to TodoDetailScreen and passes the TodoList item id as argument.
Output:
GraphQL Mutations
GraphQL allows data to be modified using mutations. Mutations can be used when performing create, update and delete operations. graphql_flutter provides the Mutation widget for executing mutation operations.
Create a SnackBar Extension
Let’s first create an extension method on BuildContext to easily show a SnackBar for success and error messages. Create a new directory under lib named utils. Under utils, create a new file named context_extension.dart. Next, add the code below in context_extension.dart:
import 'package:flutter/material.dart';

extension ShowSnackbar on BuildContext {

  void showSnackBar(String message) {
    ScaffoldMessenger.of(this).showSnackBar(
      SnackBar(content: Text(message)),
    );
  }
}
Create Todo Item
Create a new file named create_update_todo_screen.dart under lib/ui/screens. Add the following code to the newly created file:
import 'package:flutter/material.dart';
import 'package:graphql_flutter/graphql_flutter.dart';
import 'package:todolist_graphql/data/models/todo_model.dart';
import 'package:todolist_graphql/utils/context_extension.dart';

class CreateUpdateTodoScreen extends StatefulWidget {
 const CreateUpdateTodoScreen({
   Key? key,
   required this.todo,
 }) : super(key: key);

 final TodoModel? todo;

 @override
 State<CreateUpdateTodoScreen> createState() => _CreateUpdateTodoScreenState();
}

class _CreateUpdateTodoScreenState extends State<CreateUpdateTodoScreen> {
 final _titleController = TextEditingController();
 final _isCompleted = ValueNotifier(false);

 @override
 void dispose() {
   _titleController.dispose();
   super.dispose();
 }

 @override
 void initState() {
   if (widget.todo != null) {
     _titleController.text = widget.todo!.title;
     _isCompleted.value = widget.todo!.isCompleted;
   }
   super.initState();
 }

 @override
 Widget build(BuildContext context) {
   return Scaffold(
     appBar: AppBar(
       title: Text(
         widget.todo == null ? 'Create Todo' : 'Update Todo',
       ),
       centerTitle: true,
     ),
     body: Padding(
       padding: const EdgeInsets.only(left: 8, right: 8, top: 16),
       child: Column(
         crossAxisAlignment: CrossAxisAlignment.start,
         children: [
           TextField(
             controller: _titleController,
             decoration: const InputDecoration(
               hintText: "Todo title",
               border: OutlineInputBorder(),
             ),
           ),
           const SizedBox(height: 8),
           ValueListenableBuilder(
               valueListenable: _isCompleted,
               builder: (context, value, child) {
                 return CheckboxListTile(
                   value: value,
                   title: const Text("Completed"),
                   onChanged: (newValue) {
                     _isCompleted.value = newValue!;
                   },
                 );
               }),
           const SizedBox(height: 8),
           Mutation(
             options: MutationOptions(
               document: gql(createTodoItemMutation()),
               onError: (exception) {
                 context.showSnackBar("Failed to create/update item");
               },
               onCompleted: (resultData) {
                 if (resultData != null) {
                   context.showSnackBar("Todo Item Created/Updated");
                   Navigator.of(context)
                       .popUntil((route) => route.settings.name == "/");
                 }
               },
             ),
             builder: (runMutation, result) {
               if (result != null && result.isLoading) {
                 return const Center(child: CircularProgressIndicator());
               }
               return ElevatedButton(
                 onPressed: () {
                   createTodo(runMutation);
                 },
                 style: ElevatedButton.styleFrom(
                     minimumSize: const Size(150, 40)),
                 child: const Text('Save'),
               );
             },
           ),
         ],
       ),
     ),
   );
 }
}
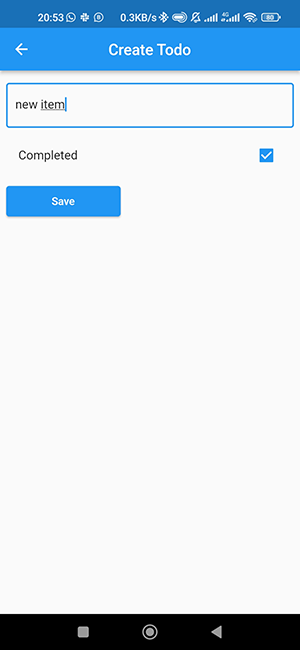
In the code above, we define CreateUpdateTodoScreen as a StatefulWidget. This widget will handle both creating and updating a Todo item. The CreateUpdateTodoScreen widget has a nullable TodoModel field, which will be passed a TodoModel object when a TodoList item is being modified.
Inside _CreateUpdateTodoScreenState, we have two fields:
- _titleController: A TextEditingController for a Todo item title.
- _isCompleted: A boolean ValueNotifier that toggles between the completed and not completed state for a Todo item.
The two fields are initialized in initState() if CreateUpdateTodoScreen.todo is not null. The controller is disposed of in dispose() when the widget is destroyed.
In the build method, a Mutation widget similar to the Query widget used in previous sections is wrapped around an ElevatedButton. The options property of the Mutation widget takes a MutationOptions object. Here, we’re interested in three of the MutationOptions object’s properties:
- onError: A callback function executed when an exception occurs. We are only showing a SnackBar here.
- onCompleted: A callback function executed when the mutation operation ends. This is triggered regardless of whether the mutation failed or was completed successfully. Here, we show a SnackBar if data is returned on completion, and navigate back to the home screen.
- document: This is similar to the QueryOptions document property of the Query widget. It takes a DocumentNode which holds the actual mutation document. Here, the gql() function is used in creating the DocumentNode.
The builder callback method of the Mutation widget has a parameter called runMutation, which is also a callback function, used to trigger the execution of the mutation. Here, we are passing it to createTodo(), where it is actually called. Let’s implement the createTodo() method by adding the following code below the build method:
void createTodo(RunMutation runMutation) {
 final todoItemTitle = _titleController.text;
 final isTodoItemCompleted = _isCompleted.value;
 runMutation({
   'input': {
     'title': todoItemTitle,
     'completed': isTodoItemCompleted,
   }
 });
}
This method takes the RunMutation callback function as a parameter. The values of the TodoList item’s title and completion status are retrieved and passed to the runMutation callback. These values are passed as Map<String, dynamic> where the ‘input’ key corresponds to the variable name defined in the mutation document. The nested Map with the ‘title’ and ‘completed’ status is the data sent to the API. Next, let’s create the mutation document by adding the following code below the createTodo() method:
String createTodoItemMutation() {
 return '''
 mutation CreateTodoItem(\$input: CreateTodoInput!) {
   createTodo(input: \$input) {
     id
     title
   }
 }
 ''';
}
This method uses a multiline string to create a mutation document. The defined $input variable in the document is used to create a TodoList item. The id and title fields of the newly created item are returned if the operation is successful. Now, let’s enable navigation to CreateUpdateTodoScreen. Go to main.dart, replace the routes property of MaterialApp with the code below and import the required files:
routes: {
 "/": (context) => const TodoListScreen(),
 '/detail': (context) {
   final todoId = ModalRoute.of(context)?.settings.arguments as String;
   return TodoDetailScreen(todoId: todoId);
 },
 '/create-update-todo': (context) {
   final todoItem = ModalRoute.of(context)?.settings.arguments as TodoModel?;
   return CreateUpdateTodoScreen(todo: todoItem);
 }
}
Then, go to lib/ui/screens/todo_list_screen.dart and replace the floatingActionButton property of the Scaffold with the following code:
floatingActionButton: FloatingActionButton(
 onPressed: () {
   Navigator.of(context).pushNamed('/create-update-todo');
 },
 child: const Icon(Icons.add),
)
Output:
Update Todo Item
An update mutation is performed in a similar manner as a create mutation. Let’s define a method to update a TodoList item by adding the following code below the createTodo() method:
void updateTodo({
 required RunMutation runMutation,
 required String todoId,
}) {
 final todoItemTitle = _titleController.text;
 final isTodoItemCompleted = _isCompleted.value;
 runMutation({
   'id': todoId,
   'input': {
     'title': todoItemTitle,
     'completed': isTodoItemCompleted,
   }
 });
}
This method calls the RunMutation callback function triggering an update mutation. In addition to the ‘input’ key, we have the ‘id’ key, which is assigned the TodoList item’s id. It’s worth noting that the ‘id’ key corresponds to the variable defined in the update mutation document. Next, let’s create an update mutation document by adding the following code below the updateTodo() method:
String updateTodoItemMutation() {
 return '''
 mutation UpdateTodoItem(\$id: ID!, \$input: UpdateTodoInput!) {
   updateTodo(id: \$id, input: \$input) {
     id
     title
   }
 }
 ''';
}
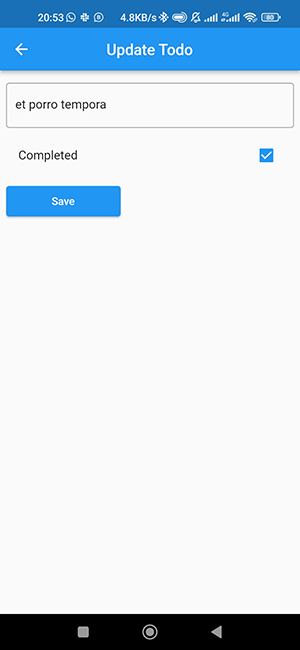
This method creates a mutation document for updating a TodoList item. The document defines two variables $id and $input whose values are used to perform an update to a TodoList item. The id and title fields of the updated item are returned if the operation is successful. To use these methods, let’s make further changes to our code. Replace the onPressed() callback of the ElevatedButton with the code below:
onPressed: () {
 if (widget.todo != null) {
   updateTodo(
     runMutation: runMutation,
     todoId: widget.todo!.id,
   );
 } else {
   createTodo(runMutation);
 }
}
Above, the updateTodo() or createTodo() methods are called when updating an existing Todo item or creating a new Todo item. Next, replace the document property of the MutationOptions object with the following code:
document: gql(
 widget.todo == null
     ? createTodoItemMutation()
     : updateTodoItemMutation(),
)
Lastly, let’s add navigation to enable editing a Todo item. Open lib/ui/screens/todo_detail_screen.dart and replace the ElevatedButton with the code below:
ElevatedButton(
 onPressed: () {
   Navigator.of(context).pushNamed(
       '/create-update-todo',
       arguments: todo
   );
 },
 style: ElevatedButton.styleFrom(
     minimumSize: const Size(150, 40)),
 child: const Text('Edit'),
)
Output:
Delete Todo Item
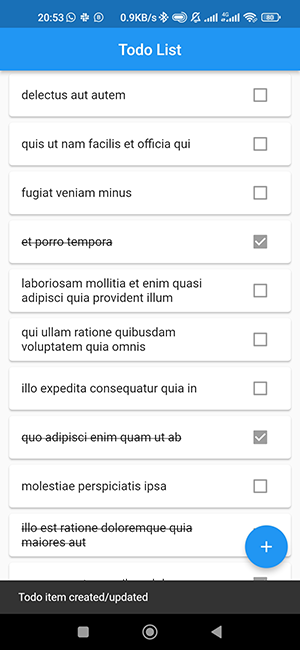
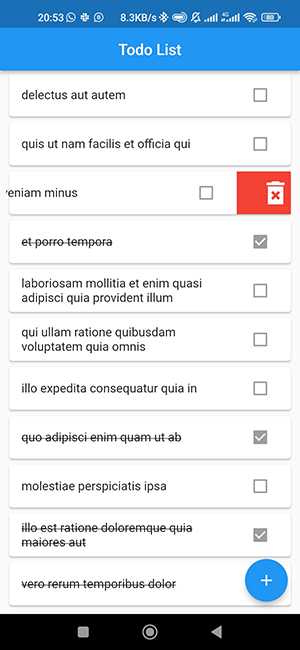
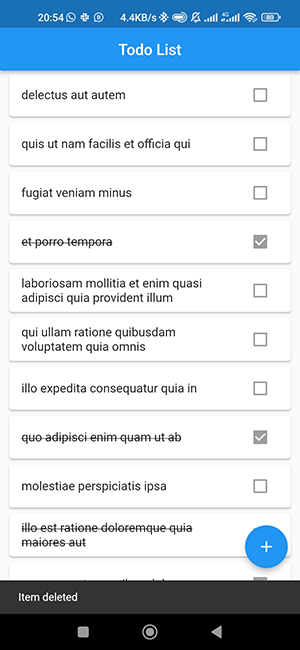
To delete a Todo item, we’ll implement the swipe-to-delete functionality in the TodoListScreen using the Dismissible widget. Note that since the API we’re interacting with uses mock data, the actual data won’t be deleted but we’ll get a successful response. Open lib/ui/screens/todo_list_screen.dart and replace the itemBuilder() callback with the following code:
itemBuilder: (context, index) {
 final todoItem = todoList[index];
 return Card(
   elevation: 2.0,
   child: Mutation(
     options: MutationOptions(
         document: gql(deleteTodoItemMutation()),
         onError: (exception) {
           context.showSnackBar(
               "Error occurred while deleting item");
         },
         onCompleted: (resultData) {
           if (resultData != null) {
             context.showSnackBar("Item deleted");
           }
         }),
     builder: (runMutation, result) {
       return Dismissible(
         key: UniqueKey(),
         background: Container(
           color: Colors.red,
           alignment: Alignment.centerRight,
           child: const Icon(
             Icons.delete_forever_sharp,
             color: Colors.white,
             size: 40,
           ),
         ),
         direction: DismissDirection.endToStart,
         onDismissed: (direction) => deleteTodoItem(
           context: context,
           runMutation: runMutation,
           todoId: todoItem.id,
         ),
         child: ListTile(
           title: Text(
             todoItem.title,
             style: TextStyle(
               decoration: todoItem.isCompleted
                   ? TextDecoration.lineThrough
                   : TextDecoration.none,
             ),
           ),
           onTap: () {
             Navigator.of(context)
                 .pushNamed('/detail', arguments: todoItem.id);
           },
           trailing: Checkbox(
             value: todoItem.isCompleted,
             onChanged: null,
           ),
         ),
       );
     },
   ),
 );
}
In the code above, the Mutation widget is used to perform the delete operation in the same way it was used in the previous sections. It wraps around the Dismissible widget which enables the swipe functionality.
The onDismissed() callback of the Dismissible widget is executed when a swipe from right to left is performed. The callback method then calls the deleteTodoItem() method where the actual deletion operation is performed.
Let’s implement the deleteTodoItem() method by adding the code below:
void deleteTodoItem({
 required RunMutation runMutation,
 required String todoId,
}) {
 runMutation({'id': todoId});
}
This method calls the RunMutation callback, passing it the id of the TodoList item to be deleted. Next, let’s define the delete mutation document by adding the following code:
String deleteTodoItemMutation() {
 return '''
 mutation DeleteTodoItem(\$id: ID!) {
   deleteTodo(id: \$id)
 }
 ''';
}
This method defines a mutation document using a multiline string. The document takes a variable, $id which is used to delete the associated TodoList item. Remember to fix the imports for the showSnackBar() extension method if you are still getting some red squiggles.
Output:
Conclusion
GraphQL provides several benefits over RESTful APIs when working with remote data. It offers efficient data manipulation and retrieval and improved performance while using a simplified API. We’ve covered how to use the graphql_flutter package to seamlessly integrate GraphQL to power your Flutter applications. You can learn more about GraphQL here.
You can also find the complete source code on GitHub.
Reference Links
https://pub.dev/packages/graphql_flutter
https://medium.com/@vitaliysteffensen/should-i-use-graphql-or-rest-in-2022-7291cc882cab
https://www.apollographql.com/blog/graphql/basics/graphql-vs-rest/
https://graphql.org/graphql-js/mutations-and-input-types/
https://graphqlzero.almansi.me/api


