
Placeholders are an essential addition to the overall UI of any app. They enable us to show the temporary image or text until the actual data loads. Using them, users can know that the content is yet to load in the section placeholders are shown. With there addition, users can even gauge out the internet connectivity. The longer the placeholder stands, the slower the connectivity. Hence, the content placeholders provide a visual impact in the overall UI. Thus, optimizing the user experience to another level.
In this chapter, we will create a preloader using the component from the rn-placeholder package and a preloader for the image using the component from the image-placeholder package. For content, we are using rn-placeholder that displays some placeholder stuff before rendering your text or media content in React Native. For the image, we are using the image-placeholder that supports both Android and iOS. It also provides Activity Indicator customization. The preloaders help to provide a better user experience by showing the loading effect until the actual data loads. This will help users know that the data to be shown on the screen is loading. Its slowness depicts the disturbance in internet connection. Hence, it is a very useful feature for a great user experience.
The idea is to set up the Pre-loader component for content in a separate component file and render it out conditionally in the post list. For the image placeholder, we are going to configure it and then add it to the FlatList component.
Let’s get started!
Creating a preloader Component
First, we need to install rn-placeholder using yarn in the project terminal:
yarn add rn-placeholder
For preloader style, we are going to use a style similar to the Facebook app which we see every day. The example preloader style is shown below:

Now, we need to create component name ContentPlaceholder.js as shown in the screenshot below:
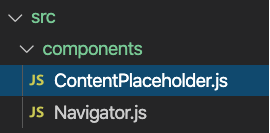
In the file, we need to import all the necessary components from rn-placeholder package as shown in the code snippet below:
import React, { Component } from 'react';
import { Text, View } from 'react-native';
import {
   Placeholder,
   PlaceholderMedia,
   PlaceholderLine,
   Fade,
} from 'rn-placeholder';
Here, we are creating a loop inside a function called PlaceHolderObject. Then, we need to add the placeholder to view by calling the function as shown in the code snippet below:
const RNPlaceHolder = () => {
   return (
       <View>
           {PlaceholderObject()}
       </View>
   );
};
export default RNPlaceHolder;
Hence, we have the placeholder component to be used in other components to show the preloaders.
Now, we need to learn how to use them in different components.
How to use
First, we need to import it to the screen file that we want to set preload such as Home and SinglePost. For that, we need to use the code from the following code snippet:
import ContentPlaceholder from '../components/ContentPlaceholder'
Then, we need to create a state called isLoading in order to handle the loading state as shown in the code snippet below:
const [isLoading, setIsLoading] = useState(true)
Here, while the initial state is true we need to display the preloader until we get response data from the server. For that, we need to use the code from the following code snippet:
const fetchLastestPost = async () => {
       const response = await fetch(
           `https://kriss.io/wp-json/wp/v2/posts?per_page=5&page=${page}`,
       );
       const post = await response.json();
       if (page == 1) {
           setPosts(post);
       } else {
           setPosts([...posts, ...post]);
       }
	  setIsFetching(false);
       setIsLoading(false)
   }
Here, the function fetchLatestPost is configured to fetch the date from the server. And, the loading is set based on the data being fetched.
Now, we need to hide/show the preloaders based on the state value. For that, we need to use the code from the following code snippet:
if (isLoading) {
       return (
           <View style={{ paddingLeft: 10, paddingRight: 10 }}>
               <Headline style={{ marginLeft: 23 }}>Lastest Post</Headline>
               <ContentPlaceholder />
           </View>
       )
   } else {
       return (
           <View>
               <Headline style={{ marginLeft: 23 }}>Lastest Post</Headline>
               <FlatList
                   data={posts}
                   onRefresh={() => onRefresh()}
                   refreshing={isFetching}
                   onEndReached={() => handleLoadMore()}
                   onEndReachedThreshold={0.1}
                   ListFooterComponent={() => renderFooter()}
                   renderItem={({ item }) => (
                       <Card
                           style={{
                               shadowOffset: { width: 5, height: 5 },
                               width: '90%',
                               borderRadius: 12,
                               alignSelf: 'center',
                               marginBottom: 10,
                           }}>
                           <Card.Content>
                               <Title>{item.title.rendered}</Title>
                               <Paragraph>Published on {moment(item.date).fromNow()}</Paragraph>
                           </Card.Content>
                           <Card.Cover
                               source={{ uri: item.jetpack_featured_media_url }}
                           />
                           <Card.Content>

                               <HTMLRender html={item.excerpt.rendered} />

                           </Card.Content>

                       </Card>
                   )}
                   keyExtractor={(item, index) => index.toString()}
               />

           </View>
       );
   }
Hence, we will get the result as shown in the emulator screenshots below:
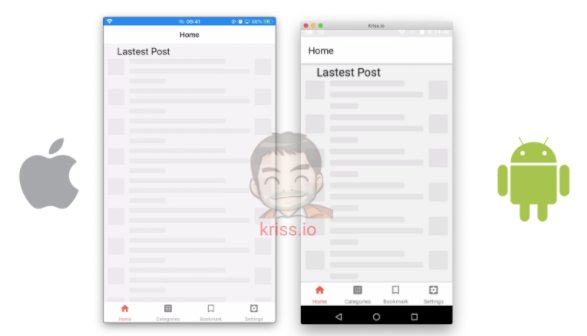
Image placeholder
The package that we used for the content placeholder above does not support images. Thus, we need to use a different package for image preloaders. Hence, the package we are going to use is react-native-image-placeholder.
First, we need to install the package using the following command:
yarn add react-native-image-placeholder
Then, we need to import it to screen files that have images in it such as Home, SinglePost, etc as shown in the code snippet below:
import ImageLoad from 'react-native-image-placeholder';
Next, we need to replace <Image> component with ImageLoad component and set the attributes in order to adjust the loading icon as shown in the code snippet below:
<ImageLoad
      style={{ width: '100%', height: 250 }}
      loadingStyle={{ size: 'large', color: 'grey' }}
      source={{ uri: item.jetpack_featured_media_url }}
  />
Now, if we re-run the app, we will get the following result on the emulator screen:
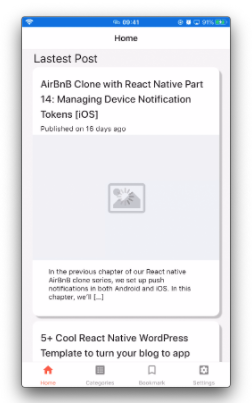
Here, we can see the spinner-like icon at the center of the image area which is an image preloader.
Extracting Flatlist
Until now, we have many duplicate FlatList components on multiple screens. In order to optimize it, we need to create a separate FlatlistItem component. For that, we need to create a new file called FlatlistItem.js first. Then, we can use the code from the following code snippet into this file for creating a FlatList component that can be used in multiple screens:
import React from 'react';
import { TouchableOpacity } from 'react-native';
import HTMLRender from 'react-native-render-html';
import ImageLoad from 'react-native-image-placeholder';
import moment from 'moment';
import {
   Card,
   Title,
   Paragraph
} from 'react-native-paper';

const FlatlistItem = ({ item, navigation }) => {
   return (

       <TouchableOpacity
           onPress={() =>
               navigation.navigate('SinglePost', {
                   post_id: item.id,
                   name: item.title.rendered,
               })
           }>
           <Card
               style={{
                   shadowOffset: { width: 5, height: 5 },
                   width: '90%',
                   borderRadius: 12,
                   alignSelf: 'center',
                   marginBottom: 10,
               }}>
               <Card.Content>
                   <Title>{item.title.rendered}</Title>
                   <Paragraph>Published on {moment(item.date).fromNow()}</Paragraph>
               </Card.Content>
               <ImageLoad
                   style={{ width: '100%', height: 250 }}
                   loadingStyle={{ size: 'large', color: 'grey' }}
                   source={{ uri: item.jetpack_featured_media_url }}
               />
               <Card.Content>
                   <Card.Content>
                       <HTMLRender
                           html={item.excerpt.rendered}
                       />
                   </Card.Content>
               </Card.Content>
           </Card>
       </TouchableOpacity>
   );
};

export default FlatlistItem
Now, in order to use the FlatlistItem component in Home Screen, we need to import the FlatlistItem component to Home screen as shown in the code snippet below:
import FlatlistItem from '../components/FlatlistItem'
Next, we need to replace the old Flatlist component as highlighted in the code snippet below:
<FlatList
       data={posts}
       onRefresh={() => onRefresh()}
       refreshing={isFetching}
       onEndReached={() => handleLoadMore()}
       onEndReachedThreshold={0.1}
       ListFooterComponent={() => renderFooter()}
       renderItem={({ item }) => (
            <FlatlistItem item={item} navigation={navigation} />
       )}
       keyExtractor={(item, index) => index.toString()}
    />
Note that, we must not forget to pass the navigation object in the Home functional component as shown in the code snippet below:
const Home = ({navigation}) => {Finally, we have successfully created the content placeholder component, integrated the image preloaders, and also configured the separate FlatList component which can be used on multiple screens.
Conclusion
The overall tutorial was simple and the implementation was also easy. This will help further optimize the user experience based on the React Native app. Content placeholders are an important concept to learn as it is used everywhere web, mobile, and desktop apps as well.
In this chapter, we got an insight into improving user experience by integrating content and image placeholders. We got stepwise guidance on how to integrate them to different screens with server data to be loader. Moreover, we also learned how to optimize the code by extracting Flatlist items to a single component. Hence, using the Flatlist component in every screen that requires FlatList.
All code in this chapter is available on GitHub.

