

Defenition: POS – “Point of Sale”. At the point of sale, the merchant calculates the amount owed by the customer, indicates that amount, may prepare an invoice for the customer (which may be a cash register printout), and indicates the options for the customer to make payment.
In the previous chapter, we completed the implementation of CRUD operations for POS data in React. We implemented both the frontend UI and backend API endpoints for the CRUD operation.
In this chapter, we are going to continue to implement CRUD operation for the general information of a grocery store. This is going to include the manipulation of the POS machine, Branch, Supplier, Employee, and customer data. These data are required for general CRUD operation. The process is similar to the previous chapter. The idea is to help you understand the CRUD operation in more detail with improvements made in each repeated phase. Here, we are going to go a bit further by adding an image upload feature for the storefront image.
But before we continue with this, we just want to refactor some ugly pos machine folder structure so that it would look cleaner as shown in the screenshot below:

Here, we just moved all the main components to a single folder. Then, we definitely need to update the imports in our App.js as shown in the code snippet below:
import PosMachineIndex from "./components/posmachine/index";
import PosMachineCreate from "./components/posmachine/create";
import PosMachineUpdate from "./components/posmachine/update";
Now, we can use this template in this chapter.
Here, we can copy the code from the previous chapter and updates.
For branch data, we want to keep general data for the branch.
Adding the door
First, we need a link that can help us navigate to the index page. Then from the index page, we can place more links that navigate to other actions such as Create, Update, Delete.
First, we need to open src>component>sidebar component and implement the sidebar UI component using the code from the following code snippet:
<li className="nav-item">
                <Link to="/dashboard" className="nav-link">
                  <i className="nav-icon fas fa-tachometer-alt" />
                  <p>Dashboard</p>
                </Link>
              </li>
              <li className="nav-item">
                <Link to="/posmachine" className="nav-link">
                  <i className="nav-icon fas fa-th" />
                  <p>Pos Machine</p>
                </Link>
              </li>
              <li className="nav-item">
                <Link to="/branch" className="nav-link">
                  <i className="nav-icon fas fa-building" />
                  <p>Branch</p>
                </Link>
Here, we basically have some Link components wrapped inside the list elements.
Hence, we will get the sidebar as shown in the following screenshot:

Redux Setup
The redux implementation and configuration are similar to the previous chapters.
We start by creating a new constant in order to define the state. For this, we need to open constant/index.js file and use the code provided in the code snippet below:
//BRANCH
export const BRANCH_FETCHING = "BRANCH_FETCHING";
export const BRANCH_SUCCESS = "BRANCH_SUCCESS";
export const BRANCH_FAILED = "BRANCH_FAILED";
export const BRANCH_CLEAR = "BRANCH_CLEAR";
Then, we need to go to the reducer folder to create a new branch.reducer.js. In this file, we are going to define the reducer function similar to previous reducers we have defined. Here, we need to make use of the code from the following code snippet:
import {
    BRANCH_FETCHING,
    BRANCH_SUCCESS,
    BRANCH_FAILED,
    BRANCH_CLEAR,
} from "../constants";

const initialState = {
    isFetching: false,
    isError: false,
    result: null,
};

export default (state = initialState, { type, payload }) => {
    switch (type) {
        case BRANCH_FETCHING:
            return { ...state, isFetching: true, isError: false, result: null };
        case BRANCH_FAILED:
            return { ...state, isFetching: false, isError: true, result: null };
        case BRANCH_SUCCESS:
            return { ...state, isFetching: false, isError: false, result: payload };
        case BRANCH_CLEAR:
            return { ...state, result: null, isFetching: false, isError: false };
        default:
            return state;
    }
};
We should not forget to combine the reducer in our root reducer in reducer/index.reducer.js as shown in the code snippet below:
import posmachineReducer from "./posmachine.reducer";
import branchReducer from './branch.reducer'
export default combineReducers({
  loginReducer,
  registerReducer,
  forgotpasswordReducer,
  resetpasswordReducer,
  posmachineReducer,
  branchReducer
});
Next, we need to go to the action folder and create a new action file named branch.action.js. This branch action configuration will work to make changes to the state in the branch reducer store. The coding implementation required in this file is provided in the code snippet below:
import {
    BRANCH_FETCHING,
    BRANCH_SUCCESS,
    BRANCH_FAILED,
    BRANCH_CLEAR,
} from "../constants";
import swal from "sweetalert";
import { httpClient } from "./../utils/HttpClient";

export const setBranchStateToFetching = () => ({
    type: BRANCH_FETCHING,
});

export const setBranchStateToFailed = () => ({
    type: BRANCH_FAILED,
});
export const setBranchStateToClear = () => ({
    type: BRANCH_CLEAR,
});
export const setBranchStateToSuccess = (payload) => ({
    type: BRANCH_SUCCESS,
    payload,
});
For new Component structure, we use the naming convention as shown in the screenshot below:

Hence, we have successfully completed the configuration of redux for the branch component.
Create operation
For the create operation, we start with backend and implement the API endpoint first.
For that, we need to open our basic pos-backend project then navigate to the schema folder. Then, we need to devise a Schema for a new table using mongoose package as shown in the code snippet below:
const mongoose = require("mongoose");
const schema = mongoose.Schema({
    name: String,
    address: String,
    tel: String,
    frontimage: String,
    created: { type: Date, default: Date.now },
});

module.exports = mongoose.model("branch", schema);
Next, we need to create a new file named api_branch.js. First, we need to start importing everything as in the previous article. But in this chapter, we introduce new form helper package name formidable that enable us to process image. The imports are shown in the code snippet below:
const express = require("express");
const router = express.Router();
const branch = require("./models/branch_schema");
const jwt = require("./jwt");
const formidable = require("formidable");
const path = require("path");
const fs = require("fs-extra");
Then, we need to create a new endpoint in order to create action. Here, we are going to use the formidable module in order to process incoming image data from the object then pass files object to process in other function as shown in the code snippet below:
router.post("/branch", async (req, res) => {
  // console.log(req)
  try {
    var form = new formidable.IncomingForm();

    form.parse(req, async (err, fields, files) => {
      // console.log(files)
      let doc = await branch.create(fields);
      await uploadImage(files, doc);
      res.json({ result: "success", message: "Update Brach data successfully" });
    });
  } catch (err) {
    res.json({ result: "error", message: err.msg });
  }
});
Processing file upload
Here, we need to create a new function in order to handle file upload. The function name is uploadImage and is implementation is shown in the code snippet below:
uploadImage = async (files, doc) => {
  if (files.frontimage != null) {
    var fileExtention = files.frontimage.name.split(".").pop();
    doc.frontimage = `${Date.now()}+${doc.name}.${fileExtention}`;
    var newpath =
      path.resolve(__dirname + "/uploaded/images/branch/frontimage") + "/" + doc.frontimage;

    if (fs.exists(newpath)) {
      await fs.remove(newpath);
    }
    await fs.move(files.frontimage.path, newpath);

    // Update database
    await branch.findOneAndUpdate({ _id: doc.id }, doc);
  }
};
Here, we are performing the following configurations:
- First, we check if the file is not null.
- Then, we split the file extension.
- Next, we create a new file name then assign it to a database object.
- Then, we move the file to a folder that we want.
- Lastly, we update the database with the new filename.
Hence, our backend API endpoint is complete and ready to be used in front. Next, we move forward to implement frontend mechanics.
First, we need to open component/branch/create.js file and import the required packages as shown in the code snippet below:
import React, { useState, useEffect } from "react";
import { Formik } from "formik";
import { useSelector, useDispatch } from "react-redux";
import * as branchActions from "../../actions/branch.action";
import { server } from "../../constants";
Then, we need to create a new functional component as shown in the code snippet below:
export default (props) => {
    const dispatch = useDispatch();
The next job is to create a form.
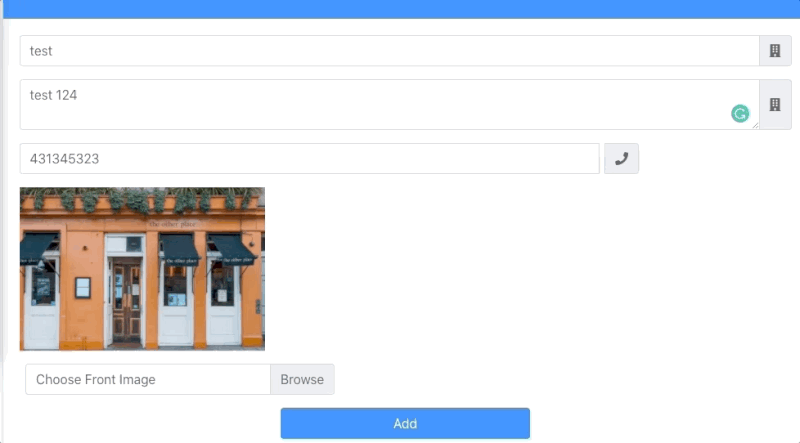
Preview image in React
First, we need to create a simple function in order to preview the image. For that, we check the image object for its availability. If available, we preview the image otherwise we need to keep the image placeholder in its place. The code for this is provided in the code snippet below:
const showPreviewImage = values => {
        return (
            <img
                id="frontimage"
                src={
                    values.file_obj != null
                        ? values.file_obj
                        : "https://via.placeholder.com/300"
                }
                class="img-fluid"
                width={300}
            />
        );
    };
Here, we need to take the image as file input as shown in the code snippet below:
<input type="file"
     onChange={e => {
              e.preventDefault();
              setFieldValue("frontimage", e.target.files[0]);
 setFieldValue("file_obj",URL.createObjectURL(e.target.files[0]));
            }}
            name="frontimage"
            className={
 errors.frontimage && touched.frontimage ? "form-control is-invalid"
          : "form-control" }
             accept="image/*"
             id="exampleInputFile" />
Hence, we can get the preview of the image as shown in the code snippet below:

For the form submission process, we need to create a new form object as shown in the code snippet below:
onSubmit={(values, { setSubmitting }) => {
              let formData = new FormData();
              formData.append("name", values.name);
              formData.append("tel", values.tel);
              formData.append("address", values.address);
              if (values.frontimage) {
                   formData.append("frontimage", values.frontimage);
              }
 dispatch(branchActions.Create(formData, props.history));
              setSubmitting(false);
}}
Here, we devise the object creation function right into the onSubmit event.
Next, For the Create action, we send the form object as a parameter as shown in the code snippet below:
export const Create = (values, history) => {
return async (dispatch) => {
dispatch(setBranchStateToFetching());
const response = await httpClient.post(
process.env.REACT_APP_API_URL + "branch",
values
);
if (response.data.result == "success") {
dispatch(setBranchStateToSuccess(response.data));
swal("Success!", response.data.message, "success").then((value) => {
dispatch(setBranchStateToClear());
history.goBack();
dispatch(Index());
});
} else if (response.data.result === "error") {
dispatch(setBranchStateToFailed());
swal("Error!", response.data.message, "error");
}
};
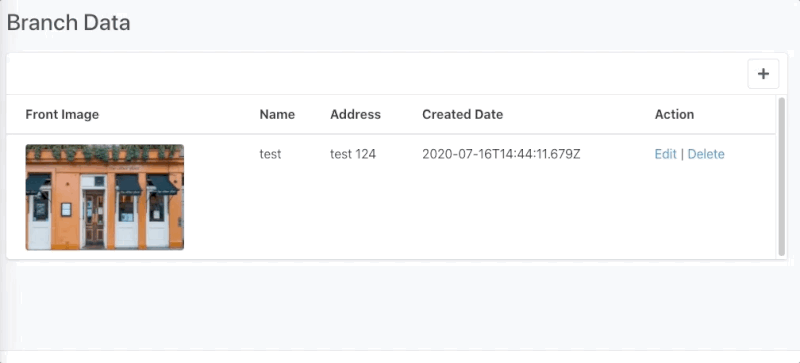
};Hence, if we test it out we will get the following result:
Index Operation
Since we are successful in adding new data, we need to display the data as well. The implementation of index operation is the same as in the previous chapter.
Since the implementation is similar, what we can do is simply copy the code from the previous one and make necessary changes.
The necessary changes are highlighted in the code snippet below:
branchReducer.result.map((data, index) => {
               return (
                    <tr key={index}>
                        <td><img class="img-fluid img-rounded"
 width={200} src={process.env.REACT_APP_BRANCH_FRONT_IMAGE_PATH + '/' + data.frontimage} /></td>
Jere, we added a new column to display image by defining a new environment variable for the image part on the backend.
Now, in the .env file, we need to add the URI path as shown in the code snippet below:
REACT_APP_BRANCH_FRONT_IMAGE_PATH=http://localhost:8080/images/branch/frontimage
Hence, we will get the result as shown in the screenshot below:

Update Operation
Since the update operation is similar to the implementation in the previous chapter as well, we can simply start by copying the code from it.
Then, we need to populate the image into it.
If you remember in the previous part when the page loads the reducer data, it is still null. So, we have to wait for data from the server.
So, we can useEffect to observe when the reducer object made the changes and when the resulting key is not null, we can populate the image by calling showPreviewImage function as shown in the code snippet below:
useEffect(() => {
        if (branchReducer.result) {
            let initial_image = { file_obj: '', frontimage:      branchReducer.result.frontimage }
            showPreviewImage(initial_image)
        }
    }, [branchReducer])
Hence, we will get the result as shown in the code snippet below:
Delete Operation
For the delete operation, There is no new highlight to show. We can just use the same code from the implementation from the previous part. But, we must not forget to make a change in the endpoint name.
Conclusion
In this chapter, we learned how to create a CRUD operation with the Redux mechanism again. This will make our knowledge on CRUD operation in React using Redux even more clearer. The operations were similar to the previous chapter. The plus point was refactoring the old code. The highlight point of this chapter, we as the implementation of image upload in React and storing it on the Backend server using API endpoint.
In the next chapter, we will implement the CRUD operation on Supplier data. The implementation will be similar to this and the previous chapter. But, there will be a recap of all processes that will surely help you understand how redux work in more depth. The chapter will deal with database relations as well.
All code for this chapter is available on Github for Frontend and Backend.
Stay tuned for the next chapter.