Who is this for
To understand this tutorial without difficulty a basic understating of PHP, SQL syntax, HTML, CSS, and familiarity with any Linux operating system distro such as Debian or ubuntu is assumed. If you do not meet any of the above requirements, I would advise You that please find yourself introductory texts or tutorials grasp the fundamentals, and come to this illustrative tutorial to get the bread and butter. To put this right I would say Lamp stack Address Book Project is a sample software development project which is to showcase how to develop a web application utilizing Linux, Apache, MySQL and PHP that is known as the LAMP STACK for beginner and intermediate PHP developers.
Process
In order to embark on the project it is very important to highlight the major steps/mile stones which will serve as road map helping us to make evaluation on whether will are on right/good track and stay focused on the project goals. It is of great importance however to realize that some steps may overlap due to dependency nature of work. The followings are major steps in our lamp stack Address Book project:
- Define Key Project Requirement
- How to Prepare the infrastructure, installation and configuration
- Database Design and Build with Test Data Preparation
- Project Folder Structuring, connection component and utility functions write up
- Frontend Development
- Backend Development
- Integration and deployment to production
Project requirements
The project requirements are to give directions to the project manager and his team about the final product required by the client/sponsor of the project. They[requirements] help the manager and his/her team to focus on building a product that meets the user expectations as defined in the specifications of product in project agreement or contract document signed between the client/representative and project engineering contractor.
Requirements in this project
- There should be a list showing all entries of contacts that have been stored in the address book;
- Every entry(above) should consist of fields(name, firstname, email, street, zip code, and a city whereby a city should be a drop-down with cities defined in a table in the database;
- A form to add a new entry;
- A form to edit existing entries in the database;
- And so forth the list continues …
Requirements in Wireframes
Wireframes are simple sketches of the product to be developed. They serve as models helping to clear understanding on how the software sought to be built features will look like by both client and contractor. In other words, we can say wireframes are like map showing features of a given landscape or a building. Wireframe are one of the low fidelity prototypes which are used as blueprints before the software development project gets underway. There are many prototyping tools to generate wireframes out there. Examples of prototyping software are adobe xd, axure rp and pencil project which is open source. If your are familiar with any such design software the choice is your on what to use to make the wireframes. It is very easy for one to get started prototyping with pencil project software. All of the following two designs just to grasp the idea of product to be developed were designed with the pencil software. You may download pencil protoyping software in the following link: https://pencil.evolus.vn/Downloads.html For more details about wireframing please find the textbook Wireframing Essentials “An Introduction to User Experience Design” by Mathew J Hamm
Contact edit form

Contact List Form

Lamp stack Infrastructure Provisioning
Provisioning is all about providing for installation and configuration of required software and their dependencies for a given environment and or platform. There are a number of ways to provision the lamp-stack in development, staging, and production environments. The development environment is the local one for coding prior shipping code to other(staging and production environment) Usually the development environment is characterized by having a lot of debugging among many other preliminary development activities such as unit testing and the like. Staging environment is there for massive testing to satisfy both functional, non-functional, and user requirements before deploying the code to production. The staging environment is made in such a way that it tries to emulate the production environment where the finished software product is going to be deployed and maintained. The production environment is the ultimate destination of highly tested and optimized code for achieving business operation tasks required to be done for the business. For the sake of simplicity, we will postpone the discussion of staging and production environments in this tutorial until the coming series of this tutorial series. If you would like to get deep in provisioning you may find the text “Creating Development environment with vagrant” by Michael Peacock.
Infrastructure in this project
To quickly install lamp stack in ubuntu or Debian Linux OS distros make sure you have a reliable Internet connection locate the terminal or command line in your computer operating system and launch it. After launching the terminal write the following command
sudo apt-get install lampserver^ -y
and click the enter button on your computer keyboard and then wait for the installation to proceed. At one time you shall be required to enter/set the MySQL root account’s password, please do that by entering the password that you will remember and wait for the installation process to finish up. After the installation, you can check for apache2, MySQL and PHP by entering the following commands that appear in each line below in your terminal and click the enter button respectively after issuing each one of the commands specified. apache2 -v
mysql -v
php -v
For each of the above, you will get the version number of the software as evidence/proof of installation in the system you are using Furthermore you may visit your site by typing localhost or localhost’s loopback IP address: 127.0.0.1 through your web browser program address bar. You should be getting the following.
Infrastructure contd

Once we are done now with the infrastructure stuff we should pull our sleeves and get ready for the next lesson where we will be dealing with the database stuff.
Database design and build with data preparation
One of the famous database writer C J Date defines a Database as the operational data for the enterprise. We will be Taking Our Address Book application as a little demo of a database-driven application in this scenario. Databases are normally managed by a special dedicated software system or subsystem known as database management systems [DBMS] such as MySQL, Oracle, Postgres, and SQL Server. For the sake of this project, we will be using MySQL which comes bundled in our lamp stack.
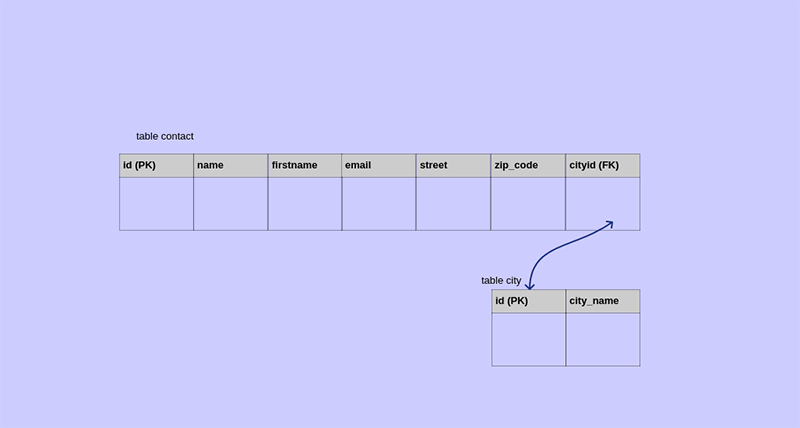
Before going further let’s revisit our case by doing a quick recap on Requirements in this project. From requirements number 2 and 3 it can be postulated that our little project requires at least two tables in its database to get going. We shall call our database contactdb and the tables contact and city. From the user story/narration we may deduce that schema for table city to be city:( id, city_name) and for the table contact to be contact :(id, name, firstname, email, street, zip_code, cityid) where id serve as the surrogate primary key and cityid as foreign key in table contact referencing id in table city
Database Schema visually
Database scripting
With our database description well outlined, it is time to make our database generation script that will be used later to create and recreate the database once needed later. This is a very useful option when creating database-driven applications since the database script was once written can be used several times to regenerate the given database and even edited occasionally and reused many times if needed. You may use the text editor of your preference to make the database script but ones with syntax highlighting feature support. The syntax highlighting editor like emacs and vi editors available in Linux become very useful as they come with a syntax support feature that can alert you of any of your syntax errors immediately. There are many text editors for Linux, Unix, and Windows platform you can get a long list of those editors(some for free, paid or free trial) by searching them online with any of the big search engines like google, bing, or yahoo. If you lack such a text editor hurry up and get one. With your text editor up and running open it and paste the following code [in bold into the writing area
Create database if not exist contactdb;
use contactdb
create table city(id smallint unsigned not null primary key auto_increment,
city_name varchar(50) not null)engine innodb;
create table contact(id int(10) unsigned not null primary key auto_increment,
name varchar(80) not null,
firstname varchar(25) not null,
email varchar(125) unique not null,
street varchar(25) not null,
zip_code int(5) not null,
cityid smallint unsigned not null,
foreign key(cityid) references city(id)
)engine innodb;
Once you are done with pasting save the document as contactdb.sql in your Documents or home directory folder. Hint: MySQL comes supported with several engines such as MyISAM and InnoDB and so forth. Of the two engines mentioned above, it is InnoDB that comes up with relational constraint enforcement that is useful for checking referential integrate across several database tables which is important for the scenario such as ours. The use of the InnoDB engine strictly enforced by writing the engine InnoDB at the end of the table creation statement script. This is so since some MySQL comes with InnoDB and MyISAM engine and it might be the case that MyISAM engine is the default. If you do not put that in the table creation statement you may end up with MyISAM engine tables. Else you may have to check for MySQL engine configurations before running the script in the terminal. For further learning about MySQL grab the book “MySQL DATABASE USAGE AND ADMINISTRATION” by Vikram Vaswani.
Interacting with MySQL client
With our database script now properly written up, it is time to run the database generation script to create our contactdb database in our locally provisioned lamp stack server. Launch the terminal on your computer and issue the following command to generate the database in the lamp stack server. Remember you have to click your computer keyboard’s enter button after writing the command to invoke it:
mysql -h localhost -u root -p password
insert the root password then issues the following command:
create database contactdb;
After creating the database exit the MySQL shell by issuing the following command
exit
Now in the shell terminal issue the following command
mysql -h localhost -u root contactdb < /home/user/contactdb.sql -p
insert the root password and click enter if everything is Ok and the password is correct the command shell will just move to $, otherwise, you will see errors
NOTE! Substitute /home/user/contactdb.sql with the right absolute path of the contactdb.sql depending on where you saved it. So if you saved your contactdb.sql in /home/user/Document/ Also the user in the above case represents the Linux machine account’s username for example in my local development the username is benedict so the correct path will be /home/benedict/Document.
Alternatively, you may change your working directory to the path where the contactdb.sql is, by issuing the command
cd /home/user/Documents
pressing enter will change the command shell path to /home/user/Documents$
Now enter the following command
mysql -h localhost -u root contactdb < contactdb.sql -p
As you can see taking the alternative option eliminates the need for you to right the absolute file path in the command statement for this case the choice is your whatever method you prefer that is up to you.
Checking the database
After running the previous command there is a need to check our mysql database to see if there are updates to our contactdb database. Given the command executed well hopeful our database should have been updated by now, to confirm that open the terminal and follow the procedures outline hereunder.
Enter command
mysql -h localhost – u root -p
enter the correct root password issue the following command into the mysql shell
use contactdb
then issue the show table command
show tables;
now our two tables i.e city and contact can be seen furthermore by issuing describe table_name; command where table_name is one of our tables in the contactdb database the details about particular table can be seen on the screen describe city; The appearance of tables listed and their details seen as defined in our database generation script confirms that the database creation/update went right.
Adding the New Mysql User
Input the following command to add new mysql user
create user onlineuser@’localhost’ identified by password ‘Pas5w#rd’;
Issue the following command to grant limited database access privillages to the user just created
grant select, insert, update on contactdb.* to ‘onlineuser’@’localhost’;
flush privilleges;
This online user is the new one with limited privileges granted just to be on the safe side. Take this As a rule “it is not advisable to allow root user remote login to MySQL as such this may jeopardize the server security by making it prone/vulnerable to attacks with elevated privileges. Also, take this as plus limit the privileges of online user to a set of the minimum just required to make him/her do the job she is supposed to given the database schema belonging to him/her. For further details about database security, you may read the book Database Administration by Craig Mullins. We will, later on, be using this online user account to access the database of our Address Book application
Test Data
To wind up this database stuff, for now, go and launch your text editor once again and paste the following PHP code into the writing area and save it as Test_Data.php in data-dir folder of our address book project we will be using later.
<?php

$cities=[ "LONDON", "LIVERPOOL", "LYON", "DORTMOND", "MADRID", "LEICESTER", "BERLIN" ];

$contacts=[
["Bernd Lenno",Bernd,"lenno@afc.com","Ashburton Groove",55105,1],
["Jurgen Klop",Jurgen,"klop@lfc.com",Anfield,54104,2],
["Nicolous Pepe",Nicolous,"pepe@afc.com","AshBurton Groove",55105,3],
["Pierre Aubemeyang",Pierre,"pam@afc.com","AshBurton Groove",55105,4],
["Per Mertsacker",Per,"bfg@afc.com","AshBurton Groove",55105,4]
];

?>
Project folder structuring and utility functions coding
There is a number of options when it comes to the structure of the project folder/directory. Though there are no strict guidelines there are some good rules to observe in organizing the project code&resource files for the sake of easy maintainability and clarity. For our case of vanilla programming style, we have a great degree of freedom on how we write and organize our code compared to if someone is writing code for a given PHP coding framework. There is a noted tendency of some frameworks to minimize flexibility and requiring programmers to write code that follows a particular pattern or convention chosen by the framework pioneers or maintainers. Whatever the style you wish to follow it is better to write a program code in such a way that embraces the separation of concerns and reduces coupling of code so that we could afford easy integration between components of the software developed.
Project Folder Structure
In our Address Book project, we shall have at most three folders/directories within the main project folder as now described. The three folders are HTML, includes, and datadir. In the HTML folder, all the frontend work will be put there. These[frontend] includes the content structure code(HTML) files, the content presentation stylesheets (CSS) files, website logo(favicon.png) image and finally the content behaviour functionalities(javascript) files. In the includes folder, all the backend work will be put there. These[backend] includes the utility functions file for common repeated operations, database connectivity component, and some specific backend files related to specific frontend file functionalities. In the datadir folder, all other less frequently used assets like Test_Data.php files and database generation script will be put for storage.
The Project Folder Diagram

Project folder in relation to document root
By default, the web document root is set to /var/www/html in Debian Ubuntu Linux distro upon installation of the lamp-server. This(web document root directory) is the one holding the index.php file that is shown once you complete the lamp-server installation and visiting the localhost via the browser immediately after successful installation. It is possible though to change this web document root by changing the configuration in the Apache http server configuration file/s. That is done by editing the DocumentRoot setting in server configuration replacing DocumentRoot /var/www/html with our new document root folder tree-like /home/user/Desktop/LAMP/html as shown below
Document root /home/benedict/LAMP/html In my case the user is benedict please make sure to substitute the right username for your Linux machine user account name to get the right folder&file path. In fact, this is very useful if you are to make your project well/easily composable with the PHP dependency management tool is known as the composer where you can incorporate/integrate other packages/APIs functionalities into the system that you are building. Do not forget to restart the apache2 server to make it reload the new configuration so that the applied change may take effect Two ways to restart the Apache HTTP server are by issuing either of the following commands via the command terminal of your Linux machine. You should have the sudo password to make any of them tick. sudo apache2 restart sudo service apache2 reload After that make sure that the apache user is given read and write access to the new DocumentRoot folder. Alternatively, you may leave the /var/www/html as the default document root in apache HTTP server configuration and simply utilize Linux’s symbolic links between your project folder and the /var/www/html directory. For more details about Linux link files please find the textbook “LINUX ADMINSTRATION A BEGINNER’S GUIDE” by WALE SOYINKA
Well, for simplicity and brevity we may leave without changing the default DocumentRoot for now as these issues of changing DocumentRoot directory and developing an easily composable PHP project and integration as a whole will discussed in the coming tutorials in this series of tutorials.
Utility Functions
As it was said earlier the utility functions are those which do common repeated operations within the application. There are many such operations in web applications good example candidate task could be writing a top banner indicating whether the user has signed in or out on each page served on the site and also a footer strip at the bottom of the site in a dynamic web application. We could divide website into two types one Static and the other Dynamic depending on the dynamic nature of content shown on them. Static websites are those whose content change only when the webmaster updates the site content while Dynamic sites are those which whose content change depending on the user interaction with the site like logging in/sign in or log of/sign out and posting comments or posts in social media sites. Not only that but also dynamic sites involve a great deal of interaction with the database updated in real-time/almost real-time like doing Internet banking where online mobile money transactions are performed and user accounts get credited or debited upon completion of such transaction.
Database connectivity
Database connectivity is another issue that is frequently needed to complete the user web application interaction cycle in a dynamic/data-driven web application. Due to a lot interactivity performed there comes the importance of devising a proper mechanism of handling database connectivity issues by assigning all database handling responsibilities to a given component that can be instantiated by following the common standard rather than reinventing the wheel by performing each database call in disorganized fashion. We shall be looking on the utility functions and database connection/connectivity in this section while the look on backend specific function logic application as far as these functions are applied will be withheld until we reach to the Backend lesson Before Moving to coding here goes the list our utility functions:
- cleansData()
- footNoting
- getContactByEmail
- getContactById
- listAllContacts
- addContact
- editContact
- addCity
- tabulate
- listCities
Prior to coding the above function, we shall look at creating our database connectivity component which we shall call class connection.
Writing the connection class
This is one component that has been written in an object-oriented paradigm. Launch the text editor you are using for coding. Paste the following code into the writing area.
<?php
class connection{
protected static $_instance = null;
public static function instance() {
    if (!isset(self::$_instance)) {
       self::$_instance = new connection();
    }
 return self::$_instance;
 }
public function getconnection() {
 $unix = "localhost";
 $socket = '';
 $db= "contactdb";
 $user = "onlineuser";
 $passwd ="Pas5w#rd";
 $dsn="mysql:host=$unix;unix_socket = $socket;dbname=$db";
 $conn = new PDO($dsn, "$user", "$passwd");
 $conn->setAttribute(PDO::ATTR_ERRMODE, PDO::ERRMODE_EXCEPTION);
 return $conn;
 }
}
?>
CRUD you need to know this
The term CRUD is an acronym for create, read, update and delete. This term comes up most of the time when we discussing database-driven application since most of the time we talk about data operations; like adding a record(row), removing a record(row), editing some or almost all fields in a given record(row), finding a particular record(row) in the database table. We deal with SQL(sequential query language) terms such as insert which refers to create, select which refers to read, update refers to modification/editing of a record in a database table. and delete refers to the removal of a particular record from the database table. With the exception of footNoting and tabulate functions all the rest of the next 10 functions which are going to be written as utility functions contains one among the four CRUD operations to be precisely they contain one among three CRUD operations which are create, read and update. The delete command won’t be touched now until later. If you are new to the SQL language I will advise you to grab an of introductory text or ebook on the SQL subject. One such text is the SQL tutorial from tutorialspoint.com.
In our application, we will be using PHP PDO MYSQL DRIVER simply because it is not only object-oriented but also easily maintainable as it supports several DBMS like Oracle, Postgress, sqlserver and many more. This makes it useful when the company decides to switch from one DBMS to another, there is no big maintenance work to be done besides little modification in the connection class compared to if someone could be using the PHP MySQL driver which is for MySQL DBMS only.
Coding the utility functions
function ListAllContacts($db){
$sql='select * from contact join city
on contact.cityid=city.id
order by contact.id desc';
$stmt=$db->prepare($sql);
$stmt->execute();
$result=$stmt->fetchAll();
return $result;
}
//function getContactById is used to get a single contact filtering by ID
function getContactById($db,$contactid){
$sql='select * from contact join city
on contact.cityid=city.id
where contact.id=:id';
$stmt=$db->prepare($sql);
$stmt->bindParam(':id',$id);
$id=$contactid;
$stmt->execute();
$result=$stmt->fetchAll();
return $result;
}
function listCities($db){
$sql='select * from city
order by id';
$stmt=$db->prepare($sql);
$stmt->execute();
$result=$stmt->fetchAll();
return $result;
}
function getContactByEmail($db,$emailId){
$sql='select * from contact c join city t
on c.cityid=t.id
where email=:email';
$stmt=$db->prepare($sql);
$stmt->bindParam(':email',$email);
$email=$emailId;
$stmt->execute();
$result=$stmt->fetchAll();
return $result;
}
function addContant($db,$contact){
$sql='insert into contact(name,firstname,email,street,zip_code,cityid)
values(:name,:firstname,:email,:street,:zip_code,:cityid)';
$stmt=$db->bindParam(':name',$name);
$stmt=$db->bindParam(':firstname',$firstname);
$stmt=$db->bindParam(':email',$email);
$stmt=$db->bindParam(':street',$street);
$stmt=$db->bindParam(':zip_code',$zip_code);
$stmt=$db->bindParam(':cityid',$cityid);
$name=$contact[0];
$firstname=$contact[1];
$email=$contact[2];
$street=$contact[3];
$zip_code=$contact[4];
$cityid=$contact[5];
$result=$stmt->execute();
return $result;
}
//function footNoting writes footer notices
function footNoting(){
$date=new DateTime("now");
$yr=$date->format('Y');
echo '<p>';echo "©$yr Benedict Daniel Masimbani"; echo '</p>';
}
//function tabulate is there to write record rows to the table be outputed to the screen view
function tabulate($list){
for($i=0;$i<count($list);$i++) {
$id=$list[$i][0];
$name=$list[$i]['name'];
$firstname=$list[$i]['firstname'];
$email=$list[$i]['email'];
$street=$list[$i]['street'];
$zip_code=$list[$i]['zip_code'];
$city_name=$list[$i]['city_name'];
echo'<tr>';
echo"<td>$name</td>";
echo"<td>$firstname</td>";
echo"<td>$email</td>";
echo"<td>$street</td>";
echo"<td>$zip_code</td>";
echo"<td>$city_name</td>";
echo'<td><a href="editcontact.php?id='.$id.'">
<button class="button">Edit</button></a>';
echo'</tr>';
}
//function addCity is used to add a named city
function addCity($db,$cityname){
$sql='insert into city(city_name)
values(:city_name)';
$stmt=$db->bindParam(':city_name',$city_name);
$city_name=$cityname;$result=$stmt->execute();
return $result;
}
//cleans data function is used to sanitize the data
//once posted on the server
function cleansData($data) {
$data = trim($data);
$data = stripslashes($data);
$data = htmlspecialchars($data);
return $data;
}
function editContact($db,$contactid,$updatedFields) {
$name=$updatedFields[0];
$firstname=$updatedFields[1];
$email=$updatedFields[2];
$street=$updatedFields[3];
$zip_code=$updatedFields[4];
$cityid=$updatedFields[5];
$sql="update contact set name='$name', firstname='$firstname',
email='$email', street='$street', zip_code='$zip_code',
cityid='$cityid'
where id=:id";
$stmt=$db->prepare($sql);
$stmt->bindParam(':id',$id);
$id=$contactid;
$result=$stmt->execute();
return $result;
}
Closing notes on Utility Functions
All the eight utility functions needs to be written in a single file lets call it utility.php between <?php //and ?> //tags as hereunder portrayed for the php parser to parse them correctly without throwing errors. <?php function addContact($db,$contact){} function getContactByEmail($db,$emailId){} function getContactById($db,$id){} function ListAllContacts($db){} function editContact($db,$contactid){} function addCity($db,$city_name){} function listCities($db){} function tabulate($list){} function footNoting(){} function cleansData(){} ?>what goes between the curly braces is particular function logic as written previously I have chosen not to write them here just for brevity since the slide space is limited so don’t forget to put them into their place as shown in the preceding slides. We shall see the usefulness of these functions once we start integrating and running
the application functionalities.
Frontend Development
The frontend is the part of the system in which the user interaction with the system is performed. As described earlier our frontend is built up of mostly content structure by HTML tags, presentation stylesheets by CSS, and a little behavior code by javascript. We won’t be covering javascript in this edition, some javascript coverage will be discussed in the coming series of tutorials. Let’s start by coding the reusable content-less HTML page template. Launch your text editor and paste the following code in the writing area.
<!Doctype html>
<html>
    <head>
        <title>Title Goes Here </title>
        <link rel=”stylesheet” href=”https://www.ajax-cdn/foundation/css/min.css”/>
        <script> </script>
     </head>
     <body>
        <header>
            <h1>Address Book</h1>
        </header>
         <nav>
            <ul>
                  <li class=”button success” style=”displaly:inline-block;”><a href=”addcontact.html” style=”text- decoration:none;”>Add Contact</a></li>
                  <li class=”button success” style=”displaly:inline-block;”><a href=”listcontacts.html” style=”text- decoration:none;”> Contact List</a></li>
           </ul>
           </nav>
           <section> </section>

           <footer> </footer>
      </body>
 </html>
This template saves as a foundation for us to be writing other frontend pages quickly following the modern HTML5 standard with semantic markup. It will be reused several times so save it as template.html in Desktop or any location of your choice easy for you to remember. We shall just be copying and editing it to write our frontend pages eliminating the need to write everything from the scratch every time we need to make such pages.
Code contact list
Copy the template.html written previously and edit it to make it resemble the one shown hereunder.
<!Doctype html>
<html>
    <head>
        <title>List of Contacts </title>
        <link rel=”stylesheet” href=”https://www.ajax-cdn/foundation/css/min.css”/>
    </head>
    <body>
    <?php
          require_once(“../connection.php”);
          require_once(“../utility.php”);
    ?>
          <header>
              <h1>Address Book</h1>
          </header>
          <nav>
              <ul>
                  <li class=”button success” style=”displaly:inline-block;”><a href=”addcontact.html” style=”text-decoration:none;”>Add Contact</a></li>
                  <li class=”button success” style=”displaly:inline-block;”><a href=”listcontacts.html” style=”text-decoration:none;”> Contacts List</a></li>
              </ul>
          </nav>
          <section>
              <table>
                    <thead>
                         <th>Name</th>
                         <th>Firstname</th>
                         <th>Email</th>
                         <th>Street</th>
                         <th>Zip Code</th>
                         <th>City</th>
                         <th>Action</th>
                      </thead>
                      <tbody>
                        <?php
                            $conn=new connection();//instatiating our connection object
                            $db=$conn→getconnection(); <!Doctype html>

<html>

    <head>

        <title>List of Contacts </title>

        <link rel=”stylesheet” href=”https://www.ajax-cdn/foundation/css/min.css”/>

    </head>

    <body>

<?php require_once(“../connection.php”); require_once(“../utility.php”); ?>

    <header>

        <h1>Address Book</h1>

    </header>

    <nav>

        <ul>

            <li class=”button success” style=”displaly:inline-block;”><a href=”addcontact.html” style=”text- decoration:none;”>Add Contact</a></li>

            <li class=”button success” style=”displaly:inline-block;”><a href=”listcontacts.html” style=”text-decoration:none;”> Contacts List</a></li>

        </ul>

    </nav>

    <section>

        <table>

                <thead>

                     <th>Name</th>

                     <th>Firstname</th>

                     <th>Email</th>

                     <th>Street</th>

                     <th>Zip Code</th>

                     <th>City</th>

                     <th>Action</th>

               </thead>

                  <tbody>

                    <?php

                           $conn=new connection();//instatiating our connection object

                           $db=$conn→getconnection();

                           $list=ListAllContacts($db);

                           tabulate($list)

                    ?>

                  </tbody>

             </table>
             </section>

            <footer>

           <?php
             footNoting();
           ?>

          </footer>

     </body>
</html>
As it can be noted the bold text in the previous code is the one that has been added after editing even though the script tag was removed from the head section of our HTML since we don’t need it now as we won’t bring javascript yet. If we had data filled in our database and with just a few tweaks in the Apache server configuration files running this file by opening the browser and typing localhost/contactlist.html would print the rows of the record into the browser window. Why few tweaks? Apache comes with default settings of not parsing PHP code within HTML files in order for us to be able to parse our PHP code within the HTML we need to instruct the server to do so by changing the apache2. conf file found in /etc/apache2/ directory in Debian & Ubuntu Linux distro or the httpd.conf in some other Linux distro. If someone tries to run this or any other HTML code that contains PHP he/she would see un parsed PHP code in the browser window which is indeed very bad and seriously so should such info fall within the prying eyes of hackers in production. For that reason there are some good suggestions of writing the code which doesn’t spell out such important details but fails quickly and involves logging any error into specially chosen output(files/folders) and catching any exception/ errors should one happen on running the code. We shall discuss a bit on those apache HTTP server settings/configuration later before winding up this lesson and much more incoming lessons when dealing with integration and deployment. For the time being, let us move on to writing the seed_test_data.php file that will be used to populate our database’s tables with test data.
write seed_test_data.php as shown in the following code between <?php and ?>tags and save the file with the given name in bold in the preceding line in the html folder
<?php
   require_once("../datadir/Test_Data.php");
   require_once("../includes/connection.php");
   function cityRecording($db,$cities) {
   $sql="insert into city(city_name)
         values(:city_name)";
   $stmt=$db->prepare($sql);
   for($i=0;$i<count($cities);$i++){
       $stmt->bindParam(':city_name',$city_name);
       $city_name=$cities[$i];
       $stmt->execute();
       }
   return true;
   }
   function contactRecording($db,$contacts) {
   $sql="insert into contact(name,firstname,email,street,zip_code,cityid)
         values(?,?,?,?,?,?)";
   $stmt=$db->prepare($sql);
   for($i=0;$i<count($contacts);$i++){
      $stmt->execute($contacts[$i]);
      }
   return true;
   }
   $conn=new connection();
   $db=$conn->getConnection();
   $location=cityRecording($db,$cities);
   $connections=contactRecording($db,$contacts);
   if($location&&$connections) {
       echo' Database Initialised Successfully!';
   }
?>
Editing Web Server Configuration
Tweaking apache http server By editing /etc/apache2/apache2.conf if you are using debian, ubuntu linux distro or /etc/apache2/httpd.conf for some other linux distro. Adding the following highlighted text below the last line of apache2.conf file found in the path above: Addtype application/x-http .php .htm .html .phtml After that reload apache service by issuing the following command in the terminal.
Sudo service apache2 reload
Launch browser visit:
localhost/seed_test_data.php you will see the message “Database Initialised Successfully” If you are connected to the internet visiting the localhost/listcontacts.html will render a nice contact page as shown in the next page/slide. In this case, the Internet connection will ensure that the foundation.css linked stylesheet file is downloaded by your browser. This stylesheet will most time remain within the browser cache for some time unless the cache is cleared so when you visit the localhost shortly later without the internet connection you will still have access to the foundation CSS stylesheet within the browser cache. Alternatively, you may download the foundation CSS stylesheet file and put that file in the HTML directory of our Address Book project and link its name in the link tag within the head section of your HTML/PHP frontend pages.

Contact add form
Launch your text editor open the template.html select it all copy and paste it into another window in the text editor. Start editing the pasted form as described below.
- Insert the following code block above the Doctype declaration make sure you start at the top most line leaving no space behind not even a single one.
<?php
    require_once(“../inclueds/connection.php”);
    require_once(“../utility.php”);
    require_once(“../addContact.php”);
?>
2. insert” Record New Contact” between <title> and </title>
3. Insert the following code between <section> and</section> tags then save it as addcontact.html file in html directory of our Address Book Project
<form name="addcontact" action="" method="POST">
    <label for="name">Name</label>
    <input name="name" id="name" type="text" required="true">
    <label for="firstname">Firstname</label>
    <input name="firstname" id="firstname" type="text" required="true">
    <label for="email">Email</label>
    <input name="email" id="email" type="email" required="true">
    <label for="street">Street</label>
    <input name="street" id="street" type="text" required="true">
    <label for="zip_code">Zip code</label>
    <input name="zip_code" id="zip_code" type="text" required="true">
    <label for="cityid">City</label>
    <select>
       <?php $conn=new connection();
       $db=$conn->getconnection();
       $cities=listCities($db);
       foreach($cities as $city){
           $cityid=$city['id'];
           $city_name=$city['city_name'];
           echo'<option value='.$cityid.'>'.$city_name.'</option>';
           }
      ?>
    </select>
    <input class="button success" name="save" type="submit" value="SAVE"/>
    <input class="button alert" name="cancel" type="reset" value="CANCEL"/>
 </form>
Elaborations on Add Contact Forms Functionality
addContact.php put between the <?php and ?>tags at the top of the file is not yet there will be made in the coming lesson about Backend Development engineering so the full functionality will be brought up after reaching that lesson for now just leave it as that until then. Additional point: if you would like to have a footer notice well written into that footer section do not forget to add the following code in bold between <footer> and </footer> tags <?php footNoting(); ?>
Edit contact form
Launch your text editor open the template.html copy it all. Open another window in the text editor paste it there. Now edit the template by:
1. Inserting the following code above the Doctype declaration at the first line of the document making sure that you leave no space behind not even a single one
<?php
    require_once(“../includes/connection.php”);
    require_once(“../includes/utility.php”);
    require_once(“../includes/editContact.php”);
 ?>
2. changing the title by inserting “Edit Contact Info” between <title> and </title> tags.
3. Add the following code in bold between <footer> and </footer> tags <?php footNoting(); ?>
4. Insert the following code between <section> and</section>
Remember to save the file as editcontact.php file in html directory of our Address Book Project
<?php
 $conn=new connection();
 $db=$conn->getconnection();
 $contactid=isset($_GET['id'])?$_GET['id']:null;
     if($contactid!=null) {
         $contact=getContactById($db,$contactid);
         $name=$contact[0]['name'];
         $firstname=$contact[0]['firstname'];
         $email=$contact[0]['email'];
         $street=$contact[0]['street'];
         $zip_code=$contact[0]['zip_code'];
         $cityid=$contact[0]['cityid'];
         $city=$contact[0]['city_name'];
         echo'<form name="editcontact" action="" method="POST">';
             echo'<label for="name">Name</label>';
             echo'<input name="name" id="name" type="text" value="'.$name.'" required="true">';
             echo'<label for="firstname">Firstname</label>';
             echo'<input name="firstname" id="firstname" type="text" value='.$firstname.' required="true">';
             echo'<label for="email">Email</label>';
             echo'<input name="email" id="email" type="email" value='.$email.' required="true">';
             echo'<label for=”street”>Street</label>';
             echo'<input name="street" id="street" type="text" value='.$street.' required="true">';
             echo'<label for="zip_code">Zip code</label>';
             echo'<input name="zip_code" id="zip_code" type="text" value='.$zip_code.' required="true">';
             echo'<label for="cityid">City</label>';
             echo'<select>';
                  $cities=listCities($db);
                  foreach($cities as $newcity){
                  $city_id=$newcity['id'];
                      if ($city_id!=$cityid){
                      $city_name=$newcity['city_name'];
                      echo'<option value='.$city_id.'>'.$city_name.'</option>';
                      }
                  echo'<option value='.$cityid.' selected="true">'.$city.'</option>';
                  }
            echo'</select>';
            echo'<input class="button success" name="save" type="submit" value="SAVE"/>';
            echo”\t”;
            echo'<input class="button alert" name="cancel" type="reset" value="CANCEL"/>';
      echo'</form>';
      }
      else
      {
           echo' ERROR! SOMETHING JUST WENT WRONG PLEASE RETRY OR IF THE ERROR PERSIST CONTACT THE ADMINSTRATOR';
      }
?>
Closing notes
Trying to run the remaining pages(editcontact.html and addcontact.html won’t execute as expected until we complete adding the two server-side logic files(editContact.php and addContact.php) in the include folder of our address book project and that will be done in the next lesson on Backend Development.
Backend Development
In this lesson, we are going to make two PHP files named addContact.php and editContact.php. Each of those files deals with the server-side logic associated with their corresponding frontend files; addcontact.html and editcontact.php respectively. The main server-side logic functionality performed by each one of these two files has to do with inputs validation and sanitizing these include for instance making sure that null/empty values are not allowed to pass through. This security activity is done purposely to ensure that the data that is allowed into the database is valid and conforms to the set standards of metadata. On doing these security functionalities the condition is that if the data posted to the server fail the test then the expected crud operation is not performed and the server issues the statement requiring the user to correct any mistake noted in the data sent to the server. On another hand, if the data posted to the server is valid and everything else is OK the expected crud operation will be executed as needed. With that said it time to start coding for the two files. Due to the fact that both two files are a bit long to fit precisely within the slides, I hereby provide you with the links to download them. The code for the two files has been commented to some extent to elaborate the logic behind it Download compressed addContact.php here https://barakadaniel.com/AddressBook/VanillaPHP/ServerSideLogic/addContact.php.zip
Download compressed editContact.php here https://barakadaniel.com/AddressBook/VanillaPHP/ServerSideLogic/editContact.php.zip Remember to decompress the downloaded files and save each file with its respective name into the includes folder in our address book project folder.
Having added the two files mentioned earlier we can now go and run our address book application by visiting the localhost just by typing localhost/addcontact.html in the browser address bar for add contact functionality and after seeing that performs well we may visit the Contacts List through clicking the Contacts List menu button and go forward to edit contact page functionality for any contact among the list for whom we would like to edit the contact details by clicking the corresponding edit button for that particular contact in a given record row. By now each of our three pages should be running as supposedly. With a keen eye, you may have observed that with exception of the listcontacts.html pages our other two pages(addcontact.html and editcontact.php) do not look such great but why this? The answer to that is in the applied styles, in the listcontacts.html we used the CSS file from foundation.org just as the link tag in the head section of the listcontact.html indicates. Foundation is one of the frontends presentational CSS library frameworks project that comes packed with a lot of CSS and javascript functionalities in them to easy the development of modern-day responsive web design “RWD” which makes sites look good in an array of devices from small screen hand-held through medium tablets to the large/widescreen devices out there. Another popular CSS framework similar to the foundation is Bootstrap. RWD is a big subject to be explained in this tutorial. For further lessons on design get the book “Jump-Start Responsive Web Design” by Chris Ward. To avail you with good design of the two pages mentioned above you may go to the downloads links given below both of which contain the modified HTML code that makes use of the foundation’s css classes to produce state-of-the-art design pages. Download compressed addcontact.html here https://www.barakadaniel.com/AddressBook/VanillaPHP/FrontendCode/addcontact.html.zip
Download modified editcontact.php here https://www.barakadaniel.com/AddressBook/VanillaPHP/FrontendCode/editcontact.php.zip After downloading the two files go to the HTML folder of our address book project delete the previous unmodified version of addcontact.html and editcontact.php uncompress each of the two downloaded files and put them in the HTML folder of our project as a replacement to the deleted ones. Running our address book application through the browser will generate amazing looking pages as shown in the next two pages/slides.
Add Contact form

Edit Contact form

What is Next?
As you may know, we once talked about the integration and deployment issue as one of the milestones in our project. Having our project running on our on local development machine is just the beginning. The ultimate goal of the web development project is indeed to have the website running 24/7 in a well-conditioned production environment whether within the company’s own in-house strong server rooms or data centers or from the outsourced well managed IT services company anywhere throughout the globe. Integration and Deployment are indeed such big topics that may require books of their own. For these topics and many more improvements, features add requests such as using AJAX, SIMPLE or ADVANCED SEARCH and PAGINATION please keep it here when series of brief and well-documented tutorials like this plus illustrative video tutorials links will be brought to you. In your own good time you may use the references given within this tutorial for consolidating the knowledge acquired in this tutorial. The author of this tutorial welcomes any question about the topics discussed in here. For any comments, suggestions or queries find the author’s contact details attached at the end of this tutorial .
About the Author
Benedict Daniel Masimbani is a full stack developer currently working as an IT consultant with mnadan group. He is a Computer Science graduate from the Institute of Finance Management(IFM) in Dar es Salaam Tanzania. He has hands-on experience in information systems analysis, design, implementation, and maintenance across variety of environments and platforms. Immediately after finishing the third year of computer science degree studies at IFM Benedict underwent an internship with Buni Innovation Hub which is under the Development and Technology Transfer Directorate of Tanzania Commission of Science and Technology(COSTECH) at the commission’s Head offices at Kijitonyama area of Kinondoni District in Dar es Salaam city of the United Republic of Tanzania. He has served in various capacities in the production of www.mnadan.co.tz and sister site www.mnadan.com both of which are owned by mnadan group since the project inception. Besides professional life, Benedict is a football fan and likes very much to watch competitive football league matches both at home(Tanzania) and abroad plus international tournaments. You may contact Benedict through his LinkedIn account: Benedict’s Linkedin Account’s profile:https://www.linkedin.com/in/benedict-daniel-607b1b182/ You may also get more information about him by visiting his website: https://www.barakadaniel.com