As their name suggests, a finite state machine is an abstract machine that can only exist in one of any number of (finite) states at once. Such a machine accepts any number of inputs, and, depending on their sequence, changes its internal state and produces an output.
A common example of a state machine that you’ve likely interacted within the real world is an elevator. It can either be going up or down (never both at once), and will stop in the sequence in which floors were input. Another example is a microwave. If the door is open and you press start, nothing happens. If the microwave is running and someone suddenly opens the door, it switches state from ‘running’ to ‘stopped’. Such a change in state is referred to as a transition.
But how does that relate to code? Let’s start with an example of how not to manage React state before we move on to demonstrate how useful state machines can be for simplifying your code.
How to poorly manage React state
One of the most common use-cases on the web that can benefit from the use of state machines is forms. Typically, forms exist in three different states: ‘submitting’, ‘error’, and ‘success’.
Let’s use the following simple form, which allows a user to input the number of car parts they want to order from their favorite automotive company.
import React, {useState} from "react";
import {Button, Input} from "bloomer";

function App() {

  const [numberOfCarParts, setNumberOfCarParts] = useState(0);
  const [carPartNo, setCarPartNo] = useState('');
  const [isSuccess, setIsSuccess] = useState(false);
  const [isError, setIsError] = useState(false);
  const [isLoading, setIsLoading] = useState(false);

  async function completeOrder(order){
    setIsLoading(true);
    try {
      await sendRequestToServer(order);
      setIsSuccess(true);
    }catch (e){
      setIsError(true)
    }
    setIsLoading(false);
  }

  const flipCoin = () => Math.random() < 0.5;

  async function sendRequestToServer() {
    return new Promise(((resolve, reject) => {
      setTimeout(()=> {
        if (flipCoin()) {
          reject("Oops. An error occurred");
          return;
        }

        resolve("Your order is on it's way!")
      }, 2000)
    }))
  }

    return (
        <div>
            <div>
                {
                    // only show this message if the request was completed successfully
                    isSuccess ? (
                        <p>Great! Your new car parts are on the way</p>
                    ) : isError ? (
                        <p>Sorry! an error occurred!</p>
                    ) : <span/>
                }
            </div>
            <form
                onSubmit={() => completeOrder({
                    numberOfCarParts,
                    nameOfCarPart: carPartNo
                })}>
                <label>
                    Car part number
                </label>
                <Input
                    type={'text'}
                    placeholder={'Car part number'}
                    onChange={(e)=> {
                        setCarPartNo(e.target.value)
                    }}
                />
                <label>Number of cart parts</label>
                <Input
                    onChange={(e) => {
                        setNumberOfCarParts(Number(e.target.value));
                    }}
                    placeholder={'100'}
                    min={1}
                    type={'number'}/>
                <Button
                    isLoading={isLoading}
                    isColor={'primary'}
                    type={'submit'}>
                    Complete order
                </Button>
            </form>
        </div>
    );
}

export default App;
As far as code goes, that’s not too bad.
We handle each of the three form states using booleans. Since we’re using Bulma for this project, it will handle hiding the button text and showing a spinner when isLoading is true. When our fake request is completed, it results in either an error or a success result, which is stored in state. In fact, we might be tempted to pat ourselves for a good job done, commit the code and create a pull request to merge our code to master. But let’s not get ahead of ourselves. There’s a good chance any experienced developer will smell the bad code we’ve written here from a mile away.
In computer science, there’s a phenomenon referred to as combinatorial explosion, but since we’re using booleans to handle our state, our problem is referred to as boolean explosion. The boolean explosion is the rapid increase of the complexity of a problem due to the addition of new boolean parameters/states. It happens at the rate of 2^n, where n is the number of states.
The maths works itself out like so
- 1 boolean => 2^1 = 2 states
- 2 booleans => 2^2 = 4 states
- 3 booleans => 2^3 = 8 states
- 4 booleans => 2^4 = 16 states
But the code above has just 3 states, not 8. This is owed to the fact that there are plenty of impossible states in our code that would be a pain to maintain or refactor later on. For instance, the ‘error’ and ‘success’ state will never exist together, so there’s definitely room to improve our code.
Using state machines to simplify React state
As mentioned above, finite state machines exist in a known number of states, and can only transition in a specific order. For instance, it doesn’t make sense for a form to move from an ‘error’ state to a ‘success’ state or vice versa. The order has to be ‘idle’ -> ‘submitting’ then either ‘success’ or ‘error’.
Therefore, we need to define the logic that will allow us to:
- Get rid of impossible states
- Define strict transitions in which our state is allowed to move.
To achieve this, we will start by enumerating (manually defining) the list of all possible states and their transitions:
const states = {
   idle: 'idle',
   isLoading: 'loading',
   isError: 'error',
   isSuccess: 'success'
}

const transitions = {
   [states.idle]: {
       SUBMIT_FORM: states.isLoading
   },
   [states.isLoading]: {
       SUBMIT_FORM_SUCCESS: states.isSuccess,
       SUBMIT_FORM_ERROR: states.isError
   },
   [states.isError]: {
       SUBMIT_FORM: states.isLoading
   },
   [states.isSuccess]: {
       RESET_FORM: states.idle
   }
}
We also need a function that will change the current state to whatever relevant state is next when we pass it an action.
function transition(currentState, action){
   const nextState = transitions[currentState][action];
   return nextState || currentState;
}

function updateFormState(action) {
   setCurrentState(currentState => transition(currentState, action));
}
The transition function receives the current state together with the action that we want to be performed. For instance, if we pass the parameters ‘idle’ and ‘submit’, the next state will always be ‘loading’. This will then be the new currentState. Additionally, if anyone passes an invalid action, we simply return the current state.
And, with that, we can update our code:
import React, {useState} from "react";
import {Button, Input} from "bloomer";

function App() {
    const states = {
        idle: 'idle',
        isLoading: 'loading',
        isError: 'error',
        isSuccess: 'success'
    }
    const [numberOfCarParts, setNumberOfCarParts] = useState(null);
    const [carPartNo, setCarPartNo] = useState(null);
    const [currentState, setCurrentState] = useState(states.idle);

    const transitions = {
        [states.idle]: {
            SUBMIT_FORM: states.isLoading
        },
        [states.isLoading]: {
            SUBMIT_FORM_SUCCESS: states.isSuccess,
            SUBMIT_FORM_ERROR: states.isError
        },
        [states.isError]: {
            SUBMIT_FORM: states.isLoading
        },
        [states.isSuccess]: {
            RESET_FORM: states.idle
        }
    }

    function transition(currentState, action){
        const nextState = transitions[currentState][action];
        return nextState || currentState;
    }

    function updateFormState(action) {
        setCurrentState(currentState => transition(currentState, action));
    }

    async function completeOrder(order){
        updateFormState('SUBMIT_FORM');
        try {
            await sendRequestToServer(order);
            updateFormState('SUBMIT_FORM_SUCCESS');
        }catch (e){
            updateFormState('SUBMIT_FORM_ERROR');
        }
    }

    const flipCoin = () => Math.random() < 0.5;

    async function sendRequestToServer() {
        return new Promise(((resolve, reject) => {
            setTimeout(()=> {
                if (flipCoin()) {
                    reject("Oops. An error occurred");
                    return;
                }

                resolve("Your order is on it's way!")
            }, 2000)
        }))
    }

    return (
        <div>
            <div>
                {
                    currentState === states.isSuccess ? (
                        <p>Great! Your new car parts are on the way</p>
                    ) : currentState === states.isError ? (
                        <p>Sorry! an error occurred!</p>
                    ) : <span/>
                }
            </div>
            <form
                onSubmit={() => completeOrder({
                    numberOfCarParts,
                    nameOfCarPart: carPartNo
                })}>
                <label>
                    Car part number
                </label>
                <Input
                    type={'text'}
                    placeholder={'Car part number'}
                    onChange={(e) => {
                        setCarPartNo(e.target.value)
                    }}
                />
                <label>Number of cart parts</label>
                <Input
                    onChange={(e) => {
                        setNumberOfCarParts(Number(e.target.value));
                    }}
                    placeholder={'100'}
                    min={1}
                    type={'number'}/>
                <Button
                    isLoading={currentState === states.isLoading}
                    isColor={'primary'}
                    type={'submit'}>
                    Complete order
                </Button>
            </form>
        </div>
    );
}

export default App;
So far, we have managed to get rid of a ton of complexity, but we’re not there yet. We have reduced the number of states we track from 8 to just one. But our solution still isn’t ideal.
Say we wanted to add a new state to our form. We would first have to add it to our states object then add it to the transitions object together with its corresponding transitions. This same kind of syncing would also happen if we wanted to rename one of the state objects. To rename isLoading to isSubmitting, for example, we would have to rename it in two places, which, again, makes refactoring a pain in the butt.
It’s even worse if you consider the implication of implementing a different component using state machines. You would have to create separate transitions for that component as well, then keep it in sync with its own state enum, which isn’t ideal.
Instead, let’s move on to the final part of our journey with state machines.
Using XState to manage finite state machines
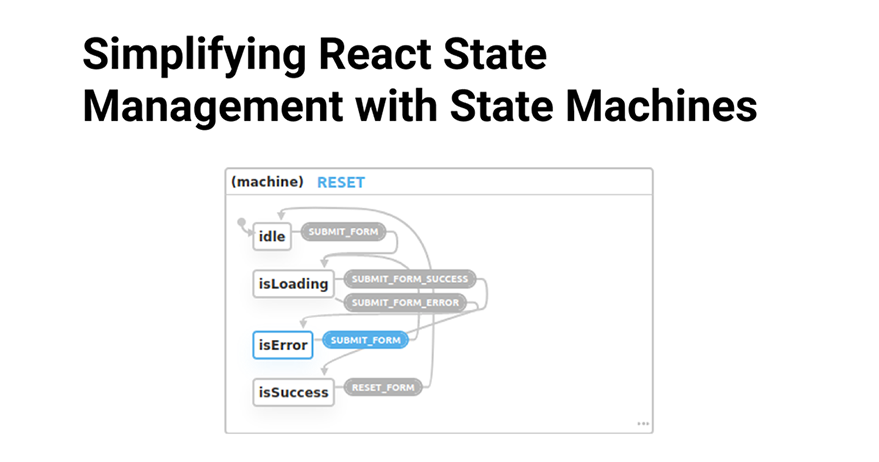
XState is a library that encapsulates all the logic for creating, interpreting, and executing finite state machines. It can also generate state machine diagrams to help you visualize how your program is going to run. To install it, run:
npm install xstate @xstate/react
First, let’s define all the states the form is going to exist in:
const formMachine = new Machine({
   initial: 'idle',
   states: {
       idle: {},
       isLoading: {},
       isError: {},
       isSuccess: {},
   }
})
Next, we define all the transitions we want our form to exist in
const formMachine = new Machine({
   initial: 'idle',
   states: {
       idle: {
           on: {
               SUBMIT_FORM: 'isLoading'
           }
       },
       isLoading: {
           on: {
               SUBMIT_FORM_SUCCESS: 'isSuccess',
               SUBMIT_FORM_ERROR: 'isError'
           }
       },
       isError: {
           on: {
               SUBMIT_FORM: 'isLoading'
           }
       },
       isSuccess: {
           on: {
               RESET_FORM: 'idle'
           }
       },
   }
})
This looks a lot like the function we wrote before and reads just the same. From the idle state, we transition to the isLoading state when a SUBMIT_FORM action is called. From the isLoading state, we transition to either isSuccess or isError depending on the action supplied to the machine, and so on.
All that’s left is to hook up the machine to XState.
const [currentState, send] = useMachine(formMachine);
currentState is an object provided by XState that gives us access to a .matches, which allows us to check for the current internal state of the machine. send is a function that accepts the action that we want to be executed. It’s used like so:
const  updateFormState = (action)=> send(action)

async function completeOrder(order){
   updateFormState('SUBMIT_FORM');
   try {
       await sendRequestToServer(order);
       updateFormState('SUBMIT_FORM_SUCCESS');
   }catch (e){
       updateFormState('SUBMIT_FORM_ERROR');
   }
}
With that, here is the final result:
import React, {useState} from "react";
import {Button} from "bloomer";
import {Machine} from "xstate";
import {useMachine} from "@xstate/react";

const formMachine = new Machine({
   initial: 'idle',
   states: {
       idle: {
           on: {
               SUBMIT_FORM: 'isLoading'
           }
       },
       isLoading: {
           on: {
               SUBMIT_FORM_SUCCESS: 'isSuccess',
               SUBMIT_FORM_ERROR: 'isError'
           }
       },
       isError: {
           on: {
               SUBMIT_FORM: 'isLoading'
           }
       },
       isSuccess: {
           on: {
               RESET_FORM: 'idle'
           }
       },
   }
})

function App() {

   const [numberOfCarParts, setNumberOfCarParts] = useState(null);
   const [currentState, send] = useMachine(formMachine);

   const  updateFormState = (action)=> send(action)

   async function completeOrder(order){
       updateFormState('SUBMIT_FORM');
       try {
           await sendRequestToServer(order);
           updateFormState('SUBMIT_FORM_SUCCESS');
       }catch (e){
           updateFormState('SUBMIT_FORM_ERROR');
       }
   }

   const flipCoin = () => Math.random() < 0.5;

   async function sendRequestToServer() {
       return new Promise(((resolve, reject) => {
           setTimeout(()=> {
               if (flipCoin()) {
                   reject("Oops. An error occurred");
                   return;
               }

               resolve("Your order is on it's way!")
           }, 2000)
       }))
   }

   return (
       <div>
           <div>
               {
                   // only show this message if the request was completed successfully
                   currentState.matches('isSuccess') ? (
                       <p>Great! Your new car parts are on the way</p>
                   ): currentState.matches('isError') ? (
                       <p>Sorry! an error occurred!</p>
                   ): <span/>
               }
           </div>
           <form onSubmit={() => completeOrder({
               numberOfCarParts
           })}>
               <label>Number of cart parts</label>
               <input
                   onChange={(e) => {
                       setNumberOfCarParts(Number(e.target.value));
                   }}
                   placeholder={100}
                   min={1}
                   type={'number'}/>
               {
                   // don't show the submit button when
                   // the form is loading
                   <Button
                       isColor={'primary'}
                       isLoading={currentState.matches('isLoading')}
                   >

                   </Button>
               }
           </form>
       </div>
   );
}

export default App;
In this article, we’ve covered a simple use-case for managing React state with state machines.
More complicated applications might leverage some of the XState library’s more advanced functionality. You can have machines communicate with each other and invoke callbacks or promises in response to different events being completed. Since this was meant to be an introductory article, it hasn’t covered those use cases, but the XState documentation does a good job of covering a lot of different applications.
Conclusion
Managing state in React isn’t always straightforward, especially when using react hooks. State machines help to take a lot of complexity out of the equation by defining all possible states a component can be in, eliminating impossible states and preventing boolean explosions in the process.
They can be used to define behaviour for pretty much every kind of component – modals, forms, menus, buttons… e.t.c. Using XState, you can also visualize your component in diagram form. This allows you to map out your whole component before you even write a line of code.


