Defenition: POS – “Point of Sale”. At the point of sale, the merchant calculates the amount owed by the customer, indicates that amount, may prepare an invoice for the customer (which may be a cash register printout), and indicates the options for the customer to make payment.
In the previous chapters, we integrate the React table with the react-table package and added more dynamic features to it which made the Table. In this chapter, we are going to continue from where we left off from the previous chapter intuitive with a plethora of functionalities.
In this chapter, we are going to continue from where we left off from the previous chapter. We are going to work on Role-Based Access Control (RBAC) feature for our react app. We are going to have two roles for now: admin and employee.
- Admin can control everything in the app.
- Employees can only view specific screens and perform specific functions.
The implementation of the employee role is simple as we already have fields that specify user roles. We are going to use those user roles for conditional rendering with the react-rbac-guard package. This package solves our problem easily and makes things easier while conditional rendering. The sole purpose of this package is to manage the visibility of particular components depending on user credentials.
We are going to work on the frontend section of the project for this chatter.
So, let’s get started!
Installing RBAC package
First, we need to install the react-rbac package by running the following command in our project terminal:
yarn add react-rbac-guard
Fortunately, they provide a demo as well which helps a lot to implement in our project.
Defining Roles
Now, we are going to define the two roles as mentioned above. It is going to be an array named Roles with object defining role name and credentials as displayed in the code snippet below:
File: src/constants/index.js

export const Roles = [
  { name: "Admin", credentials: "admin" },
  { name: "Staff", credentials: "staff" },
]
Here, we have defined the role array in the index.js file.
Next, we need to copy the sample code from the demo that handles RBAC and paste it on the components folder as directed in the folder structure screenshot below:
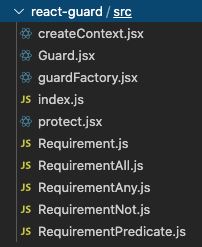
Now, we need to create a create Requirement.js file in the component folder and we import Requirement class from the demo folder that we copied before. Then, we use the Requirement module in order to compare roles that use to decide whether to render the component for users or not. Here, we have created and exported two conditional objects NeedAdmin and NeedStaff for handling the conditional rendering as shown in the code snippet below:
import { Requirement } from "./react-guard/src";

class MyRequirement extends Requirement {
    constructor(credentials) {
        super();
        this.credentials = credentials;
    }
isSatisfied(credentials) {
        return this.credentials === credentials;
    }
}
const NeedAdmin = new MyRequirement("admin");
const NeedStaff = new MyRequirement("staff");
export { NeedAdmin, NeedStaff };
next, we gonna use on sidebar open sidebar component and we start with import three files that we create to this
import {
  CredentialProvider,
  Guard,
  any,
  not,
  guardFactory,
  protect
} from "../react-guard/src";
import { NeedAdmin, NeedStaff } from "../requirements";
import { Roles } from '../../constants/'
Next, we need to define the state called role and object for handling the renders using the useState hook from react and guardFactory functional module from the RBAC package as shown in the code snippet below:
  const [role, setRole] = useState([])
  const Admin = guardFactory(NeedAdmin);
  const Staff = guardFactory(NeedStaff);
Then, we need to grab the role data from local storage and compare it with the Role objects that we imported. After that, we need to assign the compared value outcome to the role state as shown in the code snippet below:
const getcurrentRole = () => {
    let token = localStorage.getItem("token");
    var base64Url = token.split(".")[1];
    var base64 = base64Url.replace(/-/g, "+").replace(/_/g, "/");
    var jsonPayload = decodeURIComponent(
      atob(base64)
        .split("")
        .map(function (c) {
          return "%" + ("00" + c.charCodeAt(0).toString(16)).slice(-2);
        })
        .join("")
    );
    let { level } = JSON.parse(jsonPayload);
    let currentRole = Roles.find(e => e.credentials === level)
    setRole(currentRole)
  }
We also need to trigger the compare function getcurrentRole every time the component loads. Hence, we are going to call the function inside the useEffect hook as directed in the code snippet below:
useEffect(() => {
    getcurrentRole()
  }, [])
Using conditional rendering is simple and easy. Now, we just need to wrap the view with context class and pass the role. Here, we wrap the CreentialProvider component with value prop of role credential inside which we have wrapped the sections that we want to show to admin using the Admin component. The implementation can be seen in the code snippet below:
<CredentialProvider value={role.credentials}>
                <Admin>
                <li className="nav-item">
                  <Link to="/posmachine" className="nav-link">
                    <i className="nav-icon fas fa-th" />
                    <p>Pos Machine</p>
                  </Link>
                </li>
              </Admin>
              <Admin>
                <li className="nav-item">
                  <Link to="/branch" className="nav-link">
                    <i className="nav-icon fas fa-building" />
                    <p>Branch</p>
                  </Link>
                </li>
              </Admin>
</CredentialProvider>
And finally, in order to show that it works on different user roles, we update the header to show the user role. For that, we need to go to the Header component and extract user data from the token that is being stored store on local storage as directed in the code snippet below:
const [role, setRole] = useState("")
  const [username, setUsername] = useState("")
  useEffect(() => {
    getcurrentRole()
  }, [])
  const getcurrentRole = () => {
    let token = localStorage.getItem("token");
    var base64Url = token.split(".")[1];
    var base64 = base64Url.replace(/-/g, "+").replace(/_/g, "/");
    var jsonPayload = decodeURIComponent(
      atob(base64)
        .split("")
        .map(function (c) {
          return "%" + ("00" + c.charCodeAt(0).toString(16)).slice(-2);
        })
        .join("")
    );
   let { level, username } = JSON.parse(jsonPayload);
    setUsername(username)
    setRole(level)
}
Then, we attach the role in the menu dropdown for the user as displayed in the code snippet below:
<li className="nav-item dropdown">
          <a className="nav-link" data-toggle="dropdown" href="#">
            <i className="far fa-user" /> Hello,{role} {username}
          </a>
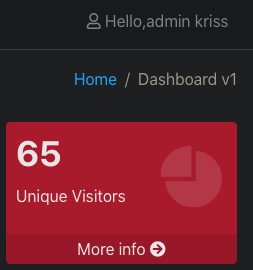
Now, whenever we log in to the app, we will see the role and username as displayed in the screenshot below:
Now it is time for testing to see if the conditional rendering works for staff as well. The testing process is displayed in the following screenshot demo:
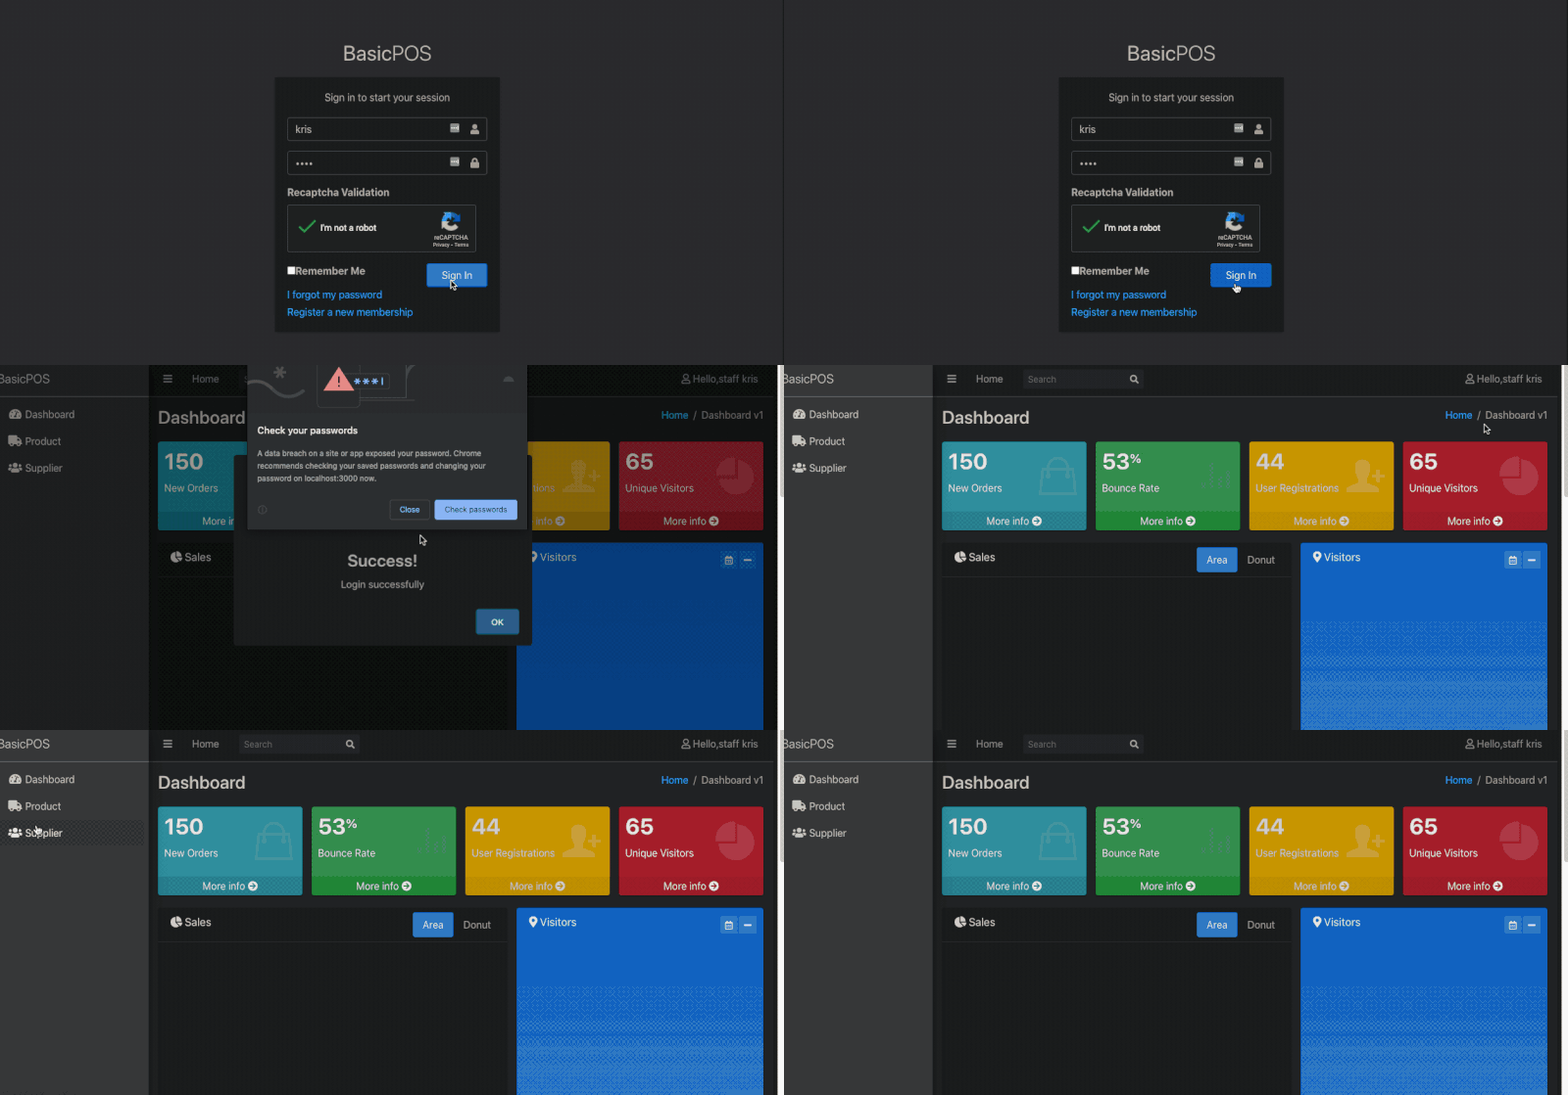
Here, we can see that whenever we log in as staff or an employee, we only get three menu options on the left sidebar. This proves that our implementation works.
The work here was simple and easy to understand. We successfully implemented the role-based access control using the objects and modules from the react-rbac-guard package.
Your challenge…
Now for the next step, you can implement this role-based access control for the staff. You can use it to render out the portions that you don’t want your staff to access. Make sure to clone this app and study the codes. I am eagerly waiting to review your work
Conclusion
This tutorial has been long and interesting. But it does not end here. We implemented lots of functionality in our POS system. In previous chapters, we dealt with functionalities of the React table and made it efficient, dynamic, and full-fledged. This chapter was something new. We got detailed guidance on how to make use of components and modules from the react-rbac-guard package to implement the role-based access control for the admin and staff roles. The method was made pretty easy by the package with a great concept to grab as well.
In our next chapter, we will continue our work on an important section that is the drawer screen which we are going to use for calculating sales and orders.
The coding implementations used in this tutorial chapter are available on Github.
See you in the next chapter! Peace out!


