Decision making is an important part of life. Many times you have to make decisions that will decide your next actions.
We do it in programming too.
Generally, the code executes from top to bottom. But sometimes you have to make some decisions that will decide which block of code executes first and which one later.
Control flow statements come to your help at that time.
Control flow statements let you control the flow of the execution of the code in your program. In Java programming language, you can control the flow of execution of the code by placing the decision making, branching, looping, and adding conditional blocks.
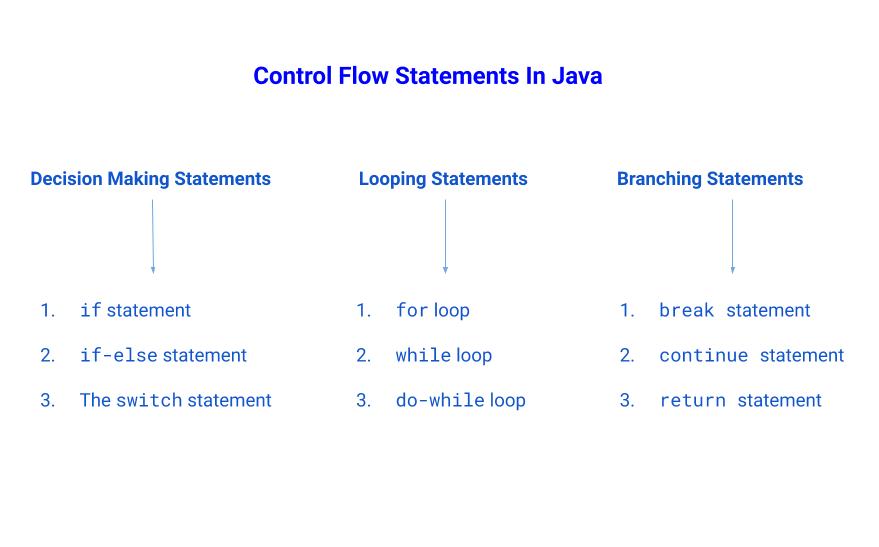
Based on this, we can classify the types of control flow statements as follows:
- Decision Making Statements
- Looping Statements
- Branching Statements

1. Decision Making Statements
We generally use decision-making statements when we have to decide which block of the code will be executed.
There are three types of decision-making statements.
ifstatementif-elsestatement- The
switchstatement
1. if statement
if statement is the most basic decision-making statement in the java programming language.
The syntax for the if statements is as given below:
if ( condition ){
	----
	code to be executed
	----
}
There are two possible values of the condition, i.e. true and false.
The code block after the if statement will execute only if the value of the condition statement is true. If the value of the condition statement is false, the code block will not be executed.
Let’s see an example of the ‘if’ statement:
/*
 * A Java program to show an example of the
 * if statement.
 */

public class GreaterStatus {

	public static void main(String[] args) {

		int number1 = 3;
		int number2 = 9;

		if(number1<number2) {
			System.out.println("The number1 is less than the number2.");
		}

	}

}
The output of the above program will be
The number1 is less than the number2.
We are getting this input because the condition statement number1<number2 evaluates to true hence the block of the code will be executed.
2. if-else statement
if-else statement is somewhat similar to the if statement, we are just adding an extra block of the code after the if statement.
If the value of the condition statement is true, the if block will be executed, else the else block will be executed.
Let’s see the syntax for if-else statement below:
if (condition statement) {
	---
	code to be executed
	---

} else {
	---
	code to be executed
	---
}
Below, I have given an example of the if-else statement:
package com.coderolls.java.blogexample;
/*
 * A Java program to show an example of the
 * if-else statement.
 */

public class GreaterStatus {

	public static void main(String[] args) {

		int number1 = 14;
		int number2 = 9;

		if(number1<number2) {

			System.out.println("The number1 is less than the number2.");
		} else {

			System.out.println("The number1 is equal or greater than the number2.");
		}

	}

}
The out of the above program will be:
The number1 is equal or greater than the number2.
We are getting this output because the value of the condition statement number1<number2 is false hence the else block of code executed.
Nested if-else
In this type of if-else statement, we are nesting one if-else block in another if-else block. Either you can put your if-else block in the outer if block or else block.
Let’s see the syntax for a better understanding of the nested if-else statement. Here we are adding an extra if-else block in the outer if block.
if(condition 1){

	-----

	if(condition 2){

		-----
		code to be executed
		-----
	} else{

		-----
		code to be executed
		-----
	}

	-----

} else {

	-----
	code to be executed
	-----

}
In the above syntax, if the value of condition 1 is true, then only condition 2 will be checked. If the value of the condition 1 is false, then the outer else block will be executed.
Below, I have given an example of the nested if-else statement, as per the syntax shown above.
/*
 * A Java program to show an example of the
 * nested if-else statement.
 */

public class GreaterStatus {

	public static void main(String[] args) {

		int number1 = 4;
		int number2 = 9;

		if(number1<number2) {

			if(number1< 5) {

				System.out.println("The number1 is less than 5.");
			}else {

				System.out.println("The number1 less than number2 and  greater than or equal to 5.");
			}
		} else {

			System.out.println("The number1 greater than or equal to number2");
		}

	}

}
The output of the above program will be,
The number1 is less than 5.
We are getting this input because condition 1 in the outer if statement is true hence the control enter in the outer if block and checks for condition 2.
Now the value of condition 2 is also true, so the ‘The number1 is less than 5.’ is printed as output.
As I said earlier, you can also put the if-else block in the outer else block. The syntax for the same is shown below:
if(condition 1){

	-----
	code to be executed
	-----

} else {

	-----

	if(condition 2){

		-----
		code to be executed
		-----
	} else{

		-----
		code to be executed
		-----
	}

	-----

}
If the value of condition 1 is true, then the outer if block will be executed.
If the value of condition 1 is false, the control goes in outer else block and condition 2 will be checked.
I have given below an example of the nested if-else statement as per the above syntax.
/*
 * A Java program to show an example of the
 * nested if-else statement.
 */

public class GreaterStatus {

	public static void main(String[] args) {

		int number1 = 10;
		int number2 = 9;

		if(number1<number2) {

			System.out.println("The number1 is less than the number2.");
		} else {

			if(number1 == number2) {

				System.out.println("The number1 is equal to the number2.");
			}else {

				System.out.println("The number1 is equal or greater than the number2.");
			}

		}

	}

}
The output of the above program will be:
The number1 is equal or greater than the number2.
We are getting this input because the value of condition 1 is false hence the control enters in outer else block.
In the outer else block, the value of condition 2 is also false hence the inner else block executed.
3. The switch statement
We have seen the if-else statement above. If the condition is true, then only the if block will be executed, else the else block will be executed.
In the switch statement, there could be several execution paths.
I have given an example of the switch statement.
/*
 * A Java program showing the example of the
 * switch statement.
 */
public class SwitchExample {

	public static void main(String[] args) {


		int rollNumebr = 3;

		String studentName;

		switch(rollNumebr) {

			case 1: studentName = "Rahul";
			break;

			case 2: studentName = "Santosh";
			break;

			case 3: studentName = "Gaurav";
			break;

			case 4: studentName = "Chaitanya";
			break;

			case 5: studentName = "Vishal";
			break;

			default : studentName = "Invalid roll number";
			break;

		}

		System.out.println("The name of the student is "+studentName+"!");

	}

}
The output of the above program will be:
The name of the student is Gaurav!
We are getting this input because the third case got executed. The break statement terminates the flow, and the rest of the conditions will not be checked. Finally, the last print statement got executed.
2. Looping Statements
We have seen all the decision-making statement, these statements make a decision and execute the block of the code based on that decision.
In looping statements, we are making a decision and executing the block of code multiple times. Until the condition is true, we are looping over the block of the code.
Each time we will check if the result of our decision statement is true or not, until and unless the result is true, we will execute the block of the code.
We can classify the lopping statements as follows:
forloopwhileloopdo-whileloop
1. for loop
In the for loop, we are going to check the value of the condition statement. If the value is true, the block of the code will be executed.
After the successful execution of the code block, control again goes to the condition statement. Now, if the value is true, again the block of the code will be executed.
Also, we are declaring one variable which stores the number of iteration. Each time the for loop runs, the value of i will be increased or decreased.
Below, I have given the syntax for the for loop.
for(init variable declaration ; condition ; increment /decrement){

	----
	code to be executed
	----

}
In the above syntax, init is the variable initialization, the condition is the condition statement with its possible values true or false, and the last there is an increment or decrement operator, that will increment or decrements the variable.
I have given an example of the for loop below.
/*
 * A Java program showing an exampple of the
 * for loop.
 */
public class ForExample {

	public static void main(String[] args) {

		for(int i = 0; i<=2; i++) {
			System.out.println(i+". My name is Gaurav!");
		}
	}

}
The output of the above program will be,
0. My name is Gaurav!
1. My name is Gaurav!
2. My name is Gaurav!
The above for loop will run until the value of i is less than or equal to 2. Once the value of i is greater than 2, i.e. at i=3, the for loop will not run.
Hence the for loop runs for 3 iterations i.e. 0. 1 and 2, and you can see the three print statements.
2. while loop
In a while loop, we do apply the initialization, condition statement and an increment or decrement operator like the for loop but the syntax is a little bit different.
The syntax of the while loop is given below.
init variable declaration

while (condition){

	----
	code to be executed
	----

	increment or decrement statement

}
We will see the same example for the while loop, that we have checked previously for the for loop.
/*
 * A Java program showing an exampe of the
 * while loop.
 */
public class WhileExample {

	public static void main(String[] args) {

		int i = 0;
		while(i<=2) {

			System.out.println(i+". My name is Gaurav!");

			i++;
		}

	}

}
The output of the above program will be:
0. My name is Gaurav!
1. My name is Gaurav!
2. My name is Gaurav!
In the first line of the code, we are initializing a variable i of integer type with the value 0.
In the next statement, we are checking the condition, if the value of the condition statement is true, the block of code will be executed.
When looking at the block of the code, at the end of the block you can see an increment operator, the value of i will increase by one, and the control goes to the condition statement. If the value of i is less than the 2, the block of code executes and so on.
When the value of the condition statement is false, the control goes to the next line of code after the while loop.
3. do-while loop
In the while loop, we are checking the condition statement first and then executing the block of code.
But in the do-while loop, we are first executing the block of code and then checking the condition.
If the value of the condition statement is true, the control goes at the starting of the code block, and the whole block of the code will be executed. Once the value of the condition statement is false, the control goes to the next line of code after the do-while loop.
I have given below the syntax for the do-while loop:
init variable declaration

do {
	----
	code to be executed
	----

} while ( condition statement}
We will continue with the same example for the do-while loop:
/*
 * A Java program showing an example of the
 * do-while loop.
 */
public class DoWhileExample {

	public static void main(String[] args) {

		int i = 0;
		do {

			System.out.println(i+". My name is Gaurav!");

			i++;

		}while (i<=2);

	}

}
The output of the above program will be:
0. My name is Gaurav!
1. My name is Gaurav!
2. My name is Gaurav!
In the above code, you can see that the for loop runs for 3 iterations i.e. 0. 1 and 2 hence you can see the three print statements.
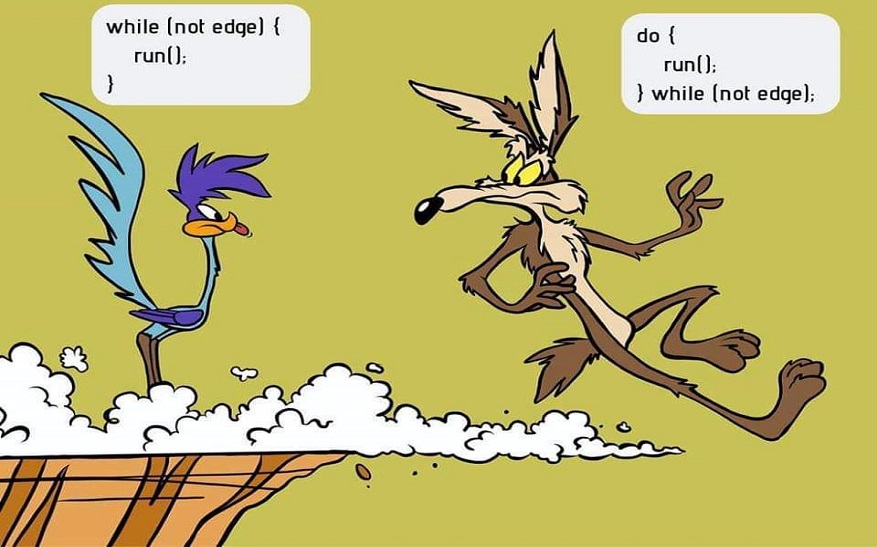
The difference between the while and do-while loop is, in a while loop, we check the condition and executes the block of code, but in the do-while loop, we first execute the block of code and then check the condition.
You can see the below cartoon to understand the while and do-while loop.

Note: for-each loop
There is an updated version of the for loop called for-each loop.
We know to iterate over a collection with a simple for loop is really confusing, so Java introduces the for-each loop. We can use the for-each loop to iterate over the Arrays and Collections.
The syntax for the for-each loop is given below:
for(type element: collection or Array){

     code to work with the element will go here
}
Also, I have given a simple example of the for-each loop below:
/*
 * A Java program showing an example of
 * the for-each loop.
 */
public class ForEachExample {

	public static void main(String[] args) {

		String[] students = {"Gaurav", "Swapnil", "Abhishek", "Vishal"};

		for(String student : students) {

			System.out.println(student);
		}

	}
}
The output of the above program will be:
Gaurav
Swapnil
Abhishek
Vishal
In the above program, we are iterating over an array, students. We have printed out the name of the array element i.e student using the for-each loop.
3. Branching Statements
Now we will see the branching statements. There are three types of the branching statements,
breakstatementcontinuestatementreturnstatement
1. break statement
break statement terminates the control flow. Usually, we do use the break statement to terminate the flow of for, while and do-while loop.
I have given an example of the break statement below:
/*
 * A Java program showing an example of the
 * simple break statement.
 */
public class BreakExample {

	public static void main(String[] args) {

		for(int i = 0; i<=5; i++) {

			if(i == 4) {
				break;
			}

			System.out.println(i+". My name is Gaurav!");
		}

	}
}
The output of the above program will be:
0. My name is Gaurav!
1. My name is Gaurav!
2. My name is Gaurav!
3. My name is Gaurav!
In the above example, the break statement will terminate the flow if the value of i will be equal to 4. Hence you can the statements up to statement index 3, i.e. 0, 1, 2, and 3.
Labeled break Statement
The simple break statement terminates the innermost for loop, but if you want to break the outer for a loop when the condition fulfills in the inner for loop, you can use the labeled break statement.
Below I have given an example of the labeled break statement with the for loop:
/*
 * A Java program showing an example of the
 * labeled break statement.
 */

public class LabeledBreakExample {

	public static void main(String[] args) {

		search:                                // label
		for(int i=0; i<=3; i++) {

			System.out.println("Group of statements , batch "+i);

			for(int j=0; j<=2; j++) {

				if(i==1 && j==1) {

					break search;            // Use label with break statement

				}

				System.out.println(j+". My name is Gaurav!");
			}
		}
	}
}
The output of the above program will be:
Group of statements, batch 0
0. My name is Gaurav!
1. My name is Gaurav!
2. My name is Gaurav!


Group of statements, batch 1
0. My name is Gaurav!
In the above example, we can see the break statement in the inner for loop with the search label. When condition fulfills .i.e when the j and i will be equal to 1, the break statement will terminate the flow of the inner for loop as well as the outer for loop.
This is happening just because we have placed the label search above the outer for loop. Hence the break statement is terminating the flow of both the for loop.
As per your requirement, you can place the label with the simple code block and mention that label with the break statement.
2. continue statement
continue statement skips the current iteration of the for, while and do-while loop. The simple continue statement skips the iteration of the innermost loop and sends the control back to the condition statement.
The code after the continue statement will not be executed for the current iteration.
Below I have given an example for the continue statement:
/*
 * A Java program showing an example oft the
 * continue statement.
 *
 * In this program we are counting the
 * number of occurrences of the character 'a'
 * in the inputString using the continue statement;
 */

public class ContinueExample {

	public static void main(String[] args) {

		String inputSttring = "Gaurav Kukade";
		int count = 0;

		for(int i=0; i<inputSttring.length(); i++) {

			if(inputSttring.charAt(i) != 'a') {
				continue;
			}

			count++;
		}

		System.out.println("We found 'a' in the inputString '"+inputSttring+"', "+count+ " times.");
	}

}
The output of the above program will be:
We found 'a' in the inputString 'Gaurav Kukade', 3 times.
In the above example, we are trying to count the number of occurrences of the character ‘a’.
We are iterating over the intputString using the for loop.
In the for loop we have added a condition to check if the character at the current index is ‘a’ or not.
If the character at the current index is not ‘a’, we will execute the continue statement, which will skip the current iteration. If the character at the current iteration is ‘a’, then we will increase the count by one.
At last, we will get the number of times character ‘a’ comes in the inputString.
Labeled continue statement
We know the simple continue statement only skips the current iteration of the innermost loop. But when you have skipped the iteration of both inner loop as well as the outer loop, you can use the labeled `continue` statement.
The syntax for the labeled continue statement is similar to the labeled break statement.
3. The return statement
`return` statement can be found at the bottom line of the method.
The return statement exits from the current method and control flow return to the line from which the method was invoked.
You can write a `return` statement in the following ways:
return;

return var;

return <an expression>;
for ex. return num1>num2;
The first return statement simply exits from the method, and the control flow goes to the line from which the method was invoked.
The second `return` the statement simply exits from the current method and returns the value of the variable. The control flow will go back to the line from which the method was invoked, and the returned value will be assigned to the variable at that line.
The third statement is similar to the second return statement, but instead of the variable, we are placing an expression. The expression will be evaluated before the exiting from the current method, and the result of the expression will be returned.
Below I have given an example of the return statement.
/*
 * A Java program showing an example of the
 * return statement.
 */
public class ReturnExample {

	public static void main(String[] args) {

		String name = getMyName();

		int numberOfCities = numberOfCities();


		System.err.println("My name is "+name+". I have travelled to "
		+numberOfCities+" different cities last year!");

	}

	static String getMyName() {

		String yourName = "Gaurav";

		return yourName; // returning variable
	}

	static int numberOfCities() {

		return 2 + 1; // evaluating an expression and returning the value
	}

}
The output of the above program will be:
My name is Gaurav. I have travelled to 3 different cities last year!
In the above example, I am returning the variable name of type string in the first method.
In the second method, I have written expression in the return statement. When control comes to the return statement, the expression got evaluated and the result i.e. 3 will be returned.
Conclusion
Controlling the flow of execution is one of the most important parts of the programming languages.
We have seen the control flow statements in the Java language.
In Java language, there are a total of three types of control flow statements. I have listed them below.
- Decision Making Statements
- Looping Statements
- Branching Statements
Decision-making statements can be classified as if, if-else, and switch statements.
Looping statements can be classified as for, while, and do-while loop.
Branching statements can be classified as break, continue, and return statement.
There is an enhanced version of the `for` loop, called a `for-each` loop. It came in Java 5. We can use the `for-each` loop to iterate over the Arrays and collections.
What is your experience while using the control flow statements? Please write down in the comment section below.


Bro you’re really using an image of Auschwitz for your Java Tutorial?
wait, is this Auschwitz? how do you know?
Referencing to his further photos on unsplash, i think it’s quite obvious: https://unsplash.com/@filippobonadiman
Hello brother, I am really sorry, I didn’t know the pic is from ‘Auschwitz’.
I chose this pic from Unsplash.com because of rails that show the analogy of the control flow statements.
Again, sorry!
No problem. I think these images were trending on unsplash, since it has been the 75th anniversary of the relief through the Red Army. Poor tagging from the photographer btw.
changed, mate, sorry it took so long.