
One of the simplest ways to make money from apps is through Advertisements. Hence, we have a popular ads network for mobile that is Admob. There are many ways to implement ads in our app. We can simply pick some ideas from the play store and implement them. In this chapter, the idea is to display ads on our app screen and force a user to watch the ad video in order for them to read the post content freely.
So, let’s get started!
Setup Admob package
First, we need to set up the Admob package. Since Admob became the part of Firebase family, we can install Admob package from Firebase by running the following command in our project terminal:
yarn add @react-native-firebase/admob
Find Publisher ID
Next, we need to configure the AdMob publisher in order to acquire publisher ID. We can find the publisher ID on the AdMob dashboard. Hence, we need to create two apps for both Android and iOS as shown in the Google Admob dashboard screenshot below:

Admob dashboardIn order to store the publisher ID in our app, we need to create firebase.json in the root directory as shown in the screenshot below:

And, inside the firebase.js file, we need to add a JSON structure with android id and ios id as shown in the code snippet below:
{
   "react-native": {
       "admob_android_app_id": "ca-app-pub-2547344479047582~8100137404",
       "admob_ios_app_id": "ca-app-pub-2547344479047582~6461027414"
   }
}
Setup on iOS
For iOS, we need to navigate to the ios directory and run the following command:
cd ios/ && pod install ; cd ..
Installation on Android
For android, we may need to link the Admob package to native configurations. For that, we need to run the following link command:
react-native link @react-native-firebase/admob --platforms android
Display Banner
First, we are going to create a banner unit from the Admob dashboard as shown in the screenshot below:

Now, we are going to use a context hook again because the banner needs to be included on every screen. Hence, we need to import the Admob component in order to create a banner and TestIds for testing publisher id. Here, we are going to use the Platform component to detect the operating system and use the right publisher id as shown in the code snippet below:
import React, { createContext } from 'react';
import { BannerAd, BannerAdSize,TestIds } from '@react-native-firebase/admob';
const banner_id =
   Platform.OS === 'ios'
       ? 'ca-app-pub-25473444792'
       : 'ca-app-pub-2547344479';
export const AdmobContext = createContext();
export const AdmobController = ({ children }) => {
Next, we need to create a function to contain Banner Ads as shown in the code snippet below:
const renderBanner = () => {
       return (
           <BannerAd style={{ alignItems: 'center', justifyContent: 'center', alignSelf: 'center' }}
              unitId={TestIds.BANNER}
               size={BannerAdSize.SMART_BANNER}
               onAdLoaded={() => {
                   console.log('Advert loaded');
               }}
               onAdFailedToLoad={(error) => {
                   console.log('Advert failed to load: ', error);
               }}
           />
       )
   }
Here, we have used the BannerAd component with unitID, size, onAdLoaded and onAdFailedtoLoad props configured.
Now, we need to use the Provider of AdmobContext with renderBanner function in the value prop as shown in the code snippet below:
return (
       <AdmobContext.Provider value={{ renderBanner}}>
           {children}
       </AdmobContext.Provider>
   );
};
In order to inject context to the root component, we need to import AdmobController in App.js as shown in the code snippet below:
import { AdmobController } from './src/components/AdmobController';
In order to inject context to the root component, we need to import AdmobController in App.js as shown in the code snippet below:
return (
   <AdmobController>
     <NetworkController>
       <ThemeController>
         <Navigators />
       </ThemeController>
     </NetworkController>
   </AdmobController>
 )
}
Now, in order to check if the AdBanner works, we need to go to the Home screen and import AdmobContext first as shown in the code snippet below:
import { AdmobContext } from '../components/AdmobController'
Then, we need to get the renderBanner function from the AdmobContext using useContext hook as shown in the code snippet below:
let { renderBanner } = useContext(AdmobContext)
Now, we can try and display a banner after every three posts using the following piece of code:
                  renderItem={({ item ,index}) => (
                       <React.Fragment>
                           <FlatlistItem item={item} navigation={navigation} />
                           { index % 3 == 0 ? renderBanner() : <React.Fragment />}
                       </React.Fragment>
                   )}
Hence, we will get the following result on our Home screen:
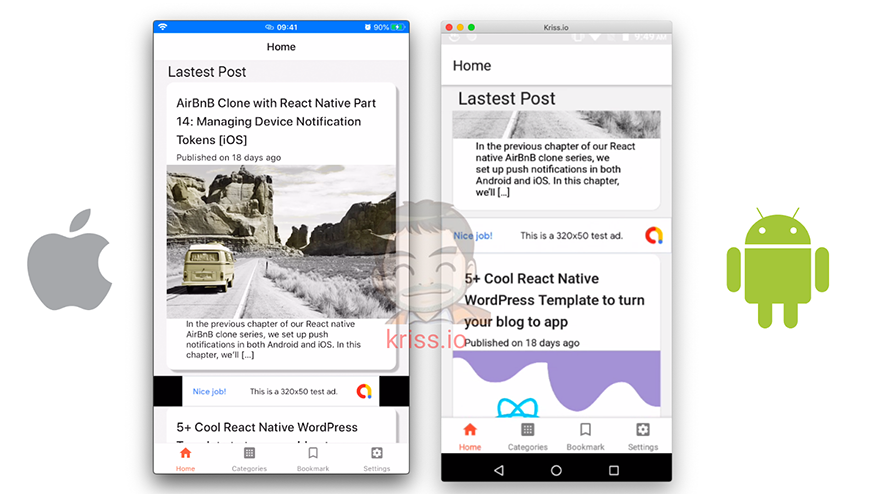
Admob in react nativeHere, we can see the AdBanner below the post.
Ad Banner in Single Post Screen
The process of adding an Ad banner to the SinglePost.js screen is the same as that of the Home Screen. First, we need to import AdmobContext as shown in the code snippet below:
import { AdmobContext } from '../components/AdmobController'
Then, we need to get the renderBanner function from the AdmobContext using useContext hook as shown in the code snippet below:
let { renderBanner } = useContext(AdmobContext)
Then, we need to call the function somewhere between the screen UI elements. Here, we have called the function just above the ImageLoad component as shown in the code snippet below:
             </Card.Content>
              {renderBanner()}
                   <ImageLoad
                       style={{ width: '100%', height: 250 }}
                       loadingStyle={{ size: 'large', color: 'grey' }}
                       source={{ uri: post[0].jetpack_featured_media_url }}
            />
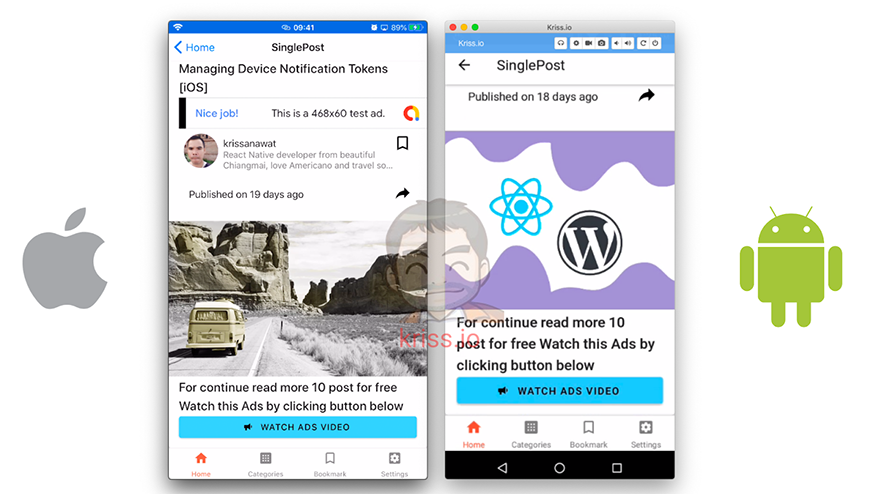
Hence, we will get the following result in our SinglePost screen:

Watch video ads in exchange to read more post
This can be a fun part for the app developer but annoying for the users. Here, we are going to force the user to watch an ad after they reach and access 10 posts. In this chapter, we are going to utilize AsyncStorage in order to store the accessed post score.
First, we import Asyncstorage as shown in the code snippet below:
import AsyncStorage from '@react-native-community/async-storage';
Then, we are going to start an initial free posts counter in App.js. Here, we need to check for the counter if it exists or not to create a new one as shown in the code snippet below:
async function initPoint() {
   let initPoint = await AsyncStorage.getItem('yourcanreadfreepost');
   if (initPoint == null) {
     await AsyncStorage.setItem('yourcanreadfreepost', '10')
   }
 }
Back in the AdmobController, we import another ad type RewardedAd from the Admob package that provides users with rewards when they watch an ad video for a certain period.
We must not forget to create an Ad unit in the Admob dashboard. The code with RewardedAd and RewardedAdEventType is shown in the code snippet below:
import { BannerAd, BannerAdSize, TestIds, RewardedAd, RewardedAdEventType } from '@react-native-firebase/admob';
const unitId =
   Platform.OS === 'ios'
       ? 'ca-app-pub-2547344479047582/1964568575'
       : 'ca-app-pub-2547344479047582/3578793688';
Now, we need to create a new state to handle reward points as shown in the code snippet below:
const [point, setPoint] = useState()
Next, we need to create a function to handle RewardAd behavior when they meet reward criteria and reset the counter back to 10 as shown in the code snippet below:
const initRewardAds = () => {
       const rewarded = RewardedAd.createForAdRequest(TestIds.REWARDED, {
           requestNonPersonalizedAdsOnly: true,
       });
       rewarded.onAdEvent(async (type, error, reward) => {
           if (type === RewardedAdEventType.LOADED) {
               rewarded.show();
           }
           if (type === RewardedAdEventType.EARNED_REWARD) {
               await AsyncStorage.setItem('yourcanreadfreepost', '10').then(res => {
                   setPoint(10)
                   alert('Thank for support us')
               });

           }
       });

       rewarded.load();
   }
Launching Reward Ad
In order to launch the Ad video, we need to go to SinglePost.js and import AdmobContext as shown in the code snippet below:
import { AdmobContext } from '../components/AdmobController'
Then, we get the required context values from AdmobContext using useContext hook as shown in the code snippet below:
let { renderBanner, initRewardAds, point, setPoint } = useContext(AdmobContext)
Next, we create a button to trigger ads and add some text that lets the user know about the ad and reward. We are going to define a function called renderRewardAdsButton function that returns the ad button as shown in the code snippet below:
const renderRewardAdsButton = () => {
       return (
           <View>
               <Title style={{ textAlign: 'center' }} >For continue read more 10 post for free Watch this Ads by clicking button below</Title>
               <Button icon="bullhorn" color={'#53ccf9'} mode="contained" onPress={() => initRewardAds()} >
                   Watch Ads Video
                </Button>
           </View>
       )
   }
Also, we need to create a function to check user points and call the reward function as shown in the code snippet below:
const renderContent = () => {

       if (point <= 0) {
           return renderRewardAdsButton();
       }

       return <Card.Content>
           <HTML
		  key={theme.dark}
               html={post[0].content.rendered}
               imagesMaxWidth={Dimensions.get('window').width}
               tagsStyles={{
                   p: { color: theme.colors.text },
                   pre: { color: theme.colors.accent },
                   h1: { color: theme.colors.text },
                   h2: { color: theme.colors.text },
                   li: { color: theme.colors.text },
               }}
           />
       </Card.Content>
 }
Lastly, we need to create a function that uses the counter value. And when user reaches that screen, we deduce their score and save it Asyncstorage as shown in the code snippet below:
async function fetchPoint() {
       await AsyncStorage.getItem('yourcanreadfreepost').then(async (res) => {
           let remain_point = JSON.parse(res)
           let currpoint = remain_point <= 0 ? 0 : remain_point - 1
           await AsyncStorage.setItem('yourcanreadfreepost', JSON.stringify(currpoint));
           setPoint(currpoint)
       });
   }
Then, we start to check the user’s point every time the screens are loaded using useEffect hook as shown in the code snippet below:
useEffect(() => {
       fetchPost()
       fetchPoint()
   }, []);
Hence, we get the following result in the emulator screens when a user reaches the zero points:
Watch ads for remove adsThe result in the emulator screen when a user triggers an ad:
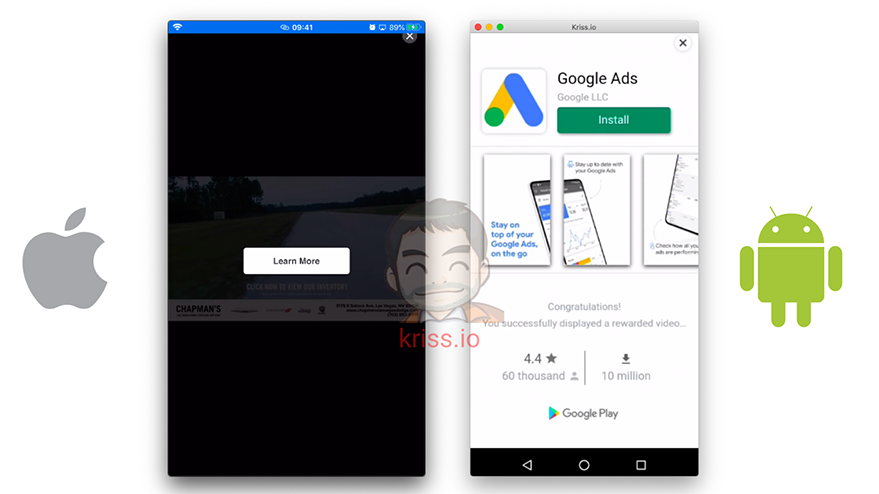
Admob video adsFinally, we have successfully integrated Admob to our React Native project.
Conclusion
In this chapter, we learned how to use the Admob package to React native that can help us monetize apps easily. We integrated the Banner ad and Video ad in our app screens as well as added reward points for users to access extra posts. Actually, this is not a suitable way to make users trigger the ad in order for them to access extra content. This will surely irritate the users. Instead, we offer them a payment option in order to remove the ads completely. We are going to implement this in our next chapter.
All codes are available on Github.