
Introduction
Prior to the introduction of GraphQL subscriptions, making real-time data manipulation has been a bit of a hassle due to the massive lines of code involved in setting up and using web sockets to fetch data in real-time. Now with GraphQL subscriptions, it is easier to fetch data in real-time. The Hasura engine makes building GraphQL backends seemingly easy without writing any GraphQL backend code unless you want to add some custom business logic to your GraphQL backend.
In this tutorial, we will move from setting up and deploying GraphQL backend with Hasura cloud to consuming the subscription endpoint on the vue.js application by building a project. Also, we will discover how to test GraphQL subscriptions on the Hasura console.
Pre-requisite
- npm/yarn
- node 10+ running.
- Basic understanding of Vue.js
- Knowledge of JavaScript ES6
- Basic knowledge of GraphQL
What will you build?
We are going to build the SoccerStarsNomination application together. This application allows its users to nominate a football star for an award.
Our application will make calls to a GraphQL subscription API endpoint to retrieve our nominations in real-time. We’ll then harness the GraphQL mutation to create a new nomination.
Setting up Backend APIs on Hasura Cloud
Hasura Cloud is a GraphQL service provider that gives you a fully managed, scalable, production-ready, and secured GraphQL API as a service to help you build modern apps faster.
Signing up with Hasura Cloud is totally free and It does not require a credit card unless you want to upgrade.
To create a new project on Hasura Cloud, click here.
Once you register and sign in, you should see the welcome screen.
If you have an existing Hasura Cloud account, You will be directed to your dashboard. On the dashboard, click the New project link and fill the form as follows:
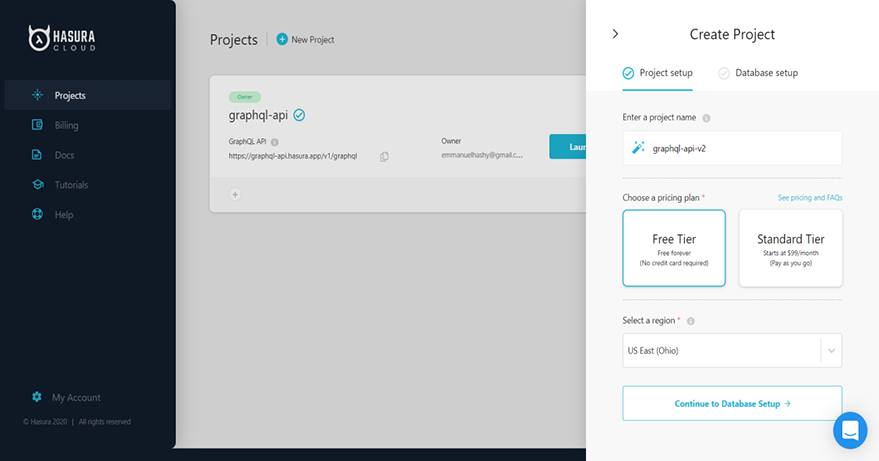
Image of Hasura cloud project setup 1
Click the Continue to Database Setup button. Then select the Try with Heroku option. Click on the Heroku button and your Heroku database URL will be generated automatically as seen below:
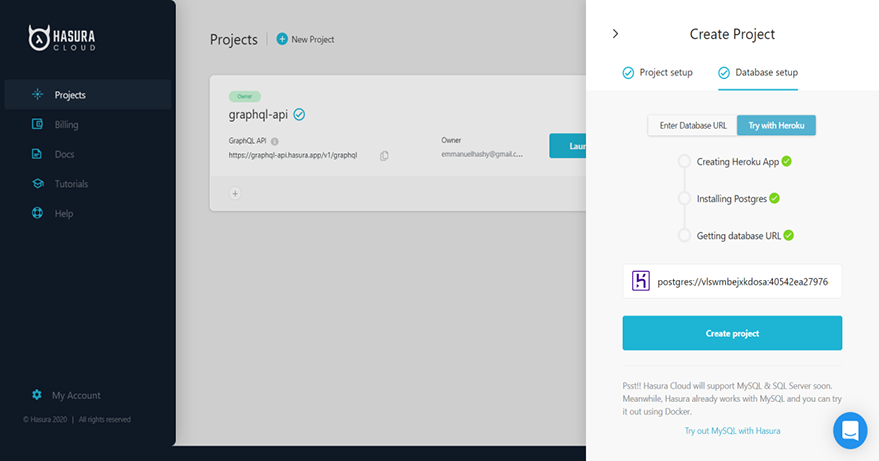
Image of Hasura cloud project setup 2Finally, click on the create project button to create your GraphQL backend project. When the process is successful, your dashboard should be as follows:
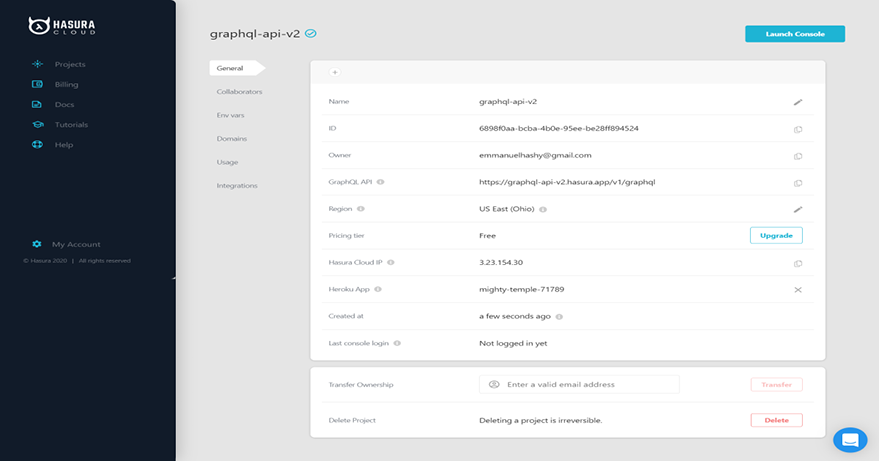
Image of Hasura cloud successful project setupClick on the Launch Console button to open the Hasura Console to get started.
Your Hasura console should look like this:
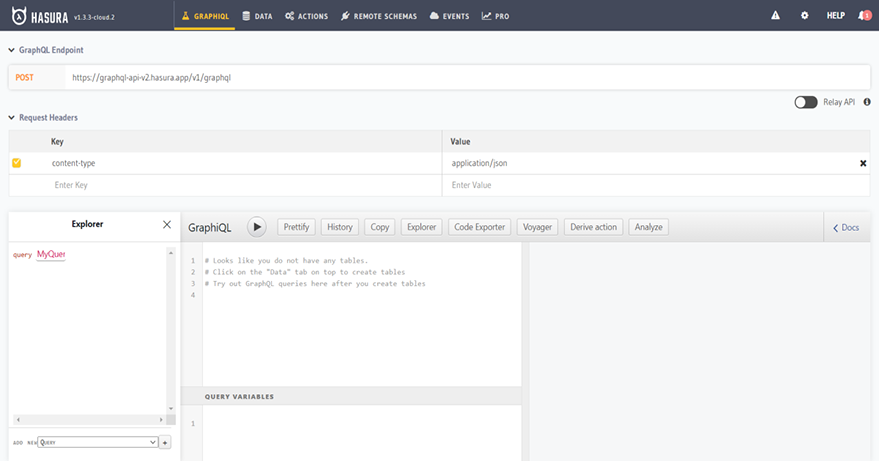
Now, we have deployed our GraphQL backend service with Hasura cloud and the admin console is ready to get started.
Creating Data Model for our GraphQL backend
Our Application will be dependent on a single model called nominations.
Let’s get started by creating the nominations table with the following columns:
- id
- name
- current_club
- nationality
- no_of_clubs
- created_at
Navigate to data and click the create table button and create nominations table as follows:
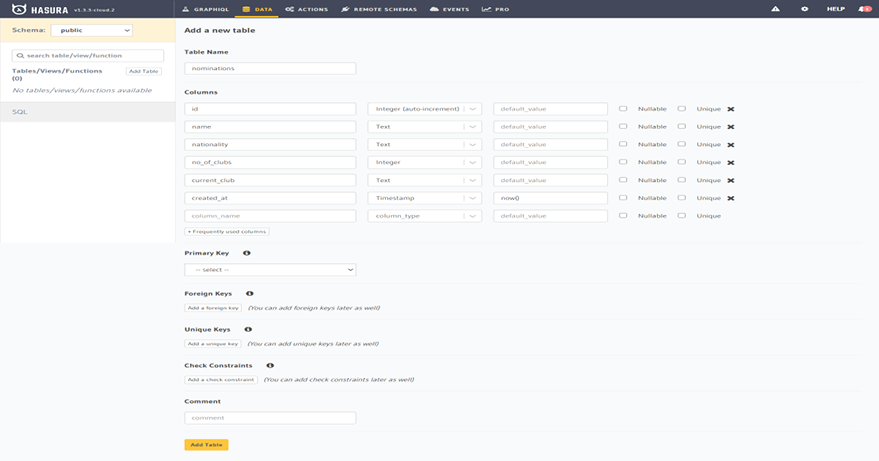
Image of Hasura console tablesClick on the Add Table button to create a table once you are done filling the form.
Explore real-time nominations on GRAPHIQL API via Subscriptions
subscription {
  nominations {
    id
    name
    nationality
    no_of_clubs
    current_club
  }
}
Copy and paste the code above on the GRAPHIQL editor as follows:
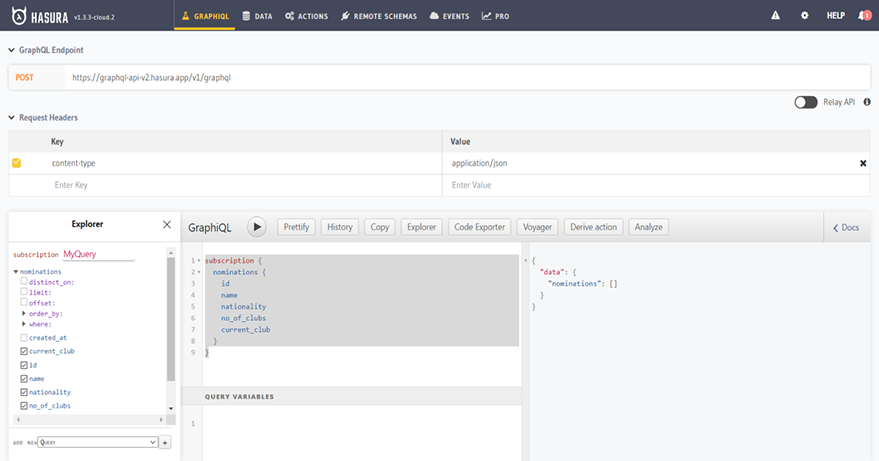
Image of GraphiQL editor with subscription queryThen clicks the play button to see the output.
As seen on the right side of the GRAPHIQL editor above, the result of this subscription is an empty array. This is because we have not added the appropriate data to the nomination table yet.
We will handle this in the frontend section of this tutorial.
Setting up the Frontend of our Project
I have the initial project set up already so you can clone the project here.
The initial project contains the static content of the application that we will build and the basic user interface of our real-time nomination app. The user interface is built with bootstrap 4 and some CSS styles.
Inside the project directory, run the npm install command to install the existing dependencies in the package.json file
next, Spin up the vue.js server with the npm run serve command
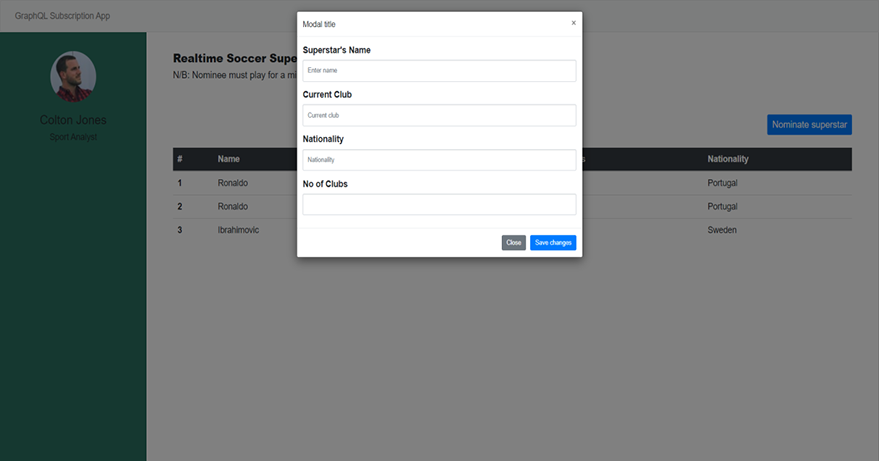
Image of the initial project UI
Dependency Installation
Our real-time nomination app requires the following dependencies:
apollo-cache-inmemory: is the recommended cache implementation for Apollo Client 2.0.apollo-client: is a comprehensive state management library for JavaScript that enables you to manage both local and remote data with GraphQL.apollo-link-ws: Send GraphQL operations over a WebSocket. Works with GraphQL Subscriptions.graphql: is the JavaScript reference implementation for GraphQL APIs.graphql-tag: is a JavaScript template literal tag that parses GraphQL queries.subscriptions-transport-ws: is a GraphQL WebSocket server and client to facilitate GraphQL queries, mutations and subscriptions over WebSocket.vue-apollo: is used to integrate GraphQL in Vue.js apps.
Install the dependencies above with the following command:
npm install --save vue-apollo graphql apollo-client apollo-link-ws apollo-cache-inmemory graphql-tag subscriptions-transport-ws
Updating main.js
Now we need to update our ApolloClient instance to point to the subscription server.
Open src/main.js and replace its content with the code snippet below:
import Vue from "vue";
import App from "./App.vue";
import router from "./router";
import "bootstrap";
import "bootstrap/dist/css/bootstrap.min.css";
import VueApollo from "vue-apollo";
import ApolloClient from "apollo-client";
import { WebSocketLink } from "apollo-link-ws";
import { InMemoryCache } from "apollo-cache-inmemory";
Vue.use(VueApollo);
// Create a WebSocket link:
const link = new WebSocketLink({
  uri: "wss://graphql-api.hasura.app/v1/graphql",
  options: {
    reconnect: true,
    timeout: 30000,
  }
});
const client = new ApolloClient({
  link: link,
  cache: new InMemoryCache({
    addTypename: true
  })
});
Vue.config.productionTip = false;
const apolloProvider = new VueApollo({
  defaultClient: client
});
new Vue({
  router,
  apolloProvider,
  render: h => h(App)
}).$mount("#app");
Here, we create a webSocketLink instance and configure its URL to our single GraphQL API endpoint which points to the subscription server. Next, we create an apolloClient instance and configure its link to the webSocketLink instance. Next, we create an vueApollo instance and configure its defaultClient property to the apolloClient instance. Finally, we add ApolloProvider to the Vue instance so that the Apollo client instances can then be used by all the child components.
Update the Initial Components
The initial project setup contains two components which are:
- NominationBoard
- NominationModal
NominationBoard Component
This component displays the list of football superstars nominated for the most versatile footballer award in a table.
Open src/components/NominationBoard.vue and replace its content with the code snippet below:
<template>
    <div>
        <div v-if="loading" class="text-center">
            <img  src="../assets/loading.svg" alt="loader" />
        </div>
        <div v-else>
        <table class="table table-hover">
            <thead class="bg-dark text-white">
            <tr>
                <th scope="col">#</th>
                <th scope="col">Name</th>
                <th scope="col">Current Club</th>
                <th scope="col">No_of_clubs</th>
                <th scope="col">Nationality</th>
            </tr>
            </thead>
            <tbody>

            <tr v-for="nomination in nominations" :key="nomination.id">
                <th scope="row">{{ nomination.id }}</th>
                <td>{{ nomination.name }}</td>
                <td>{{ nomination.current_club }}</td>
                <td>{{ nomination.no_of_clubs }}</td>
                <td>{{ nomination.nationality }}</td>
            </tr>
            </tbody>
        </table>
        </div>
    </div>
</template>
<script>
import gql from "graphql-tag";
 const SUBSCRIPTION_NOMINATION = gql`
   subscription  getNominations {
    nominations(order_by: { created_at: desc }) {
      id
      name
      nationality
      no_of_clubs
      current_club
      created_at
    }
  }
 `;
export default {
  data: function() {
    return {
        loading: true,
      nominations: [],
    }
  },
  apollo: {
   // Subscriptions
   $subscribe: {
     // When a nomination is added
     nominations: {
       query: SUBSCRIPTION_NOMINATION,
       // Result hook
       result (data) {
           console.log(data)
         // Let's update the local data
         this.nominations = data.data.nominations
         this.loading = false
       },
     },
   },
 },
}
</script>
The code snippet above defines the subscription query to get the nominations created from the Hasura GraphQL server we built earlier in real-time. This means that whenever a new nomination is created, the UI will immediately update with the new nomination without sending any request to the Hasura GraphQL server.
Vue-apollo allows us to define smart subscriptions that retrieve data in real-time from the subscription endpoint to the components state.
NominationModal Component
This component displays a form to create a nomination.
Open src/components/NominationModal.vue and replace its content with the code snippet below:
<template>
<div>
<!-- Button trigger modal -->
<button
type="button"
class="btn nominate-btn btn-primary"
data-toggle="modal"
data-target="#exampleModal"
>
Nominate superstar
</button>
<!-- Modal -->
<div
class="modal fade"
id="exampleModal"
tabindex="-1"
role="dialog"
aria-labelledby="exampleModalLabel"
aria-hidden="true"
>
<div class="modal-dialog" role="document">
<div class="modal-content">
<div class="modal-header">
<h5 class="modal-title" id="exampleModalLabel">Modal title</h5>
<button
type="button"
class="close"
data-dismiss="modal"
aria-label="Close"
>
<span aria-hidden="true">×</span>
</button>
</div>
<div class="modal-body">
<form>
<div class="form-group">
<label for="exampleInputName">Superstar's Name</label>
<input
type="text"
class="form-control"
id="exampleInputName"
placeholder="Enter name"
v-model="superstar_name"
/>
</div>
<div class="form-group">
<label for="exampleInputClub">Current Club</label>
<input
type="text"
class="form-control"
id="exampleInputClub"
placeholder="Current club"
v-model="current_club"
/>
</div>
<div class="form-group">
<label for="exampleInputNationality">Nationality</label>
<input
type="text"
class="form-control"
id="exampleInputNationality"
placeholder="Nationality"
v-model="nationality"
/>
</div>
<div class="form-group">
<label for="exampleInputClubNo">No of Clubs</label>
<input
type="number"
min="1"
max="20"
class="form-control"
id="exampleInputClubNo"
v-model="no_of_clubs"
/>
</div>
</form>
</div>
<div class="modal-footer">
<button
type="button"
class="btn btn-secondary"
data-dismiss="modal"
>
Close
</button>
<button
type="button"
class="btn btn-primary"
@click="addNomination"
>
Save changes
</button>
</div>
</div>
</div>
</div>
</div>
</template>
<script>
import gql from "graphql-tag";
const ADD_NOMINATION = gql`
mutation insert_nominations(
$name: String!
$nationality: String!
$no_of_clubs: Int!
$current_club: String!
) {
insert_nominations(
objects: {
name: $name
nationality: $nationality
no_of_clubs: $no_of_clubs
current_club: $current_club
}
) {
affected_rows
returning {
id
name
nationality
no_of_clubs
current_club
created_at
}
}
}
`;
export default {
data() {
return {
superstar_name: "",
current_club: "",
nationality: "",
no_of_clubs: "",
};
},
methods: {
addNomination: function () {
// insert new nomination into db
const name = this.superstar_name && this.superstar_name.trim();
const currentClub = this.current_club && this.current_club.trim();
const nationality = this.nationality && this.nationality.trim();
const noOfClubs = this.no_of_clubs && this.no_of_clubs.trim();
this.$apollo.mutate({
mutation: ADD_NOMINATION,
variables: {
name: name,
nationality: nationality,
no_of_clubs: noOfClubs,
current_club: currentClub,
},
update: (cache, { data: { insert_nominations } }) => {
// Read the data from our cache for this query.
// eslint-disable-next-line
console.log(insert_nominations);
},
});
this.superstar_name = "";
this.current_club = "";
this.nationality = "";
this.no_of_clubs = "";
},
},
};
</script>
Here, we create a mutation to add a new nomination to the database. We made use of variables to factor dynamic values out of the query. Next, in the addNomination function, the $apollo.mutate method allows us to trigger a call to the ADD_NOMINATION mutation with all the variables being passed.
Now you can run the application with:
npm run serve
Conclusion
In this tutorial, we have moved from setting up and deploying GraphQL backend with Hasura cloud to consuming the subscription endpoint on the vue.js application.
I hope you have learned a great deal from this tutorial. Do reach out in the comment section below if you have any questions or suggestions.
Here is the Github repo for the final version of our project.




This was easy to code along. Thank you
. Looking forward to more articles
Glad you found this piece.
👍Sure I will keep you posted