
There are several methods of building links however most of them involve outreach. Reaching out to press sites in your niche has been a major way for businesses to build backlinks as well as for PR purposes.
Link building involves the following steps:
Getting a list of prospective sites
Getting the email of the editor or journalist
Sending them the email
To do 1 and 2 above you can employ various techniques and tools. A common way of getting press sites that might be interested in your story is to find press sites that have published a related article. For example, let us assume you are a startup in New York and you are looking for press sites. You can use the “site:” search command.
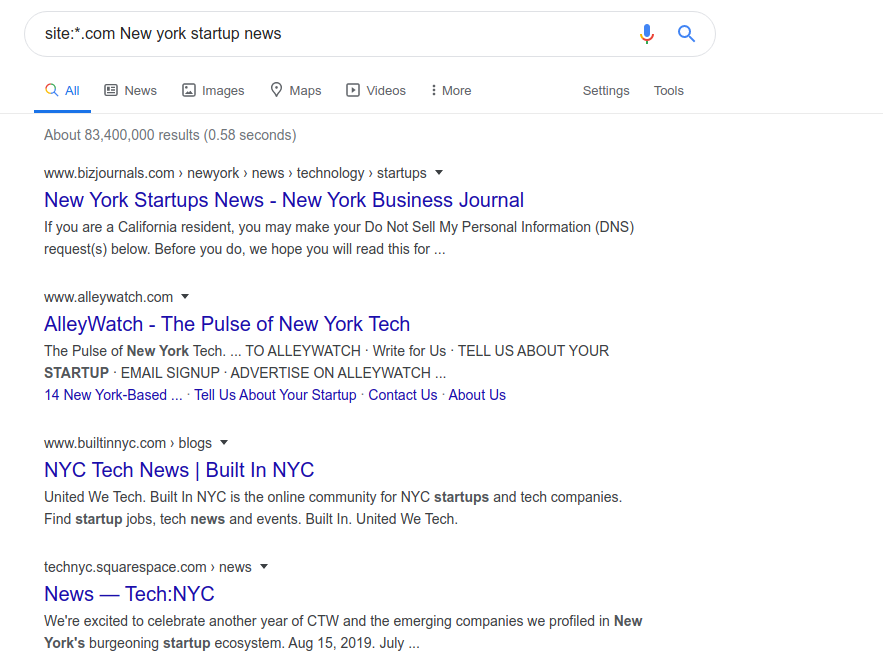
This will give you a list of press sites that have written about New York startup news and in turn, might be open to write about your startup in New York. You can export this list using the Mozbar chrome extension to google sheets.
The next step is to verify these sites and get the email addresses of the site owners or journalists associated with this site. Hunter.io and Snov.io are both useful tools to find email addresses. Alternatively, you can go through the “Contact Us” page on the site to get the contact email.
Once you have populated the list of sites and the email address, the next part involves using python to carry out your outreach techniques.
For the purpose of this tutorial we will be making use of the following libraries:
Smtplib – This is to enable us to send out emails
Pygsheets – This is to allow us to read google sheets directly from the code
Pandas – Although this isn’t necessary, I enjoy using a data frame to be able to access the different headers in my dataset.
Random – We will vary some paragraphs in our email template.
Time – We will be adding a time sleep between the sending of each email.
Email- This package helps us in formatting and preparing our emails. This library won’t help us send emails.
import pygsheets
import pandas as pd
import smtplib
import time
import random
from email.mime.text import MIMEText
from email.mime.multipart import MIMEMultipart
Now that we know the libraries we will be using, next to dive into the code.
Firstly, we will need to fetch the sheets that has the information we need. My sheet looks like this, however you can create as many columns you need with the different information you want to add to the email. I added dummy information to my sheet.
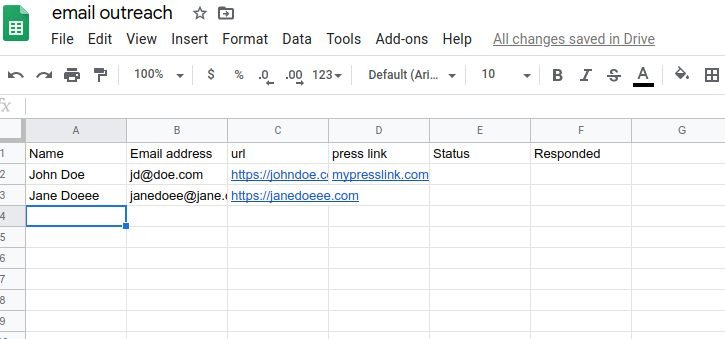
Using pygsheets we can fetch the data from the sheet. The title of my sheet here is “Sheet1”. You can give your sheet any title here. The next thing, we do is convert the sheet into a pandas Dataframe. You can read more about this powerful library from the official documentation here
client = pygsheets.authorize("get your secret key")
c = client.open_by_url("link to your sheet")
sht= c.worksheet("title", "Sheet1")
df= pd.DataFrame(sht.get_all_records())
The next, we will write a for loop to loop through our data frame and in this block of code we will do all the heavy lifting of sending the email.
sent =[]
sender="[email protected]"
password = "mypassword"
introduction_paragraph =['Hope you have had a wonderful start to the year.', "Hope you are having  great month!", "Hope this email meets you well."]
paragraph= random.choice(introduction_paragraph)
last_paragraph = ["Do let me know if you need any clarification or additional information and I’d be glad to help.", "If there is any additional information you require feel free to reach out to me.", "If you require any clarifications please reach out so I can respond accordingly."]
last_paragraph= random.choice(last_paragraph)
for i in df.index:
  if df["Status"][i] == "":
    print("Sending email to" + df["Email"][i])
    name= df["Name"][i]
    url = df["url"][i]

    presslink = df["press link"][i]
    print("Hi  "+ df["Name"][i]+ " , Got your email for your site "+ df["Url"][i])


    text = """XYZ Startup launches in New York.


    Hello {name},
    {paragraph}
    I received a number of recommendations about the reach of {url} while getting acquainted with the New York startup scene.
    I know of your interest in writing about tech startups in New York and I want to introduce my startup to you.
    "your press news here"

    I’m hoping you would share this information with your audience .
    {last_paragraph}
    Thanks,
    Nnamdi O.
    Press link: {presslink}
        """

    msg= MIMEMultipart()
    msg['From']= sender
    msg['To']= df["Email address"][i]
    msg['Subject'] = text
    msg.attach(MIMEText(text, ('plain')))
    body= msg.as_string()
    s=smtplib.SMTP_SSL('your server', 465)
    s.login(sender, password)
    s.sendmail(sender,df["Email address"][i],body.format(sender= sender , recipient= df["Email address"][i], name=name, url=url, paragraph=paragraph, last_paragraph=last_paragraph,presslink=link))
    time.sleep(30)
    s.quit()
    sent.append("Sent")
    sht.update_col(5, [sent], 1)
The “sent” variable that is an empty an array is so that we will update our sheet with the sent status after sending the email. We also put our login details; email address and password.
I went further to create an array with different introduction and closing paragraphs. With the random library, I randomize the introduction and closing paragraphs each .
We write our for loop and put an if statement to check the status of the email. “Status” here refers to if the email has been sent or not. If it is empty we know we haven’t sent an email to the email address.
The “text” variable contains the content of the email. The first line is the subject of the email. In the curly braces {} we add variables such as the name, url and any other variable you want to add in your email.
Next, we use the Email library to format our email. We assign our “from” email address as well as the email addresses we want to send the emails to.
The SMTP server here is going to be your server, it could be your localhost. Whatever server you use to ensure you have the right port which is the second argument in smtp.SMTP_SSL . We then use s.login to log into our email account(you need to ensure the email address and password are written correctly). Using sendmail function we parse every variable we want to use in sending the email. This accepts the To and Sender email as well as helps in the formatting of the body of the text. The variables in the curly brackets are passed here so as to ensure they are outputted correctly. The quit function is done at the end of the email code to ask the server to close the existing connection. However, we add a time.sleep command so that it takes 30 seconds before it sends the next email. You do not want to send all the emails at once and you probably do not want to send to more than 100 emails at the same time.
Finally, we update the column with the sent status, which is, in this case, is “Sent”, we do this using the pygsheets library.
Congratulations! You have sent out your first email outreach to a bunch of press sites. However, you can take this a bit further and send out follow up emails to sites that didn’t respond.
You will have to manually update the Responded column with “yes” or “no”, so you will be able to send emails to only sites that didn’t respond to your earlier email.
Next, we use the elif command to add the next conditional statement which is sent only to sites with Response = No and the Status =sent.
elif df["Responded"][i]== "No" and df["Status"][i] == "Sent"
The rest of the code doesn’t differ much from what we had in the if statement block of code. The body of the email changes to show this is a follow-up email.
 elif df["Responded"][i]== "No" and df["Status"][i] == "Sent"
    name= df["Name"][i]
    url = df["url"][i]

    presslink = df["press link"][i]
    print("Hi  "+ df["Name"][i]+ " , Got your email for your site "+ df["Url"][i])


    text = """XYZ Startup launches in New York.


    Hello {name},
    {paragraph}
    This is just a follow up email my earlier sent email.

    I will appreciate it if you can spend 10-15 mins of your time to discuss with me over a call or a cup of coffee
    {last_paragraph}
    Thanks,
    Nnamdi O.
    Press link: {presslink}
        """

    msg= MIMEMultipart()
    msg['From']= sender
    msg['To']= df["Email address"][i]
    msg['Subject'] = text
    msg.attach(MIMEText(text, ('plain')))
    body= msg.as_string()
    s=smtplib.SMTP_SSL('your server', 465)
    s.login(sender, password)
    s.sendmail(sender,df["Email address"][i],body.format(sender= sender , recipient= df["Email address"][i], name=name, paragraph=paragraph, last_paragraph=last_paragraph,presslink=link))
    time.sleep(30)
    s.quit()
Once you are done with this script you can begin to automate your outreach strategies and scale it!
Note: So as not to face encounter any encoding problem when trying to run the script add the following line of code at the top of your script.
# -*- coding: utf-8 -*-
The complete code looks like this
import pygsheets
import pandas as pd
import smtplib
import time
import random
from email.mime.text import MIMEText
from email.mime.multipart import MIMEMultipart
client = pygsheets.authorize("get your secret key")
c = client.open_by_url("link to your sheet")
sht= c.worksheet("title", "Sheet1")
df= pd.DataFrame(sht.get_all_records())
sent =[]
sender="[email protected]"
password = "mypassword"
introduction_paragraph =['Hope you have had a wonderful start to the year.', "Hope you are having  great month!", "Hope this email meets you well."]
paragraph= random.choice(introduction_paragraph)
last_paragraph = ["Do let me know if you need any clarification or additional information and I’d be glad to help.", "If there is any additional information you require feel free to reach out to me.", "If you require any clarifications please reach out so I can respond accordingly."]
last_paragraph= random.choice(last_paragraph)
for i in df.index:
  if df["Status"][i] == "":
    print("Sending email to" + df["Email"][i])
    name= df["Name"][i]
    url = df["url"][i]

    presslink = df["press link"][i]
    print("Hi  "+ df["Name"][i]+ " , Got your email for your site "+ df["Url"][i])


    text = """XYZ Startup launches in New York.


    Hello {name},
    {paragraph}
    I received a number of recommendations about the reach of {url} while getting acquainted with the New York startup scene.
    I know of your interest in writing about tech startups in New York and I want to introduce my startup to you.
    "your press news here"

    I’m hoping you would share this information with your audience .
    {last_paragraph}
    Thanks,
    Nnamdi O.
    Press link: {presslink}
        """

    msg= MIMEMultipart()
    msg['From']= sender
    msg['To']= df["Email address"][i]
    msg['Subject'] = text
    msg.attach(MIMEText(text, ('plain')))
    body= msg.as_string()
    s=smtplib.SMTP_SSL('your server', 465)
    s.login(sender, password)
    s.sendmail(sender,df["Email address"][i],body.format(sender= sender , recipient= df["Email address"][i], name=name, url=url, paragraph=paragraph, last_paragraph=last_paragraph,presslink=link))
    time.sleep(30)
    s.quit()
    sent.append("Sent")
    sht.update_col(5, [sent], 1)
   elif df["Responded"][i]== "No" and df["Status"][i] == "Sent"
    name= df["Name"][i]
    url = df["url"][i]

    presslink = df["press link"][i]
    print("Hi  "+ df["Name"][i]+ " , Got your email for your site "+ df["Url"][i])


    text = """XYZ Startup launches in New York.


    Hello {name},
    {paragraph}
    This is just a follow up email my earlier sent email.

    I will appreciate it if you can spend 10-15 mins of your time to discuss with me over a call or a cup of coffee
    {last_paragraph}
    Thanks,
    Nnamdi O.
    Press link: {presslink}
        """

    msg= MIMEMultipart()
    msg['From']= sender
    msg['To']= df["Email address"][i]
    msg['Subject'] = text
    msg.attach(MIMEText(text, ('plain')))
    body= msg.as_string()
    s=smtplib.SMTP_SSL('your server', 465)
    s.login(sender, password)
    s.sendmail(sender,df["Email address"][i],body.format(sender= sender , recipient= df["Email address"][i], name=name, paragraph=paragraph, last_paragraph=last_paragraph,presslink=link))
    time.sleep(30)
    s.quit()