Defenition: POS – “Point of Sale”. At the point of sale, the merchant calculates the amount owed by the customer, indicates that amount, may prepare an invoice for the customer (which may be a cash register printout), and indicates the options for the customer to make payment.
In the previous chapter, we worked on role-based access control feature for our react app. We had two roles: admin and employee. We used those user roles for conditional rendering with the react-rbac-guard package.
In this chapter, we are going to create an order page. The order page displays the products and the calculator to help calculate the total price. Finally, we will save the transaction to the database.
For the order page, the idea is to have to columns: lefts to display products and right to display total price and products in the cart.
Displaying Products
First, we are going to create a column that displays the number of products for sale. We are going to display them in a grid style by creating a new component called order.js. Now, we will create a file named create.js and work on it.
In create.js, we need to import the required component, hooks, and product actions as displayed in the code snippet below:
import React, { useEffect } from "react";
import { useSelector, useDispatch } from "react-redux";
import * as productActions from "../../actions/product.action";
export default (props) => {}
Then, we fetch the product data using useDispatch hook variable inside the useEffect hook as directed in the code snippet below:
const dispatch = useDispatch();
useEffect(() => {
    dispatch(productActions.Index());
  }, []);
Next, we need to import a reducer named productReducer using useSelector hook in order to get the getting product data as displayed in the code snippet below:
const productReducer = useSelector(({ productReducer }) => productReducer);
Now, we need to create a function to fetch all products. First, we create a product catalog by wrapping it in the card element and using the classes to show four-card items in a row. Each card will have the data concerning a single product. There will also be a button to add the items to the cart. The overall coding implementation of the function is provided in the code snippet below:
const renderProductRows = () => {
    if (productReducer.result) {
      const { result } = productReducer;
      return (
        <div className="row">
          {result &&
            result.map((item, index) => {
              return (
                <>
      {index % 3 === 0 && <div class="w-100 d-lg-none mt-4"></div>}
                  <div class="col-md-6 col-lg-4 col-xl-3 py-2">
                    <div className="card h-100">
                      <img
                        className="card-img-top img-fluid"
                        src={
                          process.env.REACT_APP_PRODUCT_IMAGE_PATH +
                          "/" +
                          item.image
                        }
                        alt="Card image cap"
                      />
                      <div className="card-block">
                        <h4 className="card-title">{item.name}</h4>
                        <p className="card-text">Price {item.price}</p>
                        <p className="card-text">
                          <small className="text-muted">
                            remain {item.stock}
                          </small>
                        </p>
                       <a href="#" class="btn btn-primary btn-block ">
                          Add to Card
                        </a>
</div>
                    </div>
                  </div>
                </>
              );
            })}
        </div>
      );
    } else {
      return "loading...";
    }
  };
Hence, we will get the result as displayed in the following screenshot:
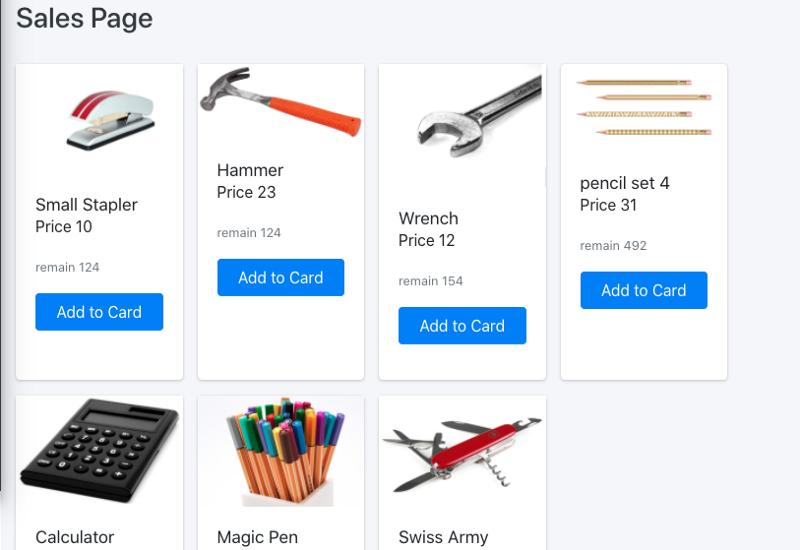
Our display Product section is complete. Now, we move to implement the right column which will have the total cost and items in the cart.
Cart section
Here, we are going to implement the right side of the column called the cart section. For that, we need to add another column just beside the Product Catalog section.
In this section, we will show the total price and tax as well as a list of items in the cart. We will use number format to manage float number and create a new action named shop to handle all calculations.
First, we need to create a new action and reducer in order to handle the cart operations.
Hence, in the constant.js file, we need to create new constants as directed in the code snippet below:
// Shop Page
export const SHOP_FETCHING = "SHOP_FETCHING";
export const SHOP_SUCCESS = "SHOP_SUCCESS";
export const SHOP_FAILED = "SHOP_FAILED";
export const SHOP_UPDATE_ORDER = "SHOP_UPDATE_ORDER";
export const SHOP_UPDATE_PAYMENT = "SHOP_UPDATE_PAYMENT";
Then, we need to create a new reducer named shop to handle updates in the cart as well as payment. The initial states are also to be defined. The overall coding implementation of the reducer is provided in the code snippet below:
import { SHOP_UPDATE_ORDER, SHOP_UPDATE_PAYMENT } from "../constants";
const initialState = {
  mOrderLines: [],
  mTotalPrice: 0,
  mTaxAmt: 0,
  mIsPaymentMade: false,
  mGiven: 0
};
export default (state = initialState, { type, payload }) => {
  switch (type) {
    case SHOP_UPDATE_ORDER:
      return {
        ...state,
        mOrderLines: payload.orderLines,
        mTotalPrice: payload.totalPrice,
        mTaxAmt: payload.taxAmt
      };
    case SHOP_UPDATE_PAYMENT:
      return {
        ...state,
        mIsPaymentMade: payload.isPaymentMade,
        mGiven: payload.given
      };
    default:
      return state;
  }
};
Next, we need to create an action that accesses the modification of reducer data. So, we need to create a new action named shop and add a function to handle orders. The coding implementation of action functions are provided in the code snippet below:
import { httpClient } from "./../utils/HttpClient";
import { SHOP_UPDATE_ORDER, SHOP_UPDATE_PAYMENT, server } from "../constants";
const setStateShoptoUpdateOrder = (payload) => ({
  type: SHOP_UPDATE_ORDER,
  payload: payload,
});
const doUpdateOrder = (dispatch, orderLines) => {
  // debugger;
  let totalPrice = 0;
  let taxAmt = 0;
  for (let item of orderLines) {
    totalPrice += item.price * item.qty;
  }
  taxAmt = totalPrice * 0.07;
dispatch(
    setStateShoptoUpdateOrder({
      orderLines,
      totalPrice,
      taxAmt,
    })
  );
};
export const addOrder = (item) => {
  return (dispatch, getState) => {
    let orderLines = getState().shopReducer.mOrderLines;
    let index = orderLines.indexOf(item);
    if (index === -1) {
      item.qty = 1;
      orderLines.unshift(item);
    } else {
      orderLines[index].qty++;
    }
doUpdateOrder(dispatch, orderLines);
  };
};
export const removeOrder = (product) => {
  return (dispatch, getState) => {
    let orderLines = getState().shopReducer.mOrderLines;
    var foundIndex = orderLines.indexOf(product);
orderLines.map((item) => {
      if (item.product_id === product.product_id) {
        item.qty = 1;
      }
    });
    orderLines.splice(foundIndex, 1);
doUpdateOrder(dispatch, orderLines);
  };
};
Now, it is time to implement the UI. We will get the cart and price states from the reducer to be rendered into the UI. For now, we need to create a function named CartSection and use NumberFormat component to display price and table to display the cart items. The overall UI coding implementation is provided in the code snippet below:
const CartSection = (index) => {
    return (
      <>
        <div className="row">
          <h4>Tax 7% </h4>
          <NumberFormat
            value={shopReducer.mTaxAmt}
            displayType={"text"}
            thousandSeparator={true}
            decimalScale={2}
            fixedDecimalScale={true}
            prefix={"฿"}
          />
        </div>
        <div className="row">
          <h4>Total</h4>
          <NumberFormat
            value={shopReducer.mTotalPrice}
            displayType={"text"}
            decimalScale={2}
            thousandSeparator={true}
            prefix={"฿"}
          />
          {shopReducer.mTotalPrice > 0 && !shopReducer.mIsPaymentMade && (
            <a
              href="#"
              class="btn btn-primary btn-block"
              onClick={() => dispatch(shopActions.togglePaymentState())}
            >
              Payment
            </a>
          )}
          {shopReducer.mOrderLines.length > 0 ? (
            <table class="table table-hover shopping-cart-wrap">
              <thead class="text-muted">
                <tr>
                  <th scope="col">Item</th>
                  <th scope="col" width="120">
                    Qty
                  </th>
                  <th scope="col" width="120">
                    Price
                  </th>
                  <th scope="col" class="text-right" width="200">
                    Delete
                  </th>
                </tr>
              </thead>
              <tbody>{renderOrder()}</tbody>
            </table>
          ) : (
            <img src={cashier} style={{ width: 200 }} />
          )}
        </div>
      </>
    );
  };
hence, we will get the result as displayed in the following screenshot:
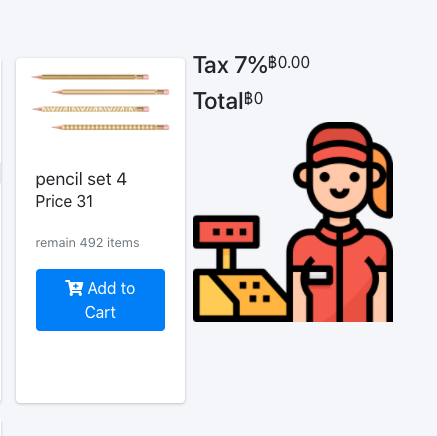
As we can notice, the state in the reducer is empty. Hence, we get the total price as 0 and no items in the cart section.
In order to add the item to the cart and calculate the price, we dispatch the addOrder action from shopActions in the Add to Cart button as directed in the code snippet below:
       <Link
            type="button"
            class="btn btn-primary"
            onClick={() =>  dispatch(shopActions.addOrder(item))}
             > <i class="fa fa-cart-plus"></i> Add to Cart
      </Link>
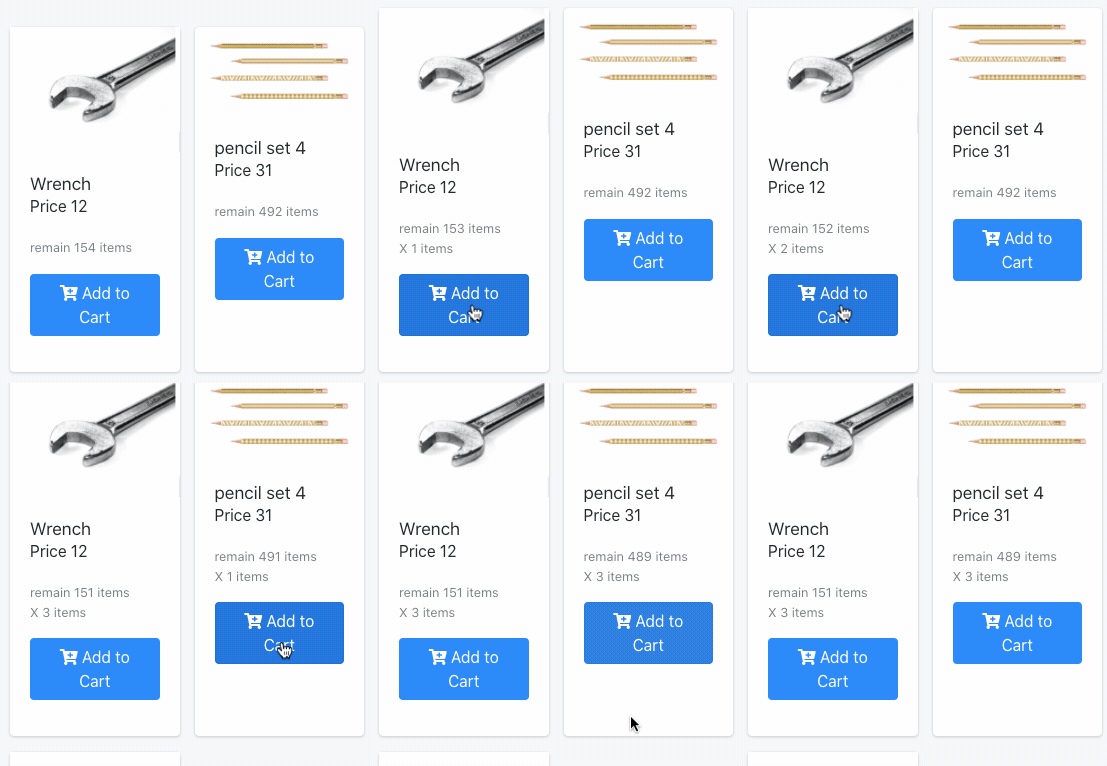
Then, we add the updated data in the product when we add the products to the cart stock. Hence, the cart data will update as well. For that, we do the conditional rendering as directed in the code snippet below:
<p className="card-text">
                          <small className="text-muted">
                            remain{" "}
                            {item.qty ? item.stock - item.qty : item.stock}{" "}
                            items
                          </small>
                          {isSelectedItem(item) && (
                            <div
                              style={{
                                display: "flex",
                                flexDirection: "row",
                              }}
                            >
                              <small className="text-muted">
                                X {item.qty} items
                              </small>
                            </div>
                          )}
                        </p>
The function to count the number of items in the cart is shown in the code snippet below:
const isSelectedItem = (product) => {
    let index = shopReducer.mOrderLines.indexOf(product);
    return index !== -1;
  };
Hence, we will get the result as displayed in the demo below:
Now, we need to create a simple table element to display products in the cart. We will also add a remove feature to it in order to remove the product from the cart if needed. For that, we need to create a new function called renderOrder and use the code from the following code snippet:
const renderOrder = () => {
    const { mOrderLines } = shopReducer;
     return mOrderLines.map((item) => {
      return (
        <tr>
          <td>{item.name}</td>
          <td>{item.qty}</td>
          <td>{item.price}</td>
          <td>
            <Link
              type="button"
              class="btn btn-danger"
              onClick={() => dispatch(shopActions.removeOrder(item))}
            >
              <i class="fa fa-trash"></i>
            </Link>
          </td>
        </tr>
      );
    });
  };
Then, we need to add the function to the main table as displayed in the code snippet below:
{shopReducer.mOrderLines.length > 0 ? (
            <table class="table table-hover shopping-cart-wrap">
              <thead class="text-muted">
                <tr>
                  <th scope="col">Item</th>
                  <th scope="col" width="120">
                    Qty
                  </th>
                  <th scope="col" width="120">
                    Price
                  </th>
                  <th scope="col" class="text-right" width="200">
                    Delete
                  </th>
                </tr>
              </thead>
              <tbody>{renderOrder()}</tbody>
            </table>
          ) : (
            <img src={cashier} style={{ width: 200 }} />
          )}
Hence, we will get the result as displayed in the demo below:
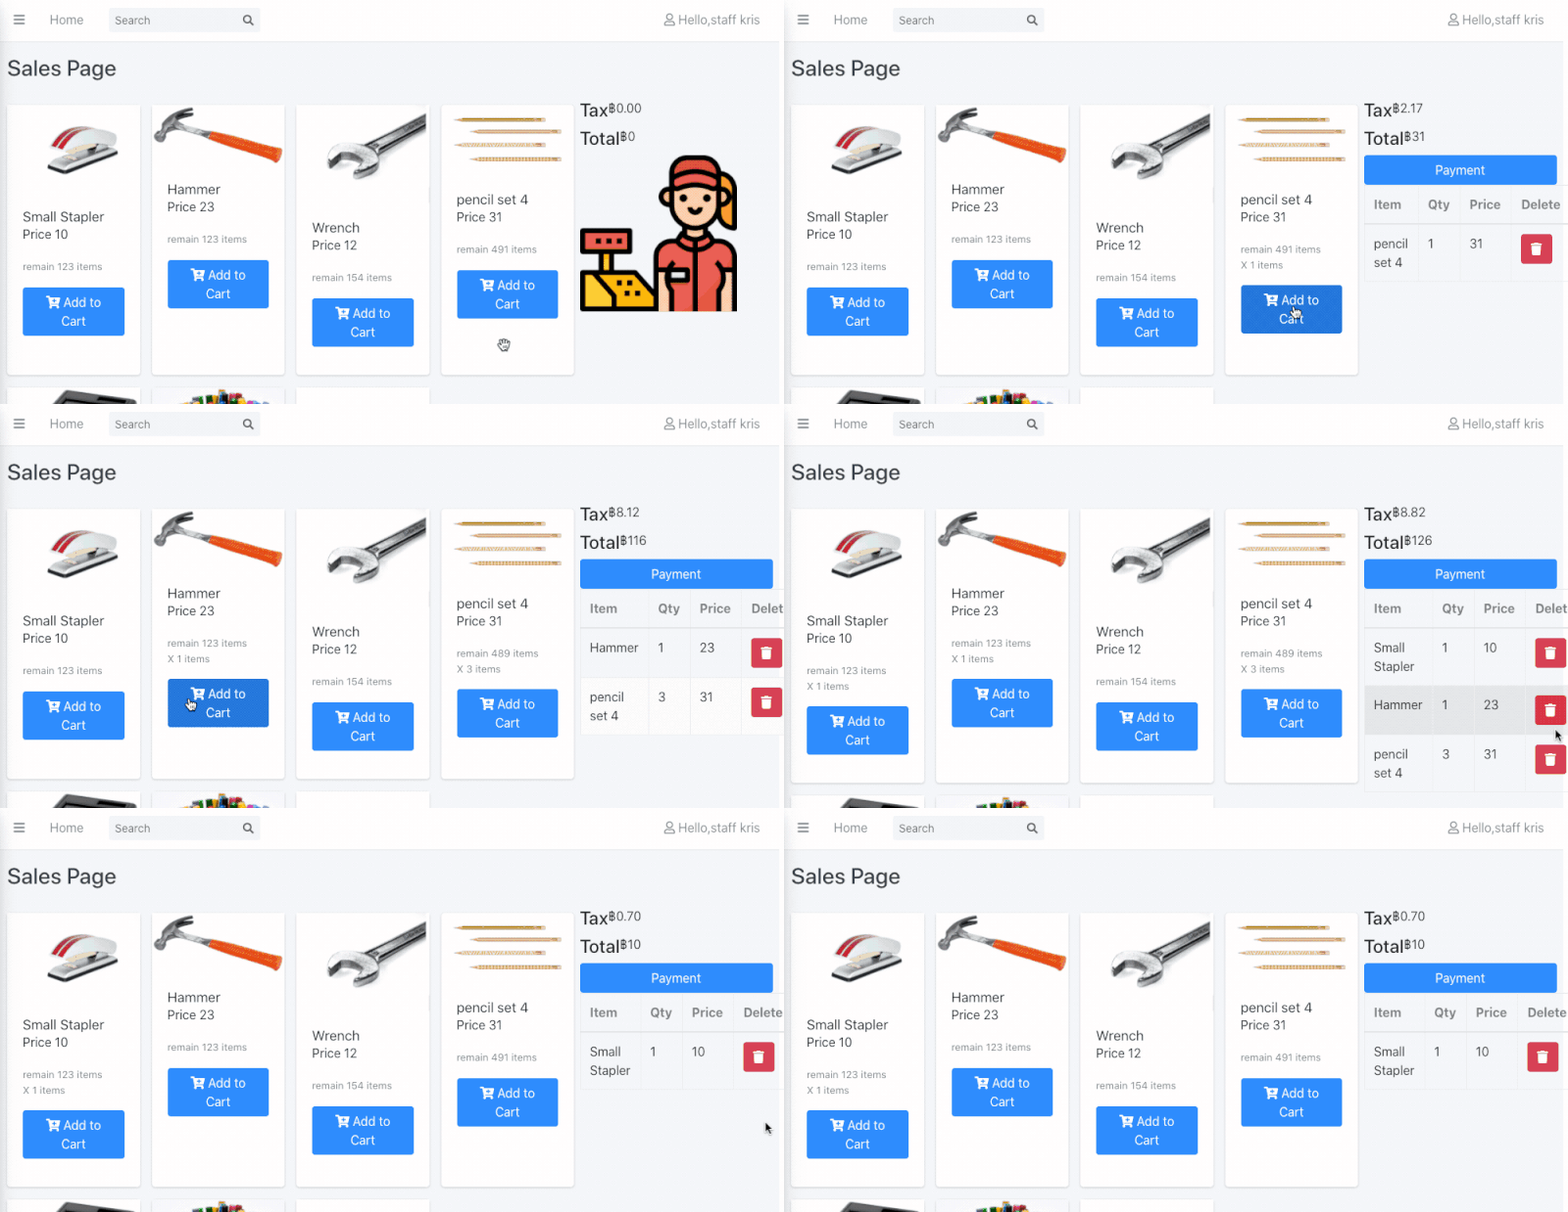
Here, we can see that as we add an item to the card the item number decreases in the product section and the items added increases in the cart section along with updates to the price as well.
Calculator
Now, we are going to create a simple calculator that will allow employees to calculate the change easily. The calculator will be displayed once an employee clicks on the payment button.
First, in the shop.action.js file, we add functions to send order data and toggle the calculator. The coding implementation of submitPayment and togglePaymentState functions are provided in the code snippet below:
export const submitPayment = (data) => {
  return (dispatch, getState) => {
    httpClient.post(server.ORDER_URL, data).then(() => {
      swal({
        title: "Your are made sale success",
        icon: "success",
        buttons: true,
      });
      getState().shopReducer.mOrderLines = [];
      dispatch({
        type: SHOP_UPDATE_PAYMENT,
        payload: {
          isPaymentMade: false,
          given: 0,
        },
      });
    });
  };
};
export const togglePaymentState = () => {
  return (dispatch, getState) => {
    dispatch({
      type: SHOP_UPDATE_PAYMENT,
      payload: {
        isPaymentMade: !getState().shopReducer.mIsPaymentMade,
        given: !getState().shopReducer.mGiven,
      },
    });
  };
};
Now in the order component, we need to create a new component named Payment in order to contain the calculator components. Then, we need to import the Payment component to the Create component as directed in the code snippet below:
import Payment from "./payment";
Next, we need to create a function called renderPayment for conditional rendering and passing the order data in the cart to the calculator. The implementation of the function is provided in the code snippet below:
const renderPayment = () => {
    return (
      <div className="col-md-8" style={{ maxHeight: 710 }}>
        <Payment order={JSON.stringify(shopReducer.mOrderLines)} />
      </div>
    );
  };
Now, we can toggle between product catalog and calculator using the conditional rendering as shown in the code snippet below:
<section className="content">
        <div className="container-fluid">
          <div className="row">
            <div
              className="col-9"
              data-spy="scroll"
              data-target=".navbar"
              data-offset="50"
            >
              {shopReducer.mIsPaymentMade
                ? renderPayment()
                : renderProductRows()}
            </div>
Now to implement the calculator screen, we import the necessary components in the payment.js file as shown in the code snippet below:
import React, { useState, useEffect } from "react";
import { useDispatch, useSelector } from "react-redux";
import { TransactionRequest } from "./transaction";
import * as shopActions from "../../actions/shop.action";
import { Formik, Form, Field } from "formik";
First, we are going to create a calculator UI. The idea is simple. Each button will represent a banknote and coin that a customer pays and subtracts from the order total. After subtraction, we can display the change to be returned to the customer. This will make it easier for employees to calculate money to be returned to the customers.
Then, we will have two input fields: one to display the total money that customer pays and another to display change to be returned to the customer.
Here, we will have three action button:
- Exact for when there is no change to be returned.
- Clear in order to reset the data.
- Submit to save data of the successful sale to database
The coding implementation for this is provided in the code snippet below:
const showForm = ({ values, setFieldValue }) => {
    return (
      <div>
        <div className="row">
          <div className="col">
            {isMustChanged(values) && (
              <div class="input-group mb-3">
                <div class="input-group-prepend">
                  <span class="input-group-text" id="basic-addon1">
                    Change
                  </span>
                </div>
                <input
                  type="text"
                  readonly="readonly"
                  name="change"
                  value={values.change}
                  className="form-control"
                  placeholder="Change"
                />
              </div>
            )}
            <div class="input-group mb-3">
              <div class="input-group-prepend">
                <span class="input-group-text" id="basic-addon1">
                  Given
                </span>
              </div>
              <input
                type="text"
                readonly="readonly"
                name="given"
                value={values.given}
                className="form-control"
                placeholder="Given"
              />
            </div>
          </div>
        </div>
        <div className="row">
          <div className="col">
            <button
              onClick={() => onClickGiven(1000, values.given, setFieldValue)}
              className="btn btn-primary btn-lg btn-block"
              type="button"
            >
              1000
            </button>
          </div>
          <div className="col">
            <button
              onClick={() => onClickGiven(500, values.given, setFieldValue)}
              className="btn btn-primary btn-lg btn-block"
              type="button"
            >
              500
            </button>
          </div>
          <div className="col">
            <button
              onClick={() => onClickGiven(100, values.given, setFieldValue)}
              className="btn btn-primary btn-lg btn-block"
              type="button"
            >
              100
            </button>
          </div>
        </div>
        <div className="row">
          <div className="col">
            <button
              onClick={() => onClickGiven(50, values.given, setFieldValue)}
              className="btn btn-primary btn-lg btn-block"
              type="button"
            >
              50
            </button>
          </div>
          <div className="col">
            <button
              onClick={() => onClickGiven(20, values.given, setFieldValue)}
              className="btn btn-primary btn-lg btn-block"
              type="button"
            >
              20
            </button>
          </div>
          <div className="col">
            <button
              onClick={() => onClickGiven(10, values.given, setFieldValue)}
              className="btn btn-primary btn-lg btn-block"
              type="button"
            >
              10
            </button>
          </div>
        </div>
        <div className="row">
          <div className="col">
            <button className="btn btn-danger btn-lg btn-block" type="button">
              Clear
            </button>
          </div>
          <div className="col">
            <button
              onClick={() => onClickExact()}
              className="btn btn-primary btn-lg btn-block"
              type="button"
            >
              Exact
            </button>
          </div>
          <div className="col">
            <button
              onClick={() => onClickSubmit(values)}
              className="btn btn-success btn-lg btn-block"
              type="button"
            >
              Submit
            </button>
          </div>
        </div>
      </div>
    );
  };
return (
    <div>
      <Formik initialValues={{ given: 0 }}>{(props) => showForm(props)}</Formik>
    </div>
  );
Hence, we will get the result as displayed in the demo below:
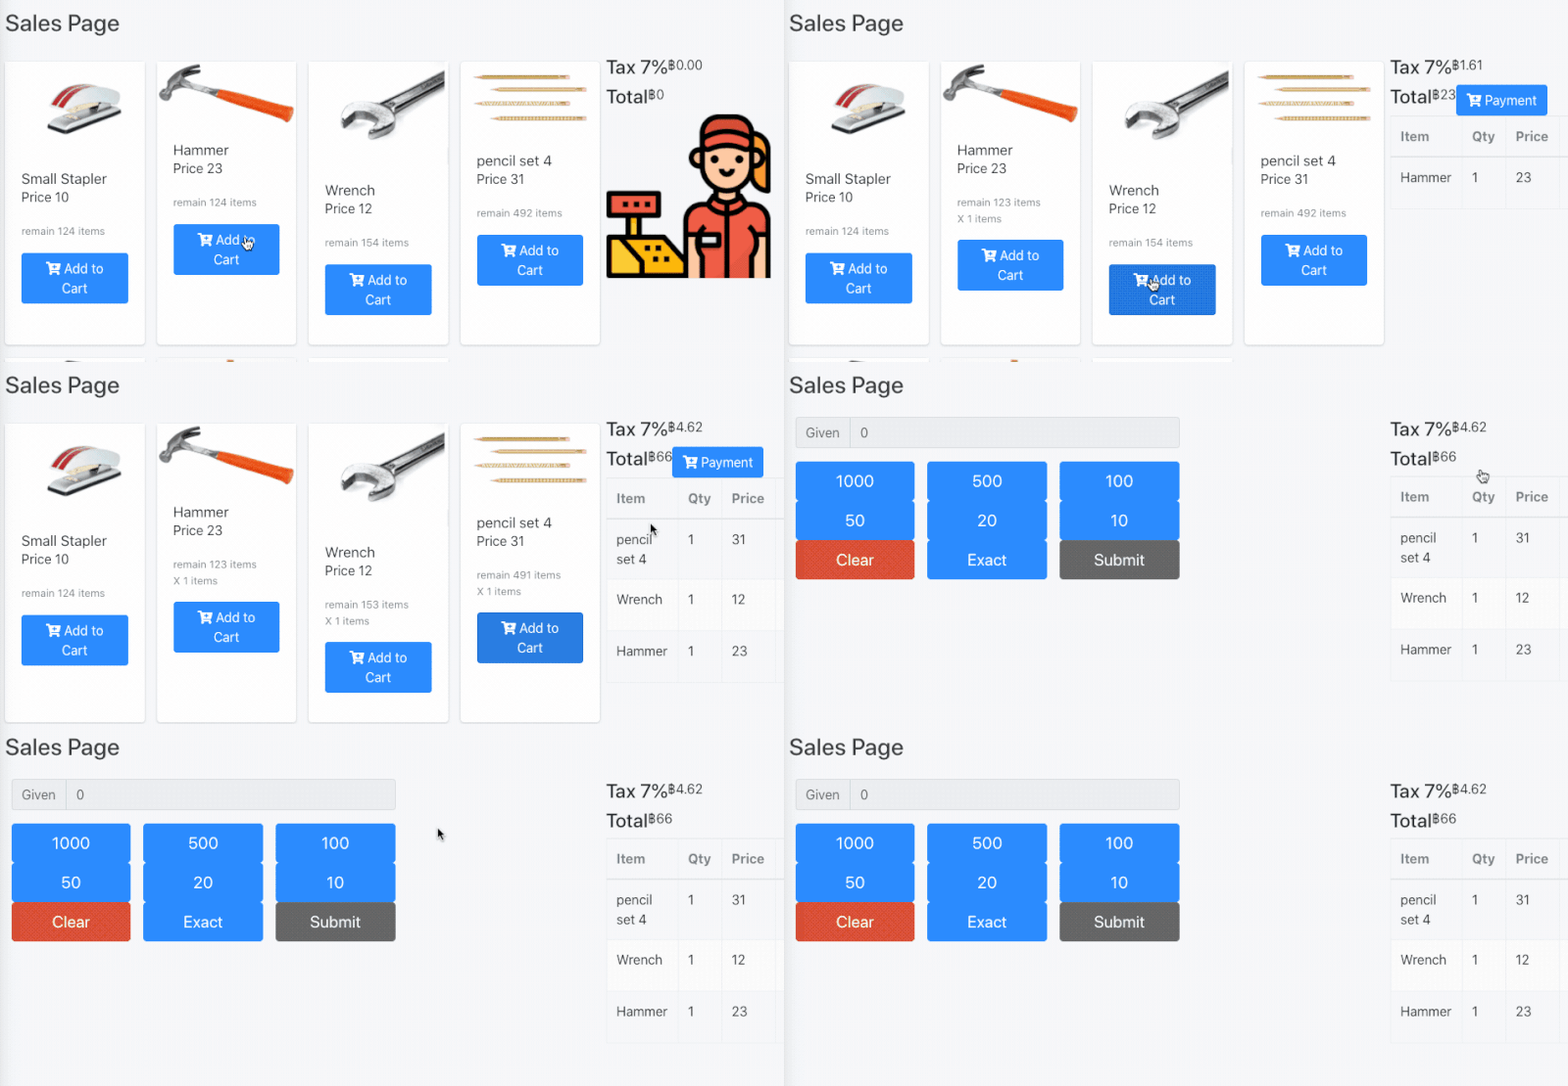
Here, we can see that as soon as we press the Payment button, a calculator page pops up with three buttons that we mentioned before.
Now for calculation, we need to create new functions as mentioned below:
- isMustChanged function to display change input. If an employee doesn’t need to return the change then we simply hide this section.
- updateChange to update the change value.
- onClickGiven to sum up all money that the customer pays.
- onClickExact trigger when no need for any change to be returned. The customer provides the exact fund equal to the money he/she has to pay.
The coding implementations of these function are provided in the code snippet below:
const isMustChanged = (values) => {
    try {
      return values.given > shopReducer.mTotalPrice;
    } catch (err) {
      return false;
    }
  };
const updateChange = (given, setFieldValue) => {
    let change = given - shopReducer.mTotalPrice;
    if (change > 0) {
      setFieldValue("change", change);
    } else {
      setFieldValue("change", 0);
    }
  };
const onClickGiven = (newValue, oldValue, setFieldValue) => {
    const newGiven = newValue + oldValue;
    console.log(newValue);
    setFieldValue("given", newGiven);
    updateChange(newGiven, setFieldValue);
  };
const onClickExact = (setFieldValue) => {
    setFieldValue("given", shopReducer.mTotalPrice);
    updateChange(0, setFieldValue);
  };
Hence, we will get the result as displayed in the demo screenshot below:
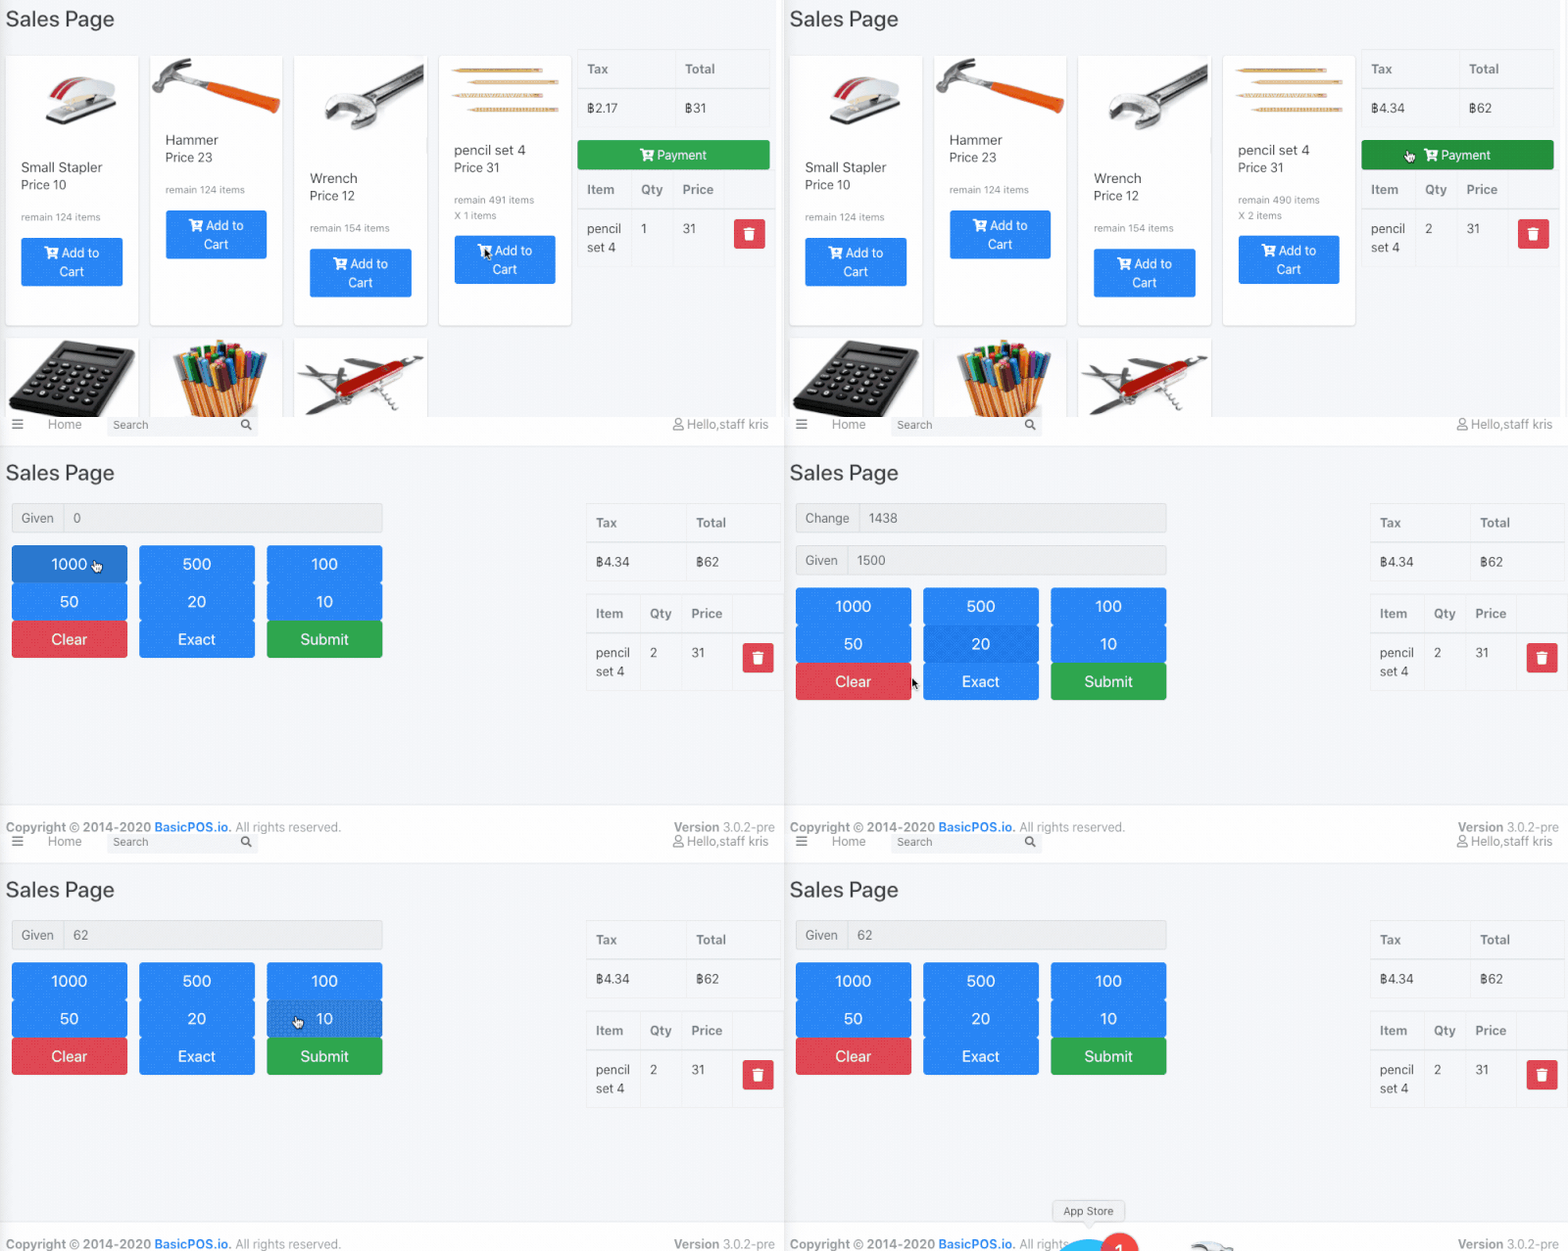
Saving Order data
Now, the last step is to save the order data to the database for each successful transaction. For this, we need to create a new endpoint in the backed to receive the order data.
First, we need to create a schema for the new table named order. We are also going to add an auto-increment field in order to generate the data in sequential order. The schema implementation using mongoose library is provided in the code snippet below:
const mongoose = require("mongoose");
const AutoIncrement = require("mongoose-sequence")(mongoose);
const OrderSchma = mongoose.Schema(
  {
    _id: { type: mongoose.Schema.Types.ObjectId, auto: true },
    total: Number,
    paid: Number,
    change: Number,
    order_list: String,
    payment_type: String,
    payment_detail: String,
    staff_id: { type: mongoose.Schema.Types.ObjectId, required: true },
    comment: String,
    timestamp: { type: Date, default: Date.now },
  },
  { _id: false }
);
OrderSchma.plugin(AutoIncrement, { inc_field: "order_id" });
module.exports = mongoose.model("order", OrderSchma);
Then, we need to create a new API endpoint named order. The API implementation code is simple. If you have been following this tutorial, you will find it pretty simple. The actual implementation of the endpoint is provided in the code snippet below:
const express = require("express");
const router = express.Router();
const Order = require("./models/order_schema.js");
router.post("/order", async (req, res) => {
  try {
    let newOrder = await Order.create(req.body);
res.json({
      result: "success",
      message: "Create Brach data successfully",
    });
  } catch (err) {
    res.json({ result: "error", message: err });
  }
});
Hence, we have successfully created an endpoint to store the order data.
Now, we need to go back to frontend and create a static file to contain default order data that will represent the blank data as directed in the code snippet below:
export class TransactionRequest {
  subtotal = 0;
  discount = 0;
  shipping_cost = 0;
  tax_percent = 0;
  total = 0;
  paid = 0;
  change = 0;
  order_list = "x";
  payment_type = "x";
  payment_detail = "x";
  staff_id = "x";
  comment = "x";
}
In the payment component, we need to create a new function named onClickSubmit which takes order values as parameter. This function works to submit order data. The implementation is given in the code snippet below:
const onClickSubmit = (values) => {
    let trans = new TransactionRequest();
    trans.total = shopReducer.mTotalPrice;
    trans.paid = values.given;
    trans.change = values.change;
    trans.payment_type = "cash";
    trans.payment_detail = "full";
    trans.staff_id = staff_id;
    trans.order_list = props.order;
    dispatch(shopActions.submitPayment(trans));
  };
Now, we set up the data and pass it to action using submitPayment . We also add an alert to display the successful sale information as shown in the code snippet below:
export const submitPayment = (data) => {
  return (dispatch, getState) => {
    httpClient.post(server.ORDER_URL, data).then(() => {
      swal({
        title: "Your are made sale success",
        icon: "success",
        buttons: true,
      });
      getState().shopReducer.mOrderLines = [];
      dispatch({
        type: SHOP_UPDATE_PAYMENT,
        payload: {
          isPaymentMade: false,
          given: 0,
        },
      });
    });
  };
};
Hence, we will get the result as displayed in the demo below:
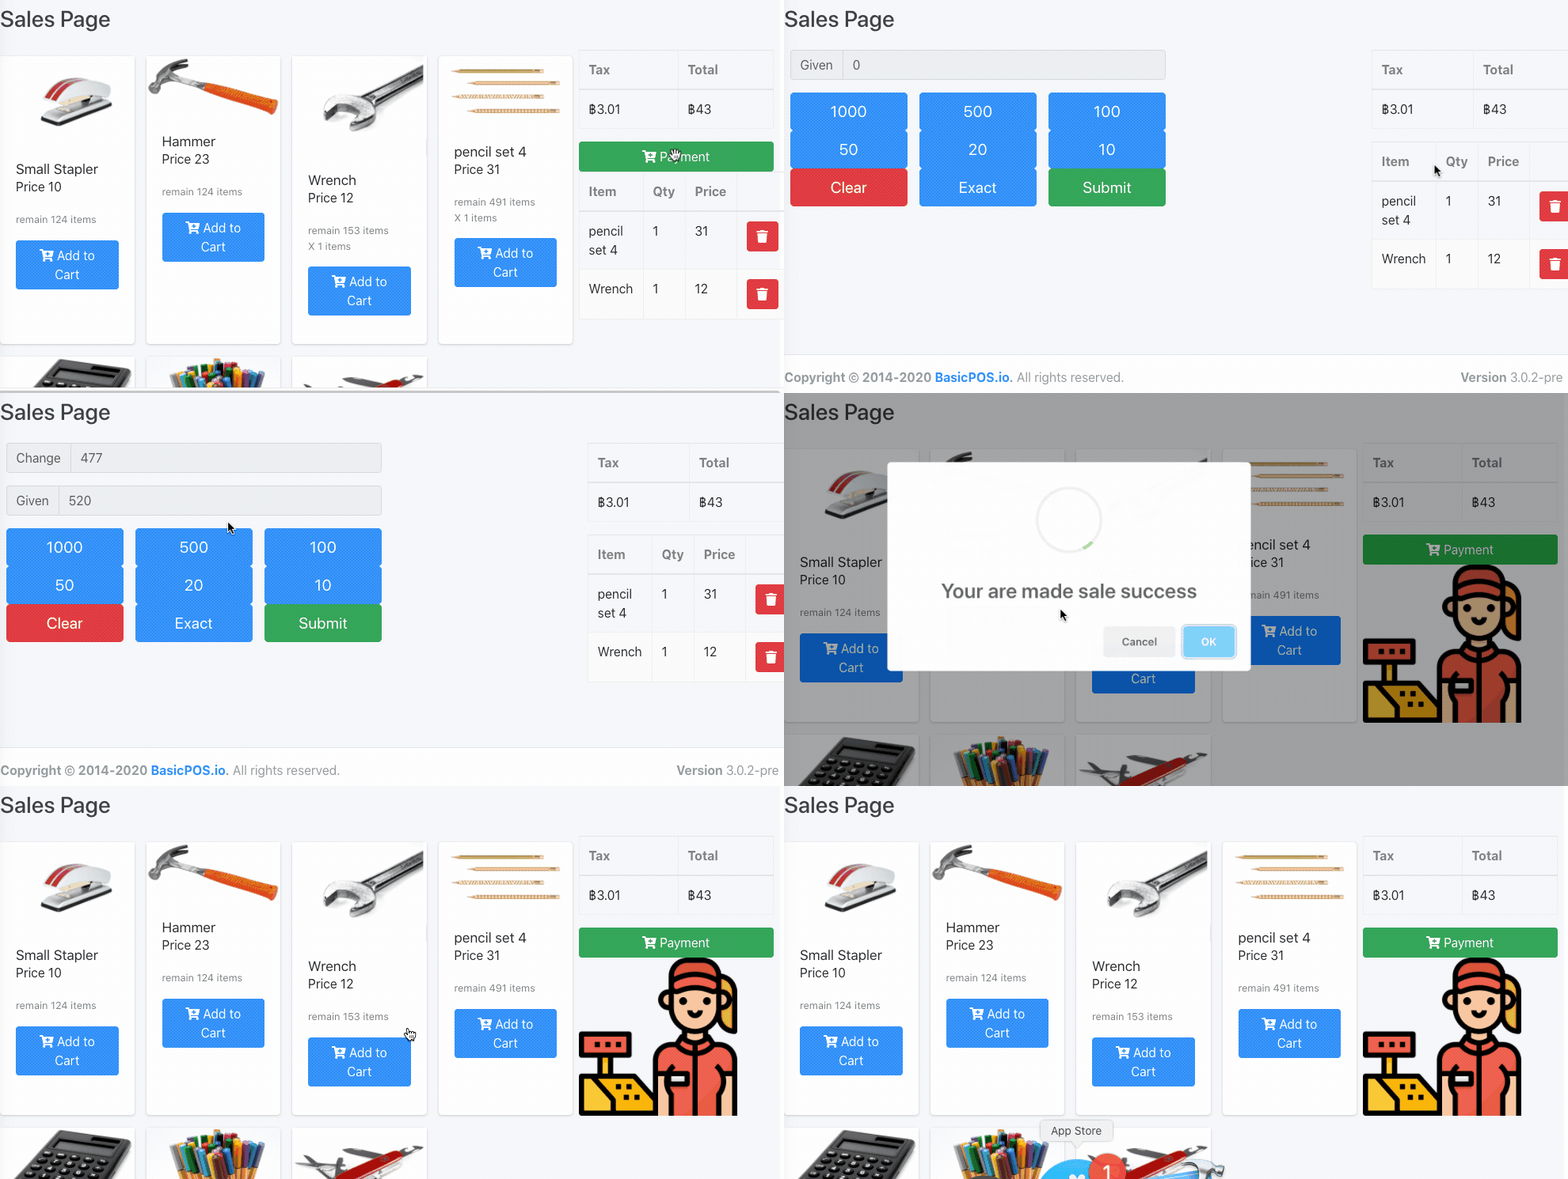
Finally, we have successfully completed the implementation of the order page in our POS system project.
Your Next Challenge….
In this tutorial, we completed the hard part to implement the overall UI and functionality of the Order page. Now, the challenge is the easy part that you have to implement. The challenge is to create a simple CRUD operation for Order in order to display the Order history.
Conclusion
At last, we have completed one of the difficult parts of this tutorial series. The tutorial was long but interesting with lots of new things to learn. We successfully coded the overall UI and functions of the Order screen. We learned how to display the product section as well as the cart section with the price section. We learned how to calculate the total items, total price as well as implement the calculator to simplify change calculation for employees. The implementation was simple but improvements can be made.
The coding implementations used in this tutorial chapter are both Frontend and Backend available on Github.
See you in the next chapter! Good day folks!


